Table of Contents
Advertisement
Advertisement
Table of Contents

Related Manuals for WELLSYSTEM MEDWAVE TOUCH


Summary of Contents for WELLSYSTEM MEDWAVE TOUCH
- Page 1 MEDWAVE_TOUCH Operating instructions...
- Page 3 Dry water massage device 0197 Operating instructions Translation of the original operating instructions well system TOUCH MEDWAVE 1026388-00A / en / 06.2021 Date of issue 10.02.2021 wellsystem...
- Page 4 Köhlershohner Straße 60 53578 Windhagen GERMANY Tel.: +49 (0) 22 24 / 818-257 Fax: +49 (0) 22 24 / 818-254 E-Mail: contact@wellsystem.com DANGER! Failure to observe these instructions: • can result in serious injury and death, • can result in damage to the device and the environment.
-
Page 5: Table Of Contents
Table of contents Table of contents Safety instructions and warnings ..........6 General ....................6 1.1.1 Definitions .................... 6 1.1.2 Symbol explanation ................7 1.1.3 Symbols on the device ................ 8 Use ....................... 9 1.2.1 Purpose ....................9 1.2.2 Intended use ..................9 Foreseeable misuse ................ - Page 6 Table of contents Operation..................30 Application tips .................. 30 3.1.1 Safety instructions................30 3.1.2 Preparing the patients ..............30 3.1.3 Using the extension cushion ............30 Operating overview ................31 3.2.1 Navigation / operation ............... 32 Starting a massage ................34 3.3.1 Starting using an NFC card ..............
- Page 7 Table of contents Appendix ..................76 wellsystem MEDWAVE TOUCH: EMC information ......76 7.1.1 Table 201: Guidelines and manufacturer's declaration – Electromagnetic emissions .............. 76 7.1.2 Table 202: Guidelines and manufacturer's declaration – Electromagnetic interference............77 7.1.3 Table 204: Guidelines and manufacturer's declaration –...
-
Page 8: Safety Instructions And Warnings
Safety instructions and warnings Safety instructions and warnings To ensure safe operation of the device, it is necessary to read the following safety instructions and warnings carefully and comply with them. The safety instructions summarized here are repeated in the corresponding chapters, where necessary. -
Page 9: Symbol Explanation
Safety instructions and warnings 1.1.2 Symbol explanation The following types of safety notices are employed in these operating instruc- tions: DANGER! Type and source of hazard This safety notice indicates the existence of a direct danger to body and life. DANGER! Type and source of hazard This safety notice warns of dangers to body and life which... -
Page 10: Symbols On The Device
Safety instructions and warnings 1.1.3 Symbols on the device The following symbols are displayed on the device or on the packaging: Manufacturer, production year and month Type BF application part Electric unit label (do not dispose of via household refuse) No continuous operation ESD-sensitive components Read the operating instructions! -
Page 11: Use
Infants and small children up to the age of 7 may not be subject to a therapy using the wellsystem medical products. Children and adolescents from 8 to 17 years of age are only al- lowed to use wellsystem medical products in agreement with a parent or guardian and after consulting a doctor. -
Page 12: Foreseeable Misuse
Contraindications NOTE! Pay attention to local contraindications (e.g. arm, leg) which mean that use of the unit is fully excluded With the following contraindications, a therapy using the wellsystem MED- WAVE TOUCH must not be carried out: Fresh wounds ... -
Page 13: Indications
Safety instructions and warnings Haematoma in areas to be treated Chronic polyarthritis (chronic joint inflammation) Functional vertebrae defects in patients with (medication-based) coagula- tion disorders On people with a body weight of more than 210 kg In cases of a dissociated form of sensory loss (restricted temperature ... -
Page 14: Safety Instructions And Warnings
Safety instructions and warnings Safety instructions and warnings 1.5.1 Operator's obligations As the operator you are responsible for providing clear operating, cleaning and maintenance instructions and ensuring the intended use and the proper operation of the device by means of training and instruction for the personnel. Your operating instructions must enable the safe use and safe operation of the device and take into account the characteristics and expertise of your company and also the national work safety and environmental protection... -
Page 15: Transport, Assembly And Setup
Safety instructions and warnings 1.5.4 Transport, assembly and setup The device may not be mounted on the palett! The device is delivered by a specialist company and assembled and set up by the manufacturer's own service personnel or by an authorized service com- pany. - Page 16 III for full isolation in accordance with IEC 60447. – wellsystem MEDWAVE TOUCH is subject to special preventive measures with regard to the electromagnetic compatibility and must be installed and commissioned according to the EMC instructions obtained from the assembly instructions.
- Page 17 Safety instructions and warnings Setup location WARNING! Overheating from inadequate cooling! The device might be damaged! – Maintain the minimum distances from the walls! Dimen- sions are given on page 72. – Do not change, obstruct or block the air inflow and outflow to the device or make any unauthorized chang- es to the device.
-
Page 18: Commissioning
Safety instructions and warnings 1.5.5 Commissioning Initial commissioning will be undertaken by the manufacturer's own service personnel or by an authorized service company. The device will be handed over ready for use. If the device has not been used for a longer period of time then it must first be inspected by our customer service staff or by another authorized company before being put back into operation again. -
Page 19: Decommissioning
Safety instructions and warnings Unauthorized modifications and changes to the device and its control unit are prohibited. Failure to comply with this voids the operating licence! To avoid hazards, the device must not be used if the mains power cable is damaged. -
Page 20: Directives
Safety instructions and warnings The manufacturer is obliged to take back and dispose of certain electrical and electronic components in accordance with the 2012/19/EC Directive. The components and devices are labelled with the following symbol: The device will, if requested, be properly disposed of by the JK Corporate Group. -
Page 21: Signs And Stickers On The Device
Safety instructions and warnings Signs and stickers on the device Danger area warning signs and important information about components are attached to the device. The signs shown below are examples. Ensure that the warning signs are always clearly recognisable and legible. Any missing warn- ing signs or stickers must be replaced. - Page 22 Safety instructions and warnings 2: ESD - sensitive component sticker (a) and 'Voltage present' warning sticker (b) (1020257-..) The sticker is located behind the front panel on the control box. 20/82...
- Page 23 Safety instructions and warnings 3: Warning sticker (1009943-..) 4: Warning sticker / type plate, pump The sticker is located on the pump. 06/2021 1026388-00A Operating instructions – 21/82...
- Page 24 Safety instructions and warnings 5: Note original parts (800702-..) The sticker is located behind the front panel on the control box. 6: 'No export USA/Canada' sticker (84829-..) 7: NFC card note sticker (1023746-..) 8: "Read instructions" sticker (1014232-..) 22/82...
-
Page 25: Warranty
Safety instructions and warnings Warranty Wellsystem guarantees to the customer for 24 months starting from handover that the goods do not present any faults which remove or decrease the value or the capability of the device in normal use. The rubber blanket, toothed belt and drive motors are components of the device that are subject to wear and tear in everyday use. -
Page 26: Description
NFC card (credit & programme) 2.1.2 Optional Air / water cooling wellsystem SPA COMPLETE (wellness accessory) NOTE: The requirements of EN IEC 60601-1 must be complied with when using optional accessories. NOTE: The ambient temperature must not exceed 25°C when using an air/water cooling system. -
Page 27: Device Description
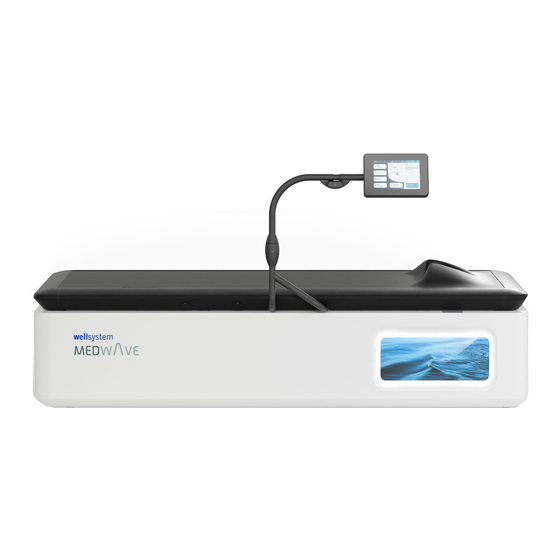
Description Device description 1. Operating unit with touch function 2. Neck support 3. Tank 4. Bed surface (rubber blanket) 5. LED Light Show 6. NFC-point 06/2021 1026388-00A Operating instructions – 25/82... -
Page 28: Accessories (Optional)
In principle mechanical massage with the wellsystem MEDWAVE TOUCH can be used for all symptomatic and non-symptomatic stiffening of the entire shoulder, back and gluteal muscles as well as the leg muscles. -
Page 29: Massage Areas
Description The benefits of this device as compared to other forms of physical therapy: No circulation strain No sweating afterwards Individual and reliable dosing Quicker for the user CONNECT: Data transfer via contactless near field communication. Individual settings can be stored on an NFC card. -
Page 30: Massage Technique
Description 2.4.2 Massage technique Button Function Button Function Zig-zag massage Stroke massage For the zig-zag massage, For the stroke massage, both massage nozzles the massage nozzles move from the inside to move back and forth the outside on the bed along the length of the within the massage area body. - Page 31 Description Enter the PIN code by tapping the numbers. – Confirm with The screen can be locked for the patient by activating the key lock mode switch. NOTE: The maximum intensity and the intensity at the start can be set. 06/2021 1026388-00A Operating instructions –...
-
Page 32: Operation
Operation Operation Application tips 3.1.1 Safety instructions CAUTION! Damage to the nozzle carriage may occur. – The patient may only remain lying on the unit or leave the unit when the nozzle carriage has stopped. Procedures before and during a massage: Clothing dyes or hair dye may lead to a discolouring of the rubber blan- ... -
Page 33: Operating Overview
Operation Operating overview 1. Settings 2. Language 3. Instructions on the current 'Menu selection' 4. User-specific settings (body size/shoulder width) 5. Type of massage (quick-start button) 6. Unit settings menu (Setup Manager) 7. Home (Setup Manager) 8. Current water temperature 9. -
Page 34: Navigation / Operation
Operation 3.2.1 Navigation / operation Operating unit with touch function – Tap the operating unit with your finger to select the desired functions. NOTE! If the control unit has not been tapped after 30 seconds, the settings return to default mode. The time until the massage screen is automatically exited can be changed in the Setup Manager. - Page 35 Operation Enter values (e.g. body size) by tapping the numbers. Switch on and off by tapping. Select the desired function by tapping. Setting the menu language The language can be changed by tapping the flag icon. The selection is made by tapping the desired language. The desired language is selected with 06/2021 1026388-00A...
-
Page 36: Starting A Massage
Operation Starting a massage NOTE: If and how the massage time, massage areas and types of massage can be selected depends on the pre-settings – see Setup Manager, see Massage time. Starting by entering the PIN An additional window opens up when the operating unit is tapped. - Page 37 Operation Various massage programmes are available: NOTE: 13 specified massage programmes are available as quick- start buttons. A max. of 4 of them can be pre-set. The cur- rent status of the massage programmes can be viewed and changed in the Setup Manager, see chapter 'Quick-start buttons (Setup Manager)', page 73.
- Page 38 Operation – Enter the PIN code. – Confirm with NOTE: The factory-set PIN code is 0000. – Lie down on the unit. In doing so, lay your head in the neck support. – Begin massage with 36/82...
-
Page 39: Starting Using An Nfc Card
Operation 3.3.1 Starting using an NFC card NFC cards are available as accessories – see page 74. NOTE: Whether the massage duration can be changed depends on the pre-settings or on the activation of the key lock (see Setup Manager – page 73, Massage time). NOTE: The massaging pressure can be decreased or increased at any time while the unit is working. - Page 40 Operation – Changing body size. An additional window opens up when the "Body size" icon is tapped. NOTE: Only those languages are displayed which have been se- lected in the Setup Manager. The entered body size can be changed by tapping the numbers.
- Page 41 Operation Various massage programmes are available: NOTE: 13 specified massage programmes are available as quick- start buttons. A max. of 4 of them can be pre-set. The cur- rent status of the massage programmes can be viewed and changed in the Setup Manager, see chapter 'Quick-start buttons (Setup Manager)', page 73.
- Page 42 Operation – Lie down on the unit. In doing so, lay your head in the neck support. – Begin massage with 40/82...
-
Page 43: Using A Coin Unit To Start
Operation 3.3.2 Using a coin unit to start NOTE: Whether the massage duration can be changed depends on the pre-settings or on the activation of the key lock (see Setup Manager – page 73, Massage time). – Changing body size. An additional window opens up when the "Body size"... - Page 44 Operation Various massage programmes are available: NOTE: 13 specified massage programmes are available as quick- start buttons. A max. of 4 of them can be pre-set. The cur- rent status of the massage programmes can be viewed and changed in the Setup Manager, see chapter 'Quick-start buttons (Setup Manager)', page 73.
-
Page 45: Start Without Payment, Nfc Card Or Pin Code
Operation – Begin massage with 3.3.3 Start without payment, NFC card or PIN code An additional window opens up when the operating unit is tapped. – Changing body size. An additional window opens up when the "Body size" icon is tapped. NOTE: Only those languages are displayed which have been se- lected in the Setup Manager. - Page 46 Operation Changing the shoulder width. Change the shoulder width by tapping on S, M or L. Various massage programmes are available: NOTE: Thirteen specified massage programmes are available as quick-start buttons. A max. of 4 of them can be pre-set. You can call up and change the current status of the massage programmes in the default settings in the Setup Manager, see chapter ‘Quick-start buttons (Setup Manager)’, page 73.
-
Page 47: Settings During The Massage
Operation NOTE: The cooler in the base of the device is switched on and off automatically whilst the device is being used. – Lie down on the unit. In doing so, lay your head in the neck support. – Begin massage with 3.3.4 Settings during the massage The following settings can be changed during the massage:... - Page 48 Operation The following settings can be defined in the "Massage" menu: Massage type Massage programme Intensity After selecting the massage programme it is possible to select between the various body areas: "Full-body point massage" (Programme 1) "Back point massage"...
- Page 49 Operation The programme selection can be changed by tapping the icon. – Confirm selection with After choosing the 'Individual' massage type In the "Massage" menu: Select body area Select massage technique Change intensity Change speed – Tap on the appropriate icons to make the desired selection.
- Page 50 Operation Tap to activate 'Stay in position'. NOTE: The water jet moves within an area of approx. 5 cm during 'Stay in position'. A massage is aborted by tapping To confirm the selection tap Change 'Massage technique' Tap on one of the icons to change the massage technique.
- Page 51 Operation Setting 'Intensity' – Tap on to change the values. Setting 'Speed' – Tap on to change the values. 06/2021 1026388-00A Operating instructions – 49/82...
-
Page 52: Expert Mode Setting
Operation 3.3.5 Expert Mode setting Creating an individual programme in Expert Mode: Tapping the Expert Mode symbol opens another window. NOTE: When creating a massage programme ensure that the ‘Memory function on NFC card’ function is activated be- forehand in the Setup Manager under System settings. Every massage point can be individually positioned by tapping on the point on the screen or using the arrow keys. -
Page 53: Ending A Massage
Operation Ending a massage The massage will be terminated automatically after the set massage time has expired. When the set massage time has expired, the nozzles move to the foot end and then to the starting position at the head end. -
Page 54: Interrupting The Massage
Operation NFC status The data transfer is indicated by colours. The NFC point flashes pulsating: Ready/Standby Data can be transferred to a data carrier. The middle of the NFC point is green: Settings have been successfully transferred from the data carrier. -
Page 55: Terminating The Massage Before The Time Has Expired
Operation NOTE! Whether the pause function can be used depends on the pre-settings (see Setup Manager – page 73, Massage time. 3.4.2 Terminating the massage before the time has expired – Tap on to end a massage. 06/2021 1026388-00A Operating instructions – 53/82... -
Page 56: Nfc Service Card
Operation NFC service card The NFC service card (1023744-..) is used to call up infor- mation via the unit and to modify certain pre-set values, e.g. the water temperature – see page 73. NOTE: The NFC service card (1023744-..) can only be used for the Setup Manager. -
Page 57: Default Massage Program
Operation Default massage program There are 9 therapeutic massage programmes saved on the unit. The following summary shows which muscle groups are affected by the specific programmes. 06/2021 1026388-00A Operating instructions – 55/82... - Page 58 Operation Muscle groups targeted 1. Shoulder / neck area: M. trapezius, M. levator scapulae 2. Thoracic spine parietal vertex: Mm. rhomboidei, M. serratus post. sup. 3. Upper lumbar spine to L3: M. iliocostalis lumborum 4. Ileo sacral area 5. Buttocks: M. piriformis, gluteal muscles 6.
-
Page 59: Additional Massage Programmes For Massage Areas
Operation 3.6.1 Additional massage programmes for mas- sage areas Massage programmes 3 + 3 min. 4 + 4 min. – 3 + 3 min. – total 20 min – 5 + 5 min. – 2 + 2 min. 3 + 3 min total 20 min 3 + 3 7 + 7 min. - Page 60 Operation Starting 'Own programme' Place the NFC card with a previously stored massage pro- gramme onto the NFC point. Select 'Own programme'. Configure possible individual settings: Set intensity: Tap on to change the values. – Confirm with – Begin massage with 58/82...
-
Page 61: Charge Credit Onto Nfc Card
Operation Charge credit onto NFC card The NFC cards can be topped up as much as you wish for further massages (see Pre-settings, Setup Manager, Top up credit). Remaining credit The NFC cards can be topped up as much as you wish for further massages (see Pre-settings, Setup Manager, Top up credit). - Page 62 Operation Confirm with Place NFC card on the NFC point until the LED lights up green. The credit has been successfully written onto the NFC card. Credit minutes are displayed. 60/82...
-
Page 63: Led Light Show
Operation Top up the credit by tapping the numbers (note min. and max.). Confirm with Place NFC card on the NFC point until the LED lights up green. The credit has been successfully written onto the NFC card. LED Light Show The LED light show lights up in standby mode for the pre-set time, see page 73, Pre-settings. -
Page 64: Cleaning And Maintenance
Cleaning and maintenance Cleaning and maintenance Safety instructions for maintenance DANGER! Electricity throughout entire device! Personnel danger due to electric shock or electric burns. – Before beginning work, disconnect all of the power connections from mains voltage. – Secure all of the disconnected connections against accidental reactivation. -
Page 65: Faults
Cleaning and maintenance Faults Error codes are output to the display to simplify troubleshooting: If a fault occurs, the error code appears in the display. If several errors occur, the error messages are displayed one below the other. NOTE: Some error messages can be reset by pressing the START/STOP button. -
Page 66: Disinfection
Cleaning and maintenance 4.3.1 Disinfection We recommend the following cleaning agents for rapid and thorough disinfec- tion: mikrozid sensitive fast disinfectant cleaner ® 1 mikrozid sensitive liquid, 1 Ltr. Order no.: 1010283-.. ® 2 Foam spray head Order no.: 1016765-.. 3 mikrozid sensitive wipes (container), Order no.: 1010285-.. -
Page 67: Cleaning The Surfaces
Cleaning and maintenance 4.3.2 Cleaning the surfaces CAUTION! Do not rub dry – danger of scratching! Failure to observe this invalidates all guarantee claims. – For fast, hygienically flawless cleaning of surfaces, use only the specially developed mikrozid sensitive rapid ®... -
Page 68: Maintenance Performed By The Customer Service Department
Cleaning and maintenance Maintenance performed by the Cus- tomer Service department WARNING! Only use genuine spare parts of the same type! Material damage or personal injuries may result when using other parts. Any liability for damage or injury proven to be the result of the use of non-genuine spare parts is excluded. -
Page 69: Maintenance Performed By The Operator
Cleaning and maintenance Maintenance performed by the operator 4.5.1 Daily visual inspection – Inspect the device for leaks. WARNING! The device might be damaged by moisture! – The device may no longer be used in the event of water loss (puddles on the floor). Please inform our customer service department –... - Page 70 Cleaning and maintenance – Reach into the unit and remove the hose and shut-off valve. – Place a collection container underneath the shut-off valve. – Remove the shut-off valve seal. – Connect the shut-off valve of the hose system to the hand pump. NOTE! Observe the direction of flow! –...
- Page 71 Cleaning and maintenance – Close the shut-off valve. – Remove the hand pump. – Reconnect the shut-off valve of the hose system to the hand pump. NOTE! Observe the direction of flow! – Open the shut-off valve. – Pump until water runs out. The assembly is the same process in reverse order.
-
Page 72: Technical Data
Lower limit Massage pressure: P. 1 Temperature: 20 °C Application time: 5 min. Upper limit Massage pressure: P. 20 Temperature: 40° C Application time: 45 min. Only when used with WELLSYSTEM SPA_COMPLETE equivalent isotropic radiant power 70/82... -
Page 73: Water And Cooling Conditions
Technical data Water and cooling conditions The device is filled with normal tap water without additives. The water can be drained off into the public sewage system after it has been used. Water and cooling conditions Permissible water pressure (water inlet): 0.8 MPa (8 bar) ... -
Page 74: Dimensions
Technical data Dimensions A1 = 150 mm A2 = 100 mm A3 = 310 mm A4 = 220 mm A5 = 90 mm A6 = 90 mm A7 = 150 mm A8 = 250 mm A9 = 90 mm A10 = 150 mm A11 = 440 mm BK = 2450 mm... -
Page 75: Pre-Configuring The Settings
Pre-configuring the settings Pre-configuring the settings Unit settings (Setup Manager) NOTE! The Setup Manager can only be called up outside a mas- sage. By tapping on the unit automatically switches into standby mode and the currently set values are saved. 1. -
Page 76: Opening Setup Manager
Pre-configuring the settings 6.1.1 Opening Setup Manager – Press on the icon to open the Setup Manager. – Enter the PIN code by tapping the numbers. – Confirm with NOTE! The Setup Manager can only be called up outside a mas- sage. -
Page 77: Operation Of The Setup Manager
Pre-configuring the settings Changing the code – Press on 'Permissions during use'. – Change by tapping 'Setup code'. – Enter the PIN code by tapping the numbers. – Confirm with 6.1.2 Operation of the Setup Manager The description of the function is displayed by tapping on the desired function for at least 2 seconds. -
Page 78: Appendix
7.1.1 Table 201: Guidelines and manufacturer's declaration – Electromagnetic emissions The wellsystem MEDWAVE TOUCH massage device has been designed for use in the electromagnetic environment specified below. The device operator must ensure that it is used such an environment. Emission measurements Conformity Electromagnetic environment –... - Page 79 7.1.2 Table 202: Guidelines and manufacturer's declaration – Electromagnetic interference The wellsystem MEDWAVE TOUCH massage device has been designed for use in the electromagnetic environment specified below. The device operator must ensure that it is used such an environment. Interference immunity tests...
- Page 80 7.1.3 Table 204: Guidelines and manufacturer's declaration – Electromagnetic interference The wellsystem MEDWAVE TOUCH massage device has been designed for use in the electromagnetic environment specified below. The device operator must ensure that it is used such an environment. Interference immunity...
-
Page 81: Medwave Touch
MED- WAVE TOUCH wellsystem MEDWAVE TOUCH has been designed for use in an electromag- netic environment in which the radiated HF interference is controlled. The operator of the massage device can help to reduce electromagnetic interfer-... -
Page 82: Index
Index Index Accessories .................... 24, 26, 73 Additional massage programmes for massage areas ........57 Adolescents ......................9 Assembly ......................13 Care ........................64 Children ....................... 30 Cleaning ....................... 63, 64 Commissioning ....................16 Connection rating ....................71 Contraindications ....................10 Cooling conditions .................... - Page 83 Index Lamps ........................9 LED Light Show Setting the colour gradient and brightness ..........62 Maintenance ....................... 63 Maintenance work Customer Service department ..............67 Operator ....................... 68 Massage areas ....................27 Massage settings During the massage ..................45 Massage start..................... 34 Massage technique....................
- Page 84 Index Safety ........................14 Safety equipment ....................23 Safety instructions Device-specific safety instructions ............... 10 General safety instructions................12 Scope of delivery ..................12, 24 Setup ........................13 Setup location ..................... 15 Size ........................73 Spare parts Order numbers ....................73 Start ........................
- Page 86 MEDWAVE_TOUCH JK-International GmbH Köhlershohner Straße 60 53578 Windhagen GERMANY Tel.: +49 (0) 22 24 / 818-257 Fax: +49 (0) 22 24 / 818-254 E-Mail: contact@wellsystem.com...
Need help?
Do you have a question about the MEDWAVE TOUCH and is the answer not in the manual?
Questions and answers