Advertisement
Quick Links
Advertisement

Related Manuals for Haier HIS-X76SWA1

Summary of Contents for Haier HIS-X76SWA1
- Page 1 Sterilizer Model:HIS-X76SWA1 INSTALLATION GUIDE/USER GUIDE...
-
Page 2: Table Of Contents
CONTENTS 1.Instruction ....................3 ................4 2.Safety and warnings ............5 3.Technical information & Packing list 4.Installation instructions ................7 5.Operating instructions ................9 6.Cleaning and maintenance ..............12 7.Troubleshooting ....................13... - Page 3 Dear Customer, sterilizer sterilizer...
-
Page 4: Instruction
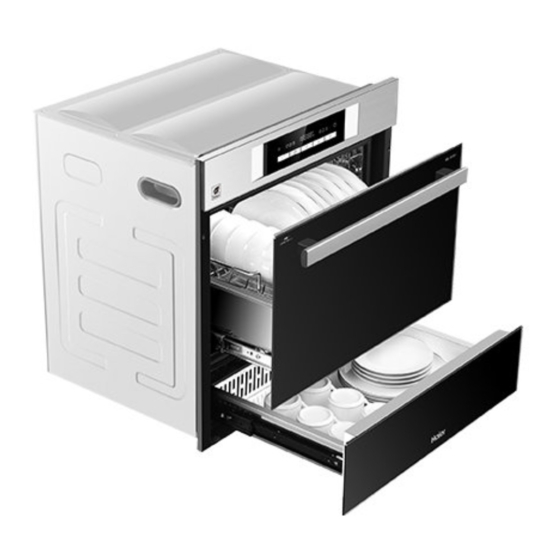
GB 4706.1-2005《Safety of Household and Similar Electrical Appliances Part 1: General Requirements》 Q/HZCD J0202 010-2019《Sterilizer》 Health permit number:Lu Wei Xiao zi Hao (2020) No.0678 Names of principal components HIS-X76SWA1 5.Upper rack 1.Power cord 6.Lower drawer 2.Touch control panel 7.Lower door panel 3.Door handle... -
Page 5: Safety And Warnings
Safety and warnings Icons Must Should be Forbid follow guidance aware and notice to operate Forbidden Warning Attention When power interruption occur during the process of operation, the cavity is in a high temperature state, Do not immediately open the door to take things, otherwise it may lead accidental injury such as scald. -
Page 6: Technical Information & Packing List
Technical information & Packing list Technical information Sterilizer Product HIS-X76SWA1 Model name Rated voltage AC220-240V 50Hz Rated Frequency 1230W Rated input power Sterilization level Capacity/L Upper Light-wave lamp: Power/Main wavelength 9 0 0 W 7 8 0 nm cavity 7 nm... - Page 7 Circuit diagram Temperature sensor 1 Upper door switch Temperature sensor 2 Power Humidity sensor Ballast Ignitor Ultraviolet sterilization lamp supply upper board door PTC heater Thermostat WIFI module lock Light wave sterilization lamp Temperature limiter The upper door lock...
-
Page 8: Installation Instructions
Installation instructions Please ground reliably, but do not connect ground wire to gas pipe, lightning rod or telephone line; Unreliable grounding may cause lelectric shock and accidents. It should be installed in a place that can bear the weight, otherwise some parts may Warning drop and cause damage or loss. - Page 9 Installation diagram: Sterilizer Dimension and Cabinet dimension (mm) Must make sure ground reliably Note: fix screws to kitchen cabinet after installation About dimension of sterilizer and cabinet: Height of floor cabinet door plate=620mm, when the height of local cabinet door plate is >620mm, it is recommended to add decorative strip on the top of sterilizer to ensure that the height of floor cabinet door plate is level with that of floor cabinet.
-
Page 10: Operating Instructions
Operating instructions Control panel Upper cavity Lower cavity WIFI Upper cavity Power Lower cavity Intelligent Upper cavity Function Lower cavity Function Lock About Control buttons Touch control Function Operation details button Switch on the power of the plug,and the power button icon will be half bright. Touch the button for 1.5 seconds,the power button icon will be fully bright, Turn ON/OFF and the other operable function icons will be half bright.Touch the power... - Page 11 Functional specifications Working status Function effect Functions Chamber/Mode Time/Temperature Ultraviolet Can kill the common intestinal Upper time≥ 20min pathogens, viruses in the kitchen, broadband chamber temperature≥ 60℃ Sterilize light used for tableware sterilization. Ultraviolet Can kill the common intestinal time≥ 10min Upper pathogens, viruses in the kitchen,...
- Page 12 Note: The sterilization time refers to the time experienced when the central point tem- perature in the sterilizer reaches the specified value and the timing starts, until the control device stops working when the power is cut off and the sterilization temperature drops below the specified value.
-
Page 13: Cleaning And Maintenance
Cleaning and maintenance Before clean and maintenance work, first to turn off the sterilizer, unplug the power plug, and wait for the machine to cool down.Do 去 汽油 污 粉 酒 not use gasoline,alcohol, or other organic solvents, cleaning powder, 精... -
Page 14: Troubleshooting
Troubleshooting Possible causes Fault Phenomenon What to do Electricity is not connected Connect the electricity Change to reliable power supply Electricity power failure The machine doesn't work There is a source of electromagnetic Eliminate the source of electromagnetic interference interference nearby The power board or controlboard is broken Call the aftersales center Close the door. - Page 15 HAIER WARRANTY HAIER APPLIANCES (INDIA) PVT. LTD. (here-in-a er referred to as “the Company”) hereby offers the following warranty to the original domes c purchaser commencing from the Date of the Purchase (DOP). The Company at its sole discre on, will free of charge repair or replace any defec ve part or parts which prove to be defec ve in workmanship and/or materials and...