Invacare Action 3 Junior User Manual
Pediatric wheelchair
Hide thumbs
Also See for Action 3 Junior:
- User manual (36 pages) ,
- User manual (14 pages) ,
- Service manual (52 pages)

Related Manuals for Invacare Action 3 Junior


Summary of Contents for Invacare Action 3 Junior
- Page 1 Invacare® Action 3 Junior en Pediatric wheelchair User Manual This manual MUST be given to the user of the product. BEFORE using this product, this manual MUST be read and saved for future reference.
- Page 2 All rights reserved. Republication, duplication or modification in whole or in part is prohibited without prior written permission from Invacare Corporation. Trademarks are identified by ™and ®. All trademarks are owned by or licensed to Invacare Corporation or its subsidiaries unless otherwise noted.
-
Page 3: Table Of Contents
Contents 3.10 Seat cushion ....... . . 25 4 Options ......... 26 4.1 Transit version. - Page 4 8.3.1 General Safety Information..... 54 8.3.2 Cleaning Intervals......55 8.3.3 Cleaning .
-
Page 5: General
For more information about the product, for example Business in the respective countries. product safety notices and product recalls, contact your Invacare distributor. See addresses at the end of this Warranty claims can only be made through the provider document. -
Page 6: Limitation Of Liability
Invacare® Action 3 Junior 1.4 Limitation of Liability 1.6 Service Life Invacare accepts no liability for damage arising from: The expected service life of this product is five years when used daily and in accordance with the safety instructions, •... -
Page 7: Safety
Safety 2 Safety WARNING! Risk due to wheelchair being out of control At high speed you could lose control of your 2.1 Safety information wheelchair and overturn. – Never exceed a speed of 7 km/h. This section contains important safety information for the –... -
Page 8: Safety Devices
– Only use combinations with other devices the removable axle of the rear wheel, folding which are allowed by Invacare. Contact your backrest or anti-tipper, that nothing becomes authorized provider for more information. -
Page 9: Labels And Symbols On The Product
Safety The functions of the safety devices are described in chapter Manufacturer’s address 3 Product Overview, page 11. Date of manufacture 2.3 Labels and symbols on the product Product description Identification label Seat width The identification label (1. or 2.) is attached to the frame of Reference number your wheelchair and gives the following information: Serial number... - Page 10 Invacare® Action 3 Junior Snap hook symbols Depending on the configuration, some wheelchairs may be used as a seat in a motor vehicle, some may not. Tie-down positions where the restraint system straps must be placed in case of transporting the occupied wheelchair in a ISO 717 6-19 motor vehicle.
-
Page 11: Product Overview
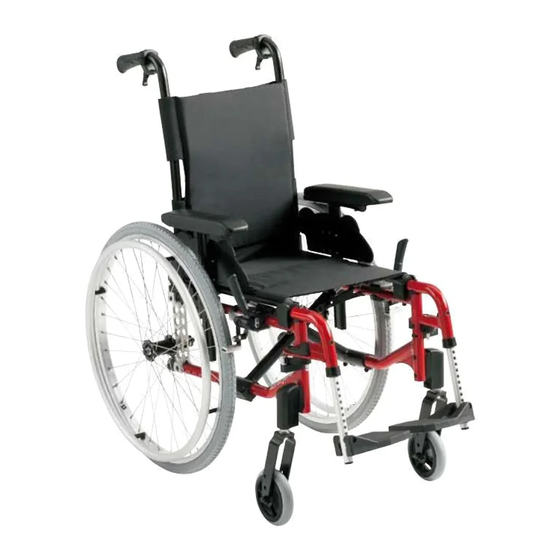
Product Overview The wheelchair may be used indoors and outdoors on level 3 Product Overview ground and accessible terrain. 3.1 Product Description Indications This is a pediatric wheelchair with crossbar folding • Considerable to complete impairment of mobility due mechanism and swing-away leg rests. to structural and/or functional damage to the lower extremities. -
Page 12: Main Parts Of The Wheelchair
Invacare® Action 3 Junior 3.3 Main parts of the wheelchair A Push handle B Backrest C Rear wheel with handrim D Parking brake E Front fork with castor F Leg rests, swiveling G Footrest H Frame I Seat J Armrest... -
Page 13: Parking Brakes
Product Overview 3.4 Parking brakes CAUTION! Risk of pinching or crushing The parking brakes are used to immobilize the wheelchair There may be a very small gap between the rear when it is stationary to prevent it from rolling away. wheel and the parking brake with the risk that you could trap your fingers. -
Page 14: Backrest
Invacare® Action 3 Junior Adjusting the backrest cover The lever of the push handle can be folded back to facilitate transfers. To do so, pull up the lever and fold it backwards. Pull brake 1. Remove the backrest cushion A. -
Page 15: Backrest Cover Height
This can cause the chair to tip backwards causing injury. – Therefore, Invacare strongly recommend the use of anti-tippers (available as an option) when using your back posts with additional Folding and unfolding the backrest load (back pack or similar items). -
Page 16: Reclining Backrest
2. Simultaneously pull the levers A to provides the same – Invacare strongly recommend the use of angle on both sides. anti-tippers (available as an option) when the 3. Release the levers when you reach the desired angle. -
Page 17: Backbrace For The Backrest
Product Overview 3.5.6 Backbrace for the backrest Unfolding the backbrace The backbrace links the two push handles, provides tension to the backrest upholstery and must always be in position on recliner versions. CAUTION! – Do not use the backbrace to push the wheelchair. -
Page 18: Push Handles
Invacare® Action 3 Junior 3.5.7 Push handles CAUTION! If the knob is not correctly tightened, the push IMPORTANT! handle could accidentally come off the backrest – Always check the push handles before using tube while pushing it upwards. the wheelchair, as to whether the hand grips –... -
Page 19: Mudguard
Product Overview Adjusting the height CAUTION! If the knob is not correctly tightened, the push 1. Loosen the screw B with 10 mm spanner in the groove handle could accidentally come off the backrest C of the armrest tube. tube while pushing it upwards. 2. -
Page 20: Armrest, Stepless Height Adjustable, Removable
Invacare® Action 3 Junior 3.7.1 Armrest, stepless height adjustable, removable Adjusting the height 1. Loosen the screw B with 5 mm Allen key in the groove C of the armrest tube. 2. Move the armrest upwards or downwards until you reach the desired height, while keeping screw B in place (at the top edge of the holder). -
Page 21: Swing Away Leg Rests
Product Overview 3.8.1 Swing away leg rests 3.8.2 Swing away, angle adjustable leg rests Swing outwards Swing outwards 1. With one hand, sightly pull the leg rest upwards (up 1. Activate the release lever A and swing the leg rests to 20 mm). - Page 22 Invacare® Action 3 Junior Adjusting angle • Height and angle adjustable foot plates Height adjustment: 1. Rotate the knob A with one hand while supporting the 1. After loosening the knob C , adjust into one of leg rest with your other hand.
-
Page 23: Anti-Tipper
– In some configurations, the static stability of the wheelchair may be lower than 10°; Invacare strongly recommends the use of anti-tipper Height adjustment: (available as an option). - Page 24 Invacare® Action 3 Junior WARNING! Risk of overturning – Always advise the user if you deactivate the anti-tippers. There is a red label on the housing of the anti-tipper, this label shows when the anti-tipper is inactivated. When the anti-tipper is correctly activated, the red label will be concealed.
-
Page 25: Seat Cushion
– If the thickness of the cushion is changed, a complete set up of the wheelchair need to be done by a qualified technician. – We recommend to use an Invacare or Matrx cushion with anti-slip base cover in order to prevent sliding. -
Page 26: Options
Invacare® Action 3 Junior 1. To engage the brake, push the brake lever B downwards 4 Options as far as possible. 2. To disengage the brake, pull or push the brake lever 4.1 Transit version B upwards. The transit version is designed to be driven only by the For drum brake, please read section 6.2 Braking during use,... -
Page 27: Posture Belt
Options 4.2 Posture belt WARNING! Risk of serious injury during transport The wheelchair can be equipped with a posture belt. It In a vehicle, a user in his wheelchair must be prevents the user from sliding downward in the wheelchair secured by a safety belt (3-point belt). -
Page 28: Headrest
Invacare® Action 3 Junior Adjusting the length The posture belt has the good length, when there’s just sufficient space for a flat hand between body and belt. 1. Thread the loop F through the fixation on the chair G and then through BOTH plastic buckles H. -
Page 29: Stabilizer Kit
Options 4.5 Tipper aid Height; depth and angle adjustment With the tipper aid, an assistant can tip the wheelchair more easily, in order to navigate steps for example. WARNING! Risk of overturning – Ensure that the tipper aid does not project beyond the external diameter of the rear wheel. -
Page 30: Swiveling, Table Tray
Invacare® Action 3 Junior 4.7 Swiveling, table tray CAUTION! Risk of discomfort / minor bruises WARNING! – Make sure that the elbows of the user Risk of tipping / injury are placed on the table when pushing the – Max load on the table: 3,5 kg wheelchair. -
Page 31: Transfer Kit Wheels
Options 1. Insert the tube A of the table tray into its support B The transfer kit wheels are attached directly to the rear below the arm pad. frame as an option. 2. Slide the table tray forwards or backwards to adjust to WARNING! the required depth. -
Page 32: Passive Illumination
Invacare® Action 3 Junior 4.10 Passive illumination You can attach reflectors to the rear wheels. 4.11 Cane holder WARNING! Risk of overturning – Ensure that the cane holder does not project beyond the external diameter of the rear wheel. 1. Place the cane in the holder B. -
Page 33: Setup
Setup 5 Setup 5.1 Safety information CAUTION! Risk of injury – Before using the wheelchair, check its general condition and its main functions, 8.2 Maintenance Schedule, page 52. Your authorized provider will supply your wheelchair ready for use. Your provider will explain the main functions and ensure that the wheelchair meets your needs and requirements. -
Page 34: Using The Wheelchair
Invacare® Action 3 Junior 6 Using the wheelchair CAUTION! Risk of crushing There may be a very small gap between the rear 6.1 Safety information wheel and the parking brake with the risk that you could trap your fingers. WARNING! –... -
Page 35: Braking During Use
Using the wheelchair 6.2 Braking during use CAUTION! Risk of burning your hands Whilst you are moving, you brake by transferring force to If you brake for a long time, a lot of frictional the handrim with your hands. heat is produced at the handrims (especially anti slip handrims). -
Page 36: Move To/From The Wheelchair
Invacare® Action 3 Junior 6.3 Move to/from the wheelchair IMPORTANT! The mudguards and armrests could become WARNING! damaged. Risk of overturning – Never sit on the mudguards or armrests when There is a high risk of overturning during the getting in and out. -
Page 37: Driving And Steering The Wheelchair
Using the wheelchair 6.4 Driving and Steering the Wheelchair Finding the Tipping Point You drive and steer the wheelchair using the handrims. Before driving without an assistant you must find your wheelchair’s tipping point. WARNING! Risk of Tipping The wheelchair can tip backwards if it is not fitted with an antitipper. -
Page 38: Negotiating Steps And Kerbs
Invacare® Action 3 Junior 6.5 Negotiating steps and kerbs Going down a step with an assistant WARNING! Risk of overturning When negotiating steps you could lose your balance and tip the wheelchair over. – Always approach steps and kerbs slowly and carefully. -
Page 39: Going Up And Down Stairs
Using the wheelchair Going up a step with an assistant WARNING! Risk of tipping WARNING! When going down a step without an assistant you Risk of serious injuries could tip over backwards if you cannot control Going up steps and kerbs frequently can result your wheelchair. -
Page 40: Negotiating Ramps And Slopes
Invacare® Action 3 Junior 6.7 Negotiating Ramps and Slopes WARNING! Risk due to wheelchair being out of control When negotiating slopes or gradients your wheelchair could tip backwards, forwards or sideways. – Always have an assistant behind the wheelchair when approaching long slopes. - Page 41 Using the wheelchair 1. Bend your upper body forwards and propel the 1. Lean back and carefully allow the handrims to run wheelchair with quick, powerful strokes on both through your hands. You should be able to stop the handrims. wheelchair at any time by gripping the handrims.
-
Page 42: Stability And Balance When Seated
Invacare® Action 3 Junior 6.8 Stability and balance when seated 1. Point the front wheels forwards. (To do this, move your wheelchair forwards slightly then back again.) Some everyday activities and actions require you to lean 2. Apply both parking brakes. -
Page 43: Transport
Transport 7.2 Folding and unfolding the wheelchair 7 Transport Folding the wheelchair 7.1 Safety information WARNING! Risk of injury if the wheelchair is not properly secured In the event of an accident, braking manoeuvre, etc. you may suffer serious injuries from flying wheelchair parts. -
Page 44: Lifting The Wheelchair
Invacare® Action 3 Junior Unfolding the wheelchair 4. Put the wheelchair back completely on the floor and check that the seat edges on both sides are in the guide components. 5. Fold the foot plates down. 6. Unfolding the backbrace, if present. -
Page 45: Removing And Fitting The Rear Wheels
Even when the wheelchair is properly secured and the following rules are met, injuries to passengers may occur in a collision or sudden stop. Therefore Invacare strongly recommends transferring the wheelchair user to the vehicle seat with the seat belt on. Do not make alterations or substitutions to points of the wheelchair (structure, frame or parts) without the written consent of Invacare Corporation. - Page 46 Invacare® Action 3 Junior according to ISO 10542-2. Contact your local Invacare WARNING! authorized provider for more information on getting and – Before journey contact transporter and request installing an approved and compatible restraint system. information about the capability for the below required equipment.
- Page 47 Transport symbols (see following figures and section 2.3 Labels and IMPORTANT! symbols on the product, page 9 ). – Refer to the user manuals supplied with the restraint systems. 1. Using the front and rear straps of the 4-point restraint –...
- Page 48 Invacare® Action 3 Junior Front side tie-down positions for belt straps: 1. Attach the front straps above the castor supporters as shown in the figure above (see location of the attachment labels). 2. Attach front straps to the rail system referring to best practice recommended instructions from the safety belt manufacturer.
- Page 49 Transport Rear side tie-down positions for snap hooks: 1. Attach the snap hooks to the orange rings as shown in the two figures above (see location of the attachment labels). 2. Attach rear straps to the rail system referring to best practice recommended instructions from the safety belt manufacturer.
- Page 50 Invacare® Action 3 Junior Fastening the 3-point passenger restraint system WARNING! – Ensure the 3-point passenger restraint system fits as tightly across the user's body as possible without discomfort and no part is twisted. – Ensure the 3-point passenger restraint system is not held away from the user's body by parts of the wheelchair such as armrests or wheels etc.
- Page 51 Transport IMPORTANT! – Apply the posture belt of the 3-point passenger restraint system low across the pelvis so that the angle of the posture belt is within the preferred zone (A) of 30° to 75° to the horizontal. A steeper angle is preferred, but never exceeding 75°.
-
Page 52: Maintenance
Invacare® Action 3 Junior 8 Maintenance weekly monthly annually Check the folding 8.1 Safety information mechanism Check the castors WARNING! Some materials deteriorate naturally over time. Check bolts This could result in damage to wheelchair Check spokes components. – Your wheelchair should be checked by a... - Page 53 Bolts can work loose through constant use. 1. Check that the bolts are tight (on the footrest, seat cover, sides, backrest, frame, seat module). 2. Tighten any loose bolts with the suitable torque. Therefore refer to the Service Manual, available on the internet at www.invacare.eu.com. 1608517-C...
-
Page 54: Cleaning And Disinfection
Invacare® Action 3 Junior Checking after a heavy collision or blow Spare parts All spare parts may be obtained from an Invacare IMPORTANT! authorized provider. The wheelchair can sustain visibly undetectable damage as a result of a heavy collision or hard blow. -
Page 55: Cleaning Intervals
Maintenance 3. Rinse the parts with warm water. For cleaning and disinfection in clinical or long-term 4. Thoroughly dry the parts with a dry cloth. care environments, follow your in-house procedures. Car polish and soft wax can be used on painted metal 8.3.2 Cleaning Intervals surfaces to remove abrasions and restore gloss. -
Page 56: Troubleshooting
Invacare® Action 3 Junior 9 Troubleshooting 9.1 Safety information Faults may arise as a result of daily use, adjustments or changing demands on the wheelchair. The table below shows how to identify and repair faults. Some of the actions listed must be carried out by a qualified technician. -
Page 57: Identifying And Repairing Faults
Troubleshooting 9.2 Identifying and repairing faults Fault Possible cause Action Correct tyre pressure, 11.2 Tyres, page 60 The wheelchair does not Incorrect tyre pressure on one rear wheel travel in a straight line One or more spokes broken Replace faulty spoke(s), → qualified technician Spokes tightened unevenly Tighten loose spokes, →... -
Page 58: After Use
Invacare® Action 3 Junior • Inspection 10 After Use • Cleaning and disinfection • Adaptation to the new user 10.1 Storage For detailed information, see 8 Maintenance, page 52 and IMPORTANT! the service manual for this product. Risk of damage to the product Make sure that the user manual is handed over with the –... -
Page 59: Technical Data
Technical Data 11 Technical Data Maximum user weight 80 kg Overall length with leg 690 – 1000 mm 11.1 Dimensions and weight rests B Overall width 365 – 585 mm All dimension an weight specifications refer to a wide range of the wheelchair in a standard configuration. -
Page 60: Tyres
Invacare® Action 3 Junior 11.2 Tyres H Backrest height 350 – 450 mm The ideal pressure depends on the tyre type: 125 – 450 mm, I Footrest to seat distance in increments of 10 mm Tyre Max. pressure Leg to seat surface angle 0° – 90°... -
Page 61: Materials
Technical Data 11.4 Environmental conditions CAUTION! – The tyres pressure have to be equal in both Storage and Operation wheels to avoid a less driving comfort, to keep transportation the brakes efficiency and an easy propelling of the wheelchair. Temperature -20 °C to 40 °C -5 °C to 40 °C Relative humidity... - Page 62 Notes...
- Page 63 Notes...
- Page 64 Invacare distributors United Kingdom: New Zealand: Invacare Limited Invacare New Zealand Ltd Pencoed Technology Park, Pencoed 4 Westfield Place, Mt Wellington 1060 Bridgend CF35 5AQ New Zealand Tel: (44) (0) 1656 776 222 Phone: 0800 468 222 Fax: (44) (0) 1656 776 220 Fax: 0800 807 788 uk@invacare.com...
Need help?
Do you have a question about the Action 3 Junior and is the answer not in the manual?
Questions and answers