Table of Contents
Advertisement
Quick Links
User Manual
Sterilizer 75
Dry-heat sterilizer
EN
Dear customer,
We thank you for your confidence demonstrated by the purchase of this MELAG product. As an owner-run and operated
family concern founded in 1951, we have a long history of successful specialization in hygiene products for practice-
based use. Our focus on innovation, quality and the highest standards of operational reliability has established MELAG
as the world's leading manufacturer in the instrument treatment and hygiene field.
You, our customer are justified in your demand for the best products, quality and reliability. Providing
hygiene"
and
"Quality – made in
agement system is subject to close monitoring: one instrument to this end is our annual multi-day audit conducted in ac-
cordance with ISO 13485. This guarantees that all MELAG products are manufactured and tested in accordance with
strict quality criteria.
The MELAG management and team.
Germany", we guarantee that these demands will be met. Our certified quality man-
"competence in
Advertisement
Table of Contents

Related Manuals for MELAG Sterilizer 75


Summary of Contents for MELAG Sterilizer 75
- Page 1 Dry-heat sterilizer Dear customer, We thank you for your confidence demonstrated by the purchase of this MELAG product. As an owner-run and operated family concern founded in 1951, we have a long history of successful specialization in hygiene products for practice- based use.
-
Page 3: Table Of Contents
Contents Contents 1 Safety..................................... 4 2 General guidelines ................................ 5 Formatting rules ................................... 5 Symbols used.................................. 5 Symbols on the device ................................. 6 3 Description of the device.............................. 7 Scope of delivery.................................. 7 Intended use .................................. 7 Views of the device ................................ 8 Loading variations ................................ 9 4 Setup and installation ................................ 10 Requirements of the installation location ........................... 10 5 First steps ................................... 11 Switching the hot air sterilizer on and off again........................ 11... -
Page 4: Safety
Never open the housing of the device. Incorrect opening and repair can compromise electrical safety and pose a danger to the user. The guarantee and warranty are forfeited as soon as the device is opened by anyone other than a member of a MELAG-authorized technical customer service. -
Page 5: General Guidelines
2 General guidelines 2 General guidelines Please read this operating manual carefully before commissioning the product. The instructions include im- portant safety information. The functionality and value-retention of this device depend primarily on the care accorded to it. Make sure to keep the Operating Manual near to the device. It represents a component of the product. -
Page 6: Symbols On The Device
MELAG devices are synonymous for long-term quality. When you eventually need to decommission your MELAG device, we offer a special disposal service. Simply contact... -
Page 7: Description Of The Device
3 Description of the device 3 Description of the device Scope of delivery Please check scope of delivery before connecting the device. Standard scope of delivery ▪ Sterilizer 75 ▪ User manual ▪ Declaration of conformity ▪ Warranty certificate ▪ Power cable ▪... -
Page 8: Views Of The Device
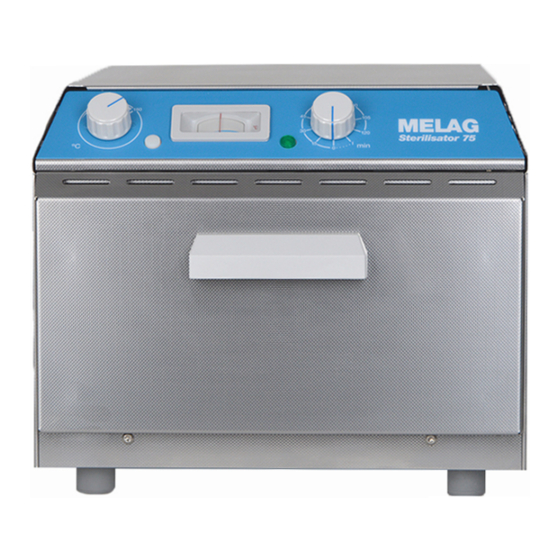
3 Description of the device Views of the device Temperature controller Indicator lamp heating Thermometer Indicator lamp network On/Off switch and time setting Door handle Door (opens forwards) Device foot Fig. 1: Fore device view Connection for the power supply and the device fuse Type plate Fig. 2: Rear view of the device Sterilization chamber... -
Page 9: Loading Variations
3 Description of the device Loading variations The hot air sterilizer is delivered with a mount for the acceptance of trays or standard tray cassettes. If one or two trays are ordered with the device, the scope of delivery will include a tray jack. The loading versions with devices with trays and standard tray cassettes are possible in the following siz- ▪... -
Page 10: Setup And Installation
4 Setup and installation 4 Setup and installation Requirements of the installation location NOTICE The mains plug and the fuse must be easily accessible. Set up the device in such a fashion that the power plug can be disconnected from the mains quickly following danger and that the fuse is easy to access. -
Page 11: First Steps
5 First steps 5 First steps Switching the hot air sterilizer on and off again. The hot air sterilizer is activated via the time switch (On/Off switch) and switches itself off after a pre-set time. The fan comes to standstill after c. 45 seconds. PLEASE NOTE Disconnect the mains plug if the device has not been operated for a long period of time. -
Page 12: Opening And Closing The Door
5 First steps Opening and closing the door CAUTION Danger of burns from hot metal surfaces Allow the device to cool sufficiently before opening. Do not touch any hot metal parts. ü The device must always be deactivated before it is opened. Do not open the door or add any objects after the sterilization procedure has started;... -
Page 13: Sterilization
6 Sterilization 6 Sterilization Preparing the sterilization material Cleaning and disinfection must always have been performed before sterilization. Only in this way is it pos- sible to guarantee the subsequent sterilization of the sterilization material. The materials used, the clean- ing fluid and treatment procedures used are of decisive significance. -
Page 14: Information Regarding Routine Operation
6 Sterilization Information regarding routine operation The sterilization temperature before every sterilization procedure must amount to 180 °C. To this end, the setting of the sterilization time must take into account the Equilibration time. The pure aborticide time amounts to 30 minutes at 180 °C. Wait 15 minutes after the thermometer has reached 180 °C. -
Page 15: Storing Sterile Instruments
6 Sterilization Storing sterile instruments The maximum storage time is dependent on the packaging and the storage conditions. For standard-con- form packaged sterilized equipment – (if protected from dust) it can amount to up to six months. Comply with the provisions of DIN 58953, part 8 and the criteria specified below for the storage of sterilized equip- ment: Comply with the maximum storage duration in accordance with the packaging type. -
Page 16: Function Tests
7 Function tests 7 Function tests Periodical checks We recommend an annual inspection using bio-indicators, thermocouples or maximum thermometers. ▪ Comply with the valid regional legal specifications. ▪ When performing the spore test using biological indicators, the spore packets are to be clamped under an instrument in order to prevent the package from being sucked into the fan motor. -
Page 17: Maintenance
8 Maintenance 8 Maintenance Checks and cleaning Check the chamber, including the door seal and chamber sealing face and the mount once a week for im- purities, deposits or damage. If you find any impurities, remove the standard tray cassettes or cartridges and the mount from the chamber. -
Page 18: Malfunctions
9 Malfunctions 9 Malfunctions General events Incident Possible cause What you can do The temperature display of The control button has Increase or reduce the temperature by turning the thermometer deviates been maladjusted. the temperature controller: by more than 8 °C than set Higher temperature: anti-clockwise on the controller. -
Page 19: Technical Data
10 Technical Data 10 Technical Data Device type Sterilizer 75 Electrical power 700 W Electrical connection 220 - 240 V 50/60 Hz Device fuse 2 x 4 A T Noise emission 56 dB Waste heat 1.1 MJ Weight 12 kg... -
Page 20: Accessories
11 Accessories 11 Accessories Table 2: Accessories Designation of article art. no. Mounting 1 59030 Mounting 2 59040 Tray 02075 Standard tray cassette 00287 Tray jack 28890 Jack for standard tray cassette 28895... -
Page 21: Glossary
Glossary Glossary DIN 58953 Standard – sterilization, sterile equipment supply Equilibration time: The equilibration time comprises the time required to to heat all the locations of the device and the sterilization material to the required temperature of 180 °C. Sterilization material Unsterile, sterilizable material which is still to be sterilized. - Page 22 MELAG Medizintechnik GmbH & Co. KG Geneststraße 6-10 10829 Berlin Germany Email: info@melag.com Web: www.melag.com Original instructions Responsible for content: MELAG Medizintechnik GmbH & Co. KG We reserve the right to technical alterations Your stockist...
Need help?
Do you have a question about the Sterilizer 75 and is the answer not in the manual?
Questions and answers