Table of Contents
Advertisement
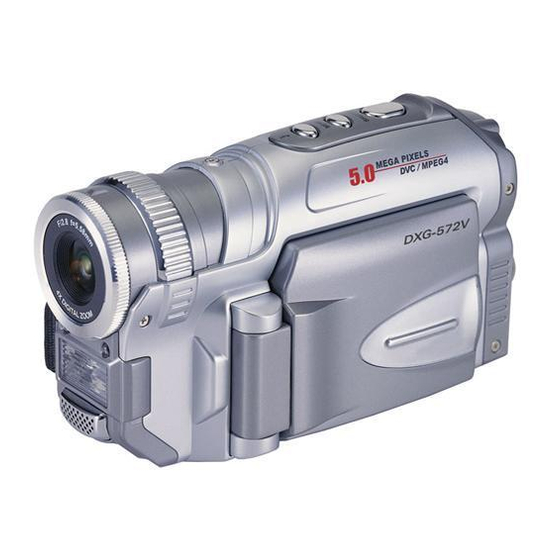
This is a digital video camera of exceptional quality and value. You will be able
to capture videos and pictures; then send and share them with friends and family.
This digital video camera is also able to record audio. Plus, you can connect to a
computer to function as a webcam.
This manual will introduce you to using your digital video camera and how to
install the accompanying software. Make sure that you read this manual carefully and
keep it in a safe place for future reference.
Advertisement
Table of Contents

Related Manuals for DXG DXG-572V


Summary of Contents for DXG DXG-572V
- Page 1 This is a digital video camera of exceptional quality and value. You will be able to capture videos and pictures; then send and share them with friends and family. This digital video camera is also able to record audio. Plus, you can connect to a computer to function as a webcam.
-
Page 2: Table Of Contents
Contents 1. Precautions………………………………………………..…….…...……3 Safety precautions…………………………………………………………………………3 Precautions before use………………………………………………………………………3 Precautions before operation……………………………………………………………………4 Package contents………………………………………………………………………………4 I n t r o d u c t i o n . . … … … … … … … … ..… … . 5 Digital video camera construction...……………..………….………….…….5 Top view………………………………………………………………………………………5 Front………………………………………………………………………………………5... - Page 3 Select date indicator………………………………………………………………………18 Return to photo mode………………………………………………………………………18 Flash light function……………………………………………………………………………18 How to take a picture………………………………………………………………………18 Audio mode……………………………………………………………………………………18 Status indicator………………………………………………………………………………18 Begin recording………………………………………………………………………………19 Playback mode………………………………………………………………………………19 Video playback………………………………………………………………………………20 Audio playback………………………………………………………………………………21 Delete single file…………………………………………………………………………22 Delete all files…………………………………………………………………………22 Protect single file……………………………………………………………………… 22 Protect all files………………………………………………………………………22 Undo single file protection………………………………………………………………...
-
Page 4: Precautions
1. Precautions Please carefully read through this user manual before use, and follow the instructions for operation to prevent unit damage due to inappropriate operation. Safety precautions ●The included CD is a PC software only and not an audio CD. Please do not playback on stereo or personal equipment to prevent damage to the CD. - Page 5 3. If liquid crystal is swallowed, please wash mouth cavity, drink large amounts of water and induce vomiting, then seek medical attention immediately.
-
Page 6: Precautions Before Operation
Precautions before operation This product is composed of electrical components. In order to ensure that the camera functions properly, please do not apply heavy shock or impact to the digital video camera during operation. ●Avoid operating and storing in the following locations: 1. -
Page 7: Introduction
2. Introduction Digital Video Camera construction Top view: 1. Flash button 2.Menu button 3 Shutter button Front: 1. Lens 2. Auto shutter indicator 3. Flash 4. Microphone Back: Power/Busy indicator - when the digital video camera is powered on, the power indicator will be lit (green). -
Page 8: Left
6. Zoom OUT button 12. TV-OUT port 13. USB port Left: Rewind button- fast rewind during video playback. Play/stop button – start or stop playback of video or audio under playback mode Forward button-fast forward during video playback. Display/Set button- switches between the display methods (normal/all/off). Switches back and forth between the video menu, photo menu, playback menu with the setup menu. -
Page 9: Bottom
Bottom: Battery cover latch –press in and push the battery cover out to open the battery compartment cover. Battery compartment SD/MMC card slot Battery cover 1.Battery cover latch Battery status indicator: full charge half charge battery power low no power 4.Battery cover 2.Battery... -
Page 10: Before Using The Digital Video Camera
3.Before using the Digital Video Camera Preparations before operation ●First step: Insert four AA alkaline or rechargeable batteries and check the battery life. If the battery life is low, immediately replace with new or fully-charged batteries to ensure proper digital video camera operation. ●Second step: Please insert the memory card illustrated below into the memory card slot. -
Page 11: Using The Digital Video Camera
4. Using the digital video camera ●Step one: Press the Power switch button, and the power indicator light will automatically light up. When the power indicator light is lit, release the power switch button. Function list... -
Page 12: Image Quality:
Video mode Video mode Photo mode Photo mode Photo menu LCD display: normal/all/off Capture Video: start/stop Digital zoom: 1x~4x Hotkey menu Size: 320*240, 640*480 Exposure compensation: -2EV — +2EV Image quality: good/standard White balance: auto/sunlight/light bulb/ florescent light/cloudy Color effect: color/monochrome/retro Video menu Size: VGA/QVGA Image quality: good/standard... - Page 13 Audio mode Audio mode Playback mode Playback mode LCD display: normal/off Previous/Next Audio playback Photo playback Video playback Playback menu LCD display: normal/off/all Audio recording Volume adjustment play/stop play/stop Volume adjustment Play/stop FF/RW Delete file: delete single file/delete all files Protect file: protect single file/protect all files Undo file protection: undo single file protection / undo all file protections...
-
Page 14: Video Mode
Setup mode Setup mode Date/time Shutter beep: on/off Format: confirm/cancel Factory defaults: confirm/cancel Memory info Photo Language: English/Traditional Chinese/Simplified Chinese/French/German/Italian /Japanese/Spanish/Russian/Korean/Turkish/Portuguese/Dutch/Arabic Video output: NTSC/PAL Auto shutoff: Off/1min/3min Light source frequency: 60HZ/50HZ Copy to card: Confirm/cancel Video mode [ Press the video mode button [Movie] Status indicator Video mode indicator Image format... - Page 15 The control procedures are on the next page.
-
Page 17: Video Menu
Video menu Under Video mode, press the MENU button to enter the Video menu. Under the Video menu page, follow these instructions to change settings: Select image size: 1. Press the up button ▲ or down button ▼ to select the size option and press the confirm button■... - Page 18 2. Use the up button ▲ or down button ▼ to select your desired image quality and press the confirm button ■ . Image quality options: Best, standard.
-
Page 19: Begin Recording
Select white balance mode: 1. Press the up button ▲ or down button ▼ to select the white balance option and press the confirm button ■ . 2. Use the up button ▲ or down button ▼ to select your desired white balance mode and press the confirm button ■... -
Page 20: Photo Mode
●Step 2 Press the shutter during recording to stop, or automatically stop recording when memory is full. Photo mode Press mode button [STILL] Status indicator: Photo mode indicator Flash mode White balance status Color effects File quality Battery status Time display Digital zoom Built-in memory status Image size... -
Page 21: Hotkey Menu
Hotkey menu (Shortcut) Under photo mode, press Confirm button■ to select shortcut functions: you can apply the following to the image to be captured: image size, exposure, image quality, white balance, auto timer, color effect setup etc. After pressing the confirm button ■ , press the up button ▲ or down button ▼... -
Page 22: Photo Menu
Photo menu: Setup the desired options before filming. Press MENU button to access the photo menu. Follow these instructions to change settings: Select image size: 1. Press up button ▲ or down button ▼ to select image size option, then press the confirm button ■... -
Page 23: Exposure Adjustment
2. Press up button ▲ or down button ▼ to select your desired white balance mode, press the confirm button ■ . White balance options: auto, sun light, cloudy, light bulb, florescent light. Exposure adjustment: 1. Press up button ▲ or down button ▼ to select exposure option , then press the confirm button ■... - Page 24 Battery status Memory status...
-
Page 25: Begin Recording
Begin recording: Under audio mode, press the shutter to begin recording, then press the shutter to stop recording. Playback mode Press the playback button If there are no files present, the display will be as below: Otherwise it will display the current file, and press up button ▲ and down button ▼ to browse other files. -
Page 26: Video Playback
Video playback: 1. Press up button▲ or down button▼ to select the video to playback, and then press the Play button to begin playback (this camera supports MP4 format). To playback video clips not recorded by the camera, please rename the file in the format MPEG0001 before copying onto the camera. - Page 27 Audio playback: 1: Under playback mode, use the up button▲ or down button▼ to select the audio file. After the file has been selected, press Play button to begin playback. If the user wishes to playback audeo clips not recorded by the camera, please rename the file in the format WAVE0001 before copying onto the camera.
-
Page 28: Delete Single File
Return to playback menu: Under playback mode, press the MENU button to enter the the menu page. Delete single file 1. Press up button ▲ or down button ▼ to select a file to delete, then press the confirm button ■ . 2. - Page 29 LCD will show a locked icon , otherwise no action will be taken and is returned to the main menu.
-
Page 30: Protect All Files
Protect all files 1. Press the up button▲ or down button▼ to select the lock all option, then press confirm button■ . 2. Press the up button▲ or down button▼ to confirm or cancel selection, then press confirm button■ . If confirm is selected then all files will be protected and the upper right of the LCD will show a locked icon menu. -
Page 31: Dpof
DPOF: DPOF can directly print out the photos stored on the SD card through a DPOF supported printer. DPOF set single 1. Press up button ▲ or down button ▼ to select the “DPOF” option, then press the confirm button ■ . 2. -
Page 32: Exit From Playback Menu
DPS (only supported for DPS (direct print service) enabled printers) Press up button ▲ or down button ▼ to select the print option, then press the confirm button ■ . Connect the digital video camera and printer with the USB cable and after successful connection is established the digital video camera will show print single and print all options. -
Page 33: Setup Mode
Setup mode Press the MENU button under any mode (except for Audio mode ) to enter the menu for each mode, then press DISP/SET button to enter Setup mode . At the setup mode, the user can modify the followng options: 1. -
Page 34: F O R Ma
Button beep: Set to on or off, controls as below: Format: Confirm to delete all data in memory. Controls are similar to Sounds setup. Factory defaults: Confirm to use factory defaults. Controls are similar to Sounds setup. Memory info: Show total video/photo/audio files and available space Language: English/Traditional Chinese/Simplified Chinese/French/German/Italian/Japanese/ Spanish/Russian/Korean/Turkish/Portuguese/Dutch/Arabic Video output: Set the video signal format (NTSC/PAL). -
Page 35: Video Output
5. Video output You can use the “video/audio out” on the digital video camera to output the video/audio to an external device (such as: TV), the method is as below: ●Step one Insert the black plug of the TV cable to the TV port on the back of the digital video camera, and the yellow plug to the ‘... -
Page 36: How To Connect To Pc
6. How to connect to PC The digital video camera can also function as a webcam/storage device, procedures as below: ●Step one Make sure the digital video camera is installed with four “AA” batteries Note: Please make sure to connect the USB cable properly to prevent damage. ●Step two Connect the smaller end of the USB cable plug to the USB port on digital video camera ●Step three Connect the larger plug of the USB cable to the USB port on the PC... -
Page 37: System Requirements
●Step four Press up button ▲ or down button ▼ to select removable disk or webcam and then press confirm button ■ , the camera screen will turnoff and enter the appropriate function. If removable disk is selected, then there will be a newly added removable disk appearing in “My Computer”... - Page 38 When playing back video on the PC, make sure the PC has DirectX8.0 or newer Note: versions and is supported.
-
Page 39: Removable Storage
7. Drivers and software applications 1. Drivers When the camera is connected to a PC, you will be able to use the camera as removable storage or PC webcam. Removable storage The digital video camera is able to provide removable storage functions as a card reader. You can use this camera as an SD card, removable disk. -
Page 40: P R E S T O ! Vi D E O Wo R K
Press the install button to install the drivers. Please follow the on screen instructions. Press “finish” to restart the PC and complete the driver installation. Load the driver 1. Insert the included CD into the CD-ROM. 2. If the CD does not auto-run, use Windows file manager to run the executable InstallMgr.exe under the root directory on the CD. - Page 41 3. Press the install button and the installation screen will be shown, please press “Next” to continue. 4. At the EULA screen, please select “I accept the agreement” and then press “Next” to continue. 5. Please follow the instructions and use “Browse” to choose the installation path to use, press “Next”...
- Page 42 6. Please choose the name of the folder to install program, press “Next” to continue. 7. At the install additional tasks screen, press “Next” to continue. 8. At the ready to install screen, press “Install” to begin installation.
- Page 43 9. Install in progress. To stop installation, please press “Cancel”. 10. The screen below will be shown after installation is complete, press “Finish” to end program installation.
-
Page 44: Digital Video Camera Specifications
Digital video camera specifications: Digital video camera specifications: ● Lens: f=9.2mm ● Sensor: 5.17Mega pixel cmos ● Aperture: F / 3.0,8.0 ● Exposure: ISO 100 ● White balance setting: Auto, sun light, light bulb, florescent light, cloudy ● Shutter: Mechanical shutter ●... -
Page 46: Troubleshooting
9. Troubleshooting When the digital video camera hangs during operation and cannot accept When the digital video camera hangs during operation and cannot accept input, please check the battery contacts and then restart. If not able to input, please check the battery contacts and then restart. If not able to System hangs System hangs restart, check if unnecessary operation has caused damage to digital video... - Page 47 You can also check out our online support desk where you can register your product, send emails to our technical support, and find a list of frequently asked questions (FAQs). DXG USA...
Need help?
Do you have a question about the DXG-572V and is the answer not in the manual?
Questions and answers