Advertisement
Quick Links
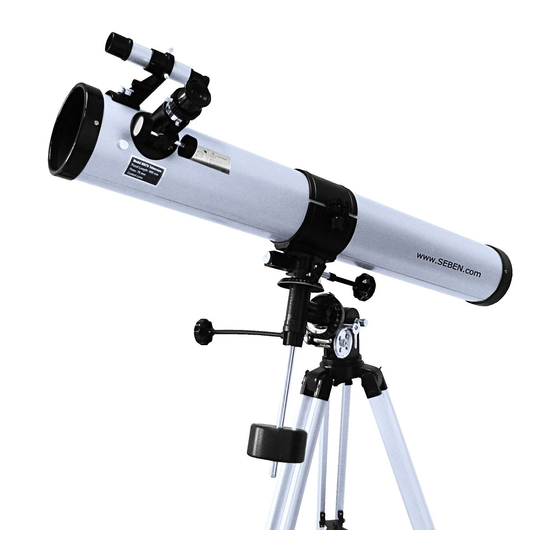
900-76 EQ2 Reflector Telescope
Owner´s Manual
Please read before using this equipment
Deutsche Anleitungen finden Sie zum Download auf:
http://www.seben.com/manuals/
You can download instructions here:
http://www.seben.com/manuals/
Vous pouvez télécharger la notice en français sur:
http://www.seben.com/manuals/
Per il download delle istruzioni in italiano cliccate qui:
http://www.seben.com/manuals/
Puede descargar las instrucciones en español aquí:
http://www.seben.com/manuals/
www.SEBEN.com
Seben GmbH – Ollenhauer Str. 73 -13403 Berlin – Deutschland
Advertisement

Related Manuals for Seben 900-76 EQ2


Summary of Contents for Seben 900-76 EQ2
- Page 1 You can download instructions here: http://www.seben.com/manuals/ Vous pouvez télécharger la notice en français sur: http://www.seben.com/manuals/ Per il download delle istruzioni in italiano cliccate qui: http://www.seben.com/manuals/ Puede descargar las instrucciones en español aquí: http://www.seben.com/manuals/ www.SEBEN.com Seben GmbH – Ollenhauer Str. 73 -13403 Berlin – Deutschland...
- Page 2 Interesting information for starting By buying a telescope you made the decision to pursue a very interesting and exciting hobby and we congratulate you. We would like to give you a couple of tips upfront. Astronomy isn’t a cinema movie Astronomy isn’t a cinema movie that you watch for a couple of hours without doing anything.
- Page 3 The magnification can be change as desired through oculars with different focal lengths. Here an example: Telescope Seben 1000/114 > opening 114mm, focal length 1000 > magnification with a 10mm ocular 1000/10 = 100x Light-gathering power The light-gathering power is dependent on the diameter of the objective or the lens of the telescope.
- Page 4 The color filters are made to increase the contrast when observing planets, so that you can see the details of the surfaces that are hardly recognizable. Seben also offers an astronomy filter package as accessory, which offers you the most important color filters in one package.
- Page 5 DKA5 this easily. Seben 31,7mm 1,25“ Zoom 8-24mm FMC Telescope Ocular Since 2004, the Seben Zoom 8-24mm FMC Ocular is the most sold Seben ocular of all times and is being used a thousand times by astronomers around the world with the greatest satisfaction.
-
Page 6: Setting Up The Telescope
Setting up the telescope Put the package on a save underground and open it carefully. Get ALL boxes out of the package, because they are also on one another. Empty boxes are merely there to ensure the transportation. Put all components on a save and flat underground, so that you can see them properly. - Page 7 Also especially ensure when setting up the tripod leg that the mounting for the ocular shell is on the inside! Remove a butterfly nut from one of the three screws and put the screw through the hole, so that the connection of the tripod and the mounting of the tripod mount is fixated.
- Page 8 You have now successfully assembled the tripod. Set the tripod on a stable and plane surface so that it is stands horizontally. To ensure maximum stability, the tripod legs should be maximum spread, but not completely pulled out. Setting up the telescope The mounting is set-up absolutely horizontal.
- Page 9 Attach the fine movements shafts. To do that, remove the small protective rubber studs from the locating bolts, if necessary. Take the weight and slide it onto the weight rod. Screw the rod correctly into the mounting from below. Put the tube into the telescope tube ring and close the telescope tube ring at the side.
- Page 10 (available in Seben’s accessories program). The adjustment of the mounting is important, because both axes have to stand level. This has the effect that the telescope, no matter how it’s positioned, won’t tip over sideways due to the unilateral overload. Think of a seesaw: if one side has more load on it, then it will sink downwards.
- Page 11 Loosen the right ascension clamp. It holds the axis. If you loosen this clamp, then the axis is freestanding and can be moved like a seesaw. The side of the telescope tube or the side of the counterweight will now probably sink downwards. It depends on which side is heavier.
-
Page 12: First Observations
You have now successfully assembled the tripod. First observations Set up the telescope outside at least half an hour before the beginning of observation so that it can cool down. Please take the lid from your telescope and remove the cap from the eyepiece. - Page 13 Look through the telescope and place it on position on the top of the tower. Look through the viewfinder tube. If you do not see exactly the same image, adjust the viewfinder tube. On the search tube you will find small screws, which can be used to adjust the viewfinder tube until the object can be seen exactly in the viewfinder tube.
- Page 14 How to use the moon filter? The moon filter can be screwed by means of its socket in the socket of the eyepieces. The moon filter and the eyepiece, you can then use as usual in the focuser. If you replace the eyepiece, you should also screw the filter out and back in.
- Page 15 What to look for in the sky: The moon The moon is the easiest target to find in the night. When it is in the full position, when the entire face is lit, then it bathes the night with a silvery light washing out the rest of the sky from all but the brightest objects. The best time to view the moon is actually not when it is full by rather anytime up to the first quarter, this is when the face appears to be half lit up.
- Page 16 Care and cleaning of Optics: WARNING: Improper cleaning of optical components may void the warranty! Optical components of a telescope will over time get dirty. The amount of dirt and or dust collected onto a lens or mirror should only be removed with the utmost care and this is at times best left to people with experience in this procedure.
Need help?
Do you have a question about the 900-76 EQ2 and is the answer not in the manual?
Questions and answers