Table of Contents
Advertisement
Advertisement
Table of Contents

Related Manuals for Pacific Solana


Summary of Contents for Pacific Solana
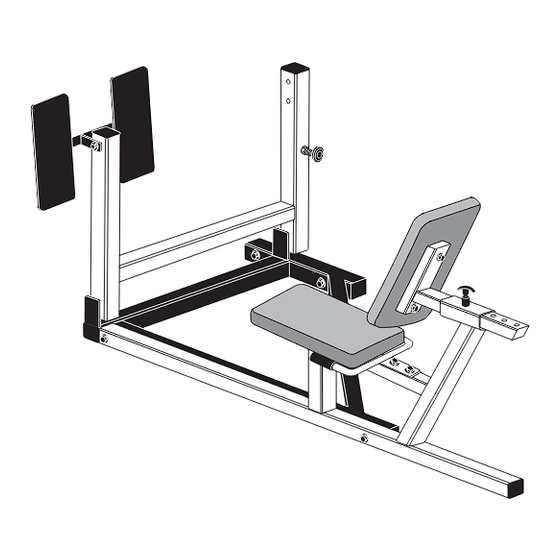
- Page 1 Solana Leg Press Option Assembly Instructions...
-
Page 2: Important Safety Instructions
Solana Leg Press Option Assembly Instructions Important Safety Instructions • Never operate the unit after it has been dropped or Obtaining Service damaged. Return the equipment to a service center Do not attempt to service the Leg Press for examination and repair. -
Page 3: Table Of Contents
Installation Requirements ......................5 Assembly Tips ......................... 5 Assembly Instructions .................. 6 1. Attach the Leg Press to the Solana ..................7 2. Attach the Seat Frame to the Leg Press ................8 3. Assemble the Seat Pads ...................... 9 4. -
Page 4: Before You Begin
Solana Leg Press Option Assembly Instructions Before You Begin Thank you for purchasing the Leg Press Option for the Solana equipment. This option will add a new dimension to your strength-training regimen. For proper installation, please read this guide thoroughly and follow the assembly instructions. -
Page 5: Preparations
Solana Leg Press Option Assembly Instructions Installation Requirements Assembly Tips • A black, 6-inch scale with white numbers is provided Follow these installation requirements when at the bottom of each assembly instruction page. assembling the unit: Use this scale to identify the correct size for bolts •... -
Page 6: Assembly Instructions
Solana Leg Press Option Assembly Instructions Assembly Instructions Assembly of the Leg Press Option takes professional installers about 1 hour to complete. If this is the first time you have assembled this type of equipment, plan on significantly more time. -
Page 7: Attach The Leg Press To The Solana
C. Rest the Support Arm against the Side Upright. 1 - 3" bolt 2 - washers 1 - locknut Rest the Support Arm against the Side Upright on the Solana Support Arm Leg Press Base Step 1. Attach the Leg Press to the Solana page 7... -
Page 8: Attach The Seat Frame To The Leg Press
Solana Leg Press Option Assembly Instructions 2. Attach the Seat Frame to the Footrest Leg Press Support Arm Seat Bracket Support A. Attach the Seat Frame to the Leg Press Base using two 3¾-inch bolts four washers two locknuts Wrench tighten. -
Page 9: Assemble The Seat Pads
Solana Leg Press Option Assembly Instructions 3. Assemble the Seat Pads Note: Make sure that the seams on the Seat Pads face Seat Pad toward the frame. A. Determine which Seat Pad you want to use as the Backpad and attach it to the Seat Bracket Support using two 1¾-inch bolts... -
Page 10: Assemble The Pulleys
Solana Leg Press Option Assembly Instructions 4. Assemble the Pulleys Top Cap A. Ensure that the Weight Pin has been pulled out of Weight the Weight Stack. B. Attach the top and bottom portions of the Pulley 1 - 3½" pulley Plate to the Side Upright using 1 - 2½"... -
Page 11: Route The Cable
Solana Leg Press Option Assembly Instructions 5. Route the Cable A. Ask your assistant to continue to hold the Support Route the cable around the pulleys and inside the cable Arm in a vertical position next to the Pulley Plate retainers before tightening while you route the Cable. -
Page 12: Cable Adjustments
Solana Leg Press Option Assembly Instructions Areas of cable adjustments are shown with arrows Cable Adjustments After the Leg Press Option is fully assembled, you must check the cables for proper tension. Obvious signs that cable problems exist include: ✔ Excess slack exists in the Cable. -
Page 13: Press Arm Adjustment
Solana Leg Press Option Assembly Instructions 1. Press Arm Adjustment A. Place the Weight Pin in the Selector Stem under the Top Cap Weight to ensure the least Cable resistance. B. To adjust the tension of the Main Cable, rotate the... -
Page 14: Support Arm Adjustment
With the slack removed from the Cables, you are now ready to use the Leg Press Option. Thank you for choosing Pacific Fitness strength-training Equipment. Note: For maintenance instructions, refer to your Solana Assembly Instructions and Maintenance Guide . Rotate the... - Page 15 Return Policy: Proof of purchase is required to determine whether service on a Precor Strength Product/ for on-site warranty repairs of strength products, Pacific Fitness Product during its warranty period will commence. Claims should be made to the dealer within the service area.
-
Page 16: Warranty Card
Shipping weight: 99 lb (45 kg) Precor Incorporated 20031 142nd Avenue NE P.O. Box 7202 Woodinville, WA USA 98072-4002 Precor and Pacific Fitness are registered trademarks of Precor Incorporated. Specifications subject to change without notice. Copyright 2001 Precor Incorporated. Precor web site: www.precor.com NOTICE:...
Need help?
Do you have a question about the Solana and is the answer not in the manual?
Questions and answers