Table of Contents
Advertisement
Available languages
Available languages
Quick Links
DELTA-SPORT HANDELSKONTOR GMBH
Wragekamp 6 • D-22397 Hamburg
Version: 11/2016
Delta-Sport-Nr.: TB-2759
IAN 279807
BARRA DE TRACCIÓN
BARRA ENTROPORTA
BARRA DE TRACCIÓN
BARRA ENTROPORTA
Manual de instrucciones
Istruzioni d'uso
BARRA PARA PORTA
CHIN-UP BAR
Manual de instruções
Instructions for use
TÜRRECK
Bedienungsanleitung
IAN 279807
Antes de leer, abra la página con las ilustraciones y familiarícese seguidamente con todas las funciones
del aparato.
Prima di leggere ribaltare la pagina con le immagini e familiarizzare poi con tutte le funzioni
dell´apparecchio.
Antes de ler, vire o lado com as imagens para fora e familiarize-se com todas as funções do aparelho.
Before reading, fold out the illustration page and get to know all of the functions of your unit.
Klappen Sie vor dem Lesen die Seite mit den Abbildungen aus und machen Sie sich anschließend mit
allen Funktionen des Artikels vertraut.
ES
Instrucciones de manejo y seguridad
IT/MT
Istruzioni d´uso e di sicurezza
PT
Manual de instruções e indicações de segurança
GB/MT
Instructions and Safety Notice
DE/AT/CH
Bedienungs- und Sicherheitshinweise
Página
10
Pagina
18
Página
26
Page
33
Seite
40
Advertisement
Table of Contents

Related Manuals for Crivit 279807


Summary of Contents for Crivit 279807
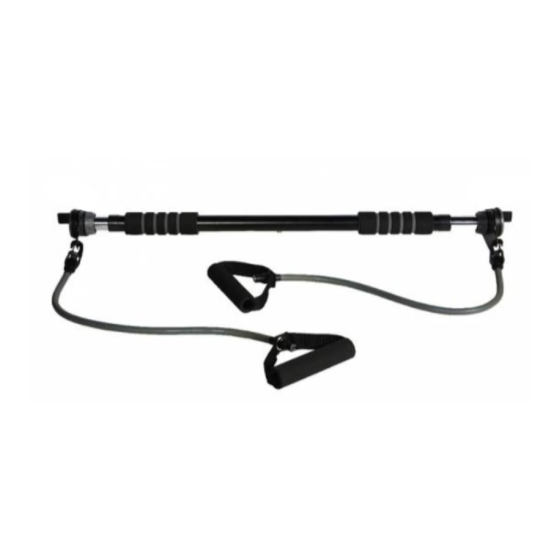
- Page 1 Instructions for use Manual de instruções e indicações de segurança Página DELTA-SPORT HANDELSKONTOR GMBH Wragekamp 6 • D-22397 Hamburg GB/MT Instructions and Safety Notice Page TÜRRECK DE/AT/CH Bedienungs- und Sicherheitshinweise Seite Version: 11/2016 Bedienungsanleitung Delta-Sport-Nr.: TB-2759 IAN 279807 IAN 279807...
- Page 2 72 - 98 cm Apertura Opening Enclavamiento Locking Aprire Öffnen Bloccare Arretieren Abertura Bloqueio...
-
Page 6: Table Of Contents
ÍNDICE / INDICE / ÍNDICE / CONTENTS Contenido del suministro ........10 Contenuto della confezione ......18 Datos técnicos ........... 10 Contenuto della confezione ......18 Uso conforme a lo previsto ......10 Utilizzo conforme ..........18 Indicaciones de seguridad para el montaje .. 10 Avvertenze di sicurezza per il montaggio .. - Page 7 INHALTSVERZEICHNIS Lieferumfang ............40 Technische Daten ..........40 Bestimmungsgemäße Verwendung ....40 Sicherheitshinweise zur Montage ....40 Sicherheitshinweise zur Benutzung ..40 - 42 Montage ............42 Werkzeugliste ..........42 Verschraubung der Sicherheitsendkappen im Türrahmen ..........42 Montage der Sicherheitsbügel ....42 Öffnen und Arretieren .......
-
Page 8: Contenido Del Suministro
Indicaciones de seguridad ¡Enhorabuena! para el montaje Con la compra de este artículo ha adquirido un producto de excelente calidad. • ¡Atención! El artículo debe emplearse Antes de utilizarlo por primera vez, fa- únicamente con los capuchones finales miliarícese con él leyendo atentamente atornillados en el marco de la puerta. las siguientes instrucciones de uso. • El ancho de extensión máximo de 98 cm está Utilice el producto según lo indicado aquí y solo marcado en los dos extremos de la barra, por para los ámbitos de uso descritos. - Page 9 • El artículo sólo debe ser empleado por perso- • Las cintas de entrenamiento deben emplearse nas que conozcan las indicaciones de seguri- únicamente junto con la barra de tracción y dad. no deben fijarse a ningún otro objeto. • La fijación (enclavamiento) debe comprobarse •...
-
Page 10: Montaje
La seguridad del artículo sólo puede ga- • Extraiga la tapa girándola (fig. C). rantizarse si se comprueba con regularidad si • Ponga las abrazaderas de seguridad entrega presenta daños y desgaste. El artículo no das en la barra de tracción (fig. D). podrá... -
Page 11: Calentamiento
• Si es posible, haga que la primera vez un Calentamiento de los brazos y los fisioterapeuta experimentado le explique la hombros correcta realización de los ejercicios. 1. Realice movimientos circulares con ambos • Realice los ejercicios siempre y cuando se en hombros hacia delante. cuentre bien o, en su caso, únicamente mien- 2. - Page 12 Posición final Importante: Tenga cuidado de que los 4. Tense los músculos abdominales y separe el brazos estén muy pegados al tronco, los músculos abdominales permanezcan pie con el lazo algunos centímetros de usted por el lateral. El tronco y la pelvis permane- tensos, las muñecas rectas y los brazos ligeramente flexionados en la posición cen rectos. La cabeza se encuentra en la prolongación de la columna vertebral y los final.
- Page 13 Posición final Posición de salida 3. Tense los músculos abdominales y de los 1. Arrodíllese con una pierna de espaldas al brazos y estire las cintas de entrenamiento artículo y coloque la otra pierna en un ángu- delante del cuerpo. La cabeza se encuentra lo de 90°.
-
Page 14: Estiramiento
4. Permanezca un momento en esta posición y Musculatura de la nuca vuelva lentamente a la posición de salida. 1. Póngase de pie relajado. Tire de la cabeza 5. Repita el ejercicio 10-15 veces en 3 tandas. suavemente con una mano primero hacia la Importante: Mantenga la tensión del izquierda y, después, hacia la derecha. -
Page 15: Garantía De 3 Años
Esto es válido también para las piezas reemplazadas o reparadas. Las reparaciones realizadas una vez transcurri- do el periodo de garantía se deberán pagar. IAN: 279807 Servicio España Tel.: 902 59 99 22 (0,08 EUR/Min. -
Page 16: Contenuto Della Confezione
Avvertenze di sicurezza Congratulazioni! per il montaggio Con il vostro acquisto avete scelto un prodotto altamente qualitativo. Familiarizzate con il pro- • Attenzione! L‘articolo può essere dotto prima di prenderlo in funzione. utilizzato solo con gli elementi finali Leggete attentamente le seguenti istru- avvitati all‘infisso della porta! zioni d´uso. • Alle estremità della sbarra è segnata Utilizzate il prodotto soltanto per lo scopo l’ampiezza massima di estensione, pari a previsto e i campi d´impiego indicati. - Page 17 • Utilizzare l‘articolo esclusivamente al suo • Gli estensori per il training devono essere scopo conforme. utilizzati esclusivamente in abbinamento con • Questo articolo può essere utilizzato solo da la sbarra per la porta. Gli estensori per il trai- persone che conoscono le avvertenze di ning non devono essere fissati ad altri oggetti.
-
Page 18: Montaggio
Se l‘articolo dovesse essere danneggiato, non calotta finale nera e riavvitare i due pezzi. deve più essere utilizzato. Non serrare le viti, poiché le staffe di sicurez- • Proteggere l‘articolo dalle alte temperature e za devono potere girare liberamente per dall‘umidità. -
Page 19: Riscaldarsi
e aumentare progressivamente la frequenza Riscaldamento della muscolatu- e l‘intensità degli esercizi. ra delle gambe Tanto più spesso e regolarmente si svolgono 1. Mettersi in piedi su una gamba e sollevare gli esercizi, quanto più in forma e meglio vi l‘altra gamba di circa 20 cm dal pavimento, sentirete. - Page 20 Cambiare appoggio, mettere il piede rivolto 2. Mettere un piede in ciascun cappio degli es- verso la porta nel cappio e avvicinarlo a sé. tensori. Le ginocchia sono leggermente pie- Importante: fare particolare attenzione gate. a mantenere il bacino dritto e la tensio- Posizione di arrivo ne corporea. 3. Tendere la muscolatura di braccia, addome e glutei, e sollevarsi con le braccia, fino a Rafforzamento dei tricipiti (imm. J) superare la sbarra con la testa.
- Page 21 Fissare l‘articolo nella posizione indicata nella 4. Spostare le scapole in direzione della colon parte bassa dell‘infisso della porta. na vertebrale. La testa è in linea con la colon Posizione di partenza na vertebrale e la spalla rimane in basso. 1. Sedersi davanti all‘articolo con le ginocchia 5.
-
Page 22: Stretching
Posizione di partenza Muscolatura delle gambe 1. Mettersi al centro e con le gambe alla larghe- 1. Mettersi in posizione eretta e sollevare un zza delle anche sotto all‘articolo. Il busto è dis- piede dal pavimento. teso e le ginocchia sono leggermente piegate. 2. Muovere lentamente il piede compiendo un 2. - Page 23 Lo stesso vale anche per le parti sostituite o riparate. Le riparazioni dopo la scadenza della garanzia verranno effettuate a pagamento. IAN: 279807 Assistenza Italia Tel.: 02 36003201 E-Mail: deltasport@lidl.it Assistenza Malta Tel.:...
-
Page 24: Material Fornecido
Indicações de segurança Muitos Parabéns! relativas à montagem Com a sua compra optou por um produto de alta qualidade. Antes de o utilizar pela primeira • Atenção! O artigo só pode ser usado vez, familiarize-se o com o produto. com as capas aparafusadas na ar- Para o efeito leia com atenção o seguin- mação da porta! te manual de instruções. • A extensão máx. de rotação de 98 cm está Utilize o produto apenas conforme descrito e marcada nas duas barras terminais. - Page 25 • Este artigo apenas deve ser usado por As tiras de treino não podem ser fixadas pessoas que estejam familiarizadas com as noutros objetos. indicações de segurança. • O comprimento de expansão máximo das • Verifique a fixação (bloqueamento) antes de tiras de treino é...
-
Page 26: Montagem
Montagem • Engate os mosquetões das tiras de treino nos olhais dos arcos de segurança. A abertura do Lista de ferramentas mosquetão tem de estar virada para dentro. Necessita de uma chave de parafusos Philips e (fig. F) de uma broca adequada para o aparafusamen- •... -
Page 27: Aquecimento
• Quando começar a treinar são suficientes 4. Levante as pernas sucessivamente e dê 2-3 minutos por exercício. Quando o treino alguns passos. Certifique-se de que levanta for diário, após uma semana pode aumentar as pernas apenas até onde conseguir perma- a duração para 5-10 minutos. - Page 28 Fixe o artigo na posição indicada na parte 5. Permaneça nesta posição durante algum tempo superior da armação da porta. e regresse lentamente à posição inicial. Posição inicial 6. Repita este exercício 10 - 15 vezes em três séries. 1. Coloque-se no centro, à frente da armação Importante: Certifique-se de que a da porta.
- Page 29 Posição final Atenção! Respeite o comprimento 3. Contraia os músculos dos braços e os de expansão máximo abdominais e puxe os cotovelos para trás. A Fixe o artigo na posição indicada na parte cabeça está alinhada com a coluna vertebral inferior da armação da porta. e os ombros permanecem para baixo. Posição inicial 4.
-
Page 30: Alongamentos
1. Coloque-se direito e levante um pé do chão. de expirada a garantia, eventuais reparações 2. Mova-o lentamente em círculos, primeiro num implicam o pagamento de custos. sentido e depois no outro. IAN: 279807 3. Após algum tempo, troque de pé. Assistência Portugal Importante: Certifique-se de que as Tel.: 70778 0005 suas coxas permanecem paralelas. Em-... -
Page 31: Scope Of Delivery
Safety notes regarding Congratulations! mounting With your purchase you have decided on a high-quality product. Get to know the product • Caution! The article may only be used before you start to use it. with the end caps screwed into the Carefully read the following instructions door frame. for use. • The maximum extension width of 98cm is Use the product only as described and only marked on both end rods, please do not for the given areas of application. -
Page 32: Assembly
• Check the mounting (clamping) before each use. • Do not use the training bands for other • Check the stability again before each use by purposes (e.g. as a tension cable, tow rope, or firmly pulling and shaking the article. similar). -
Page 33: Mounting The Safety Bracket
The screw connection provides great Tighten the door bar so far that it cannot move, security during training and is a manda- even with sudden loads (please note that the tory requirement. door frame can still be deformed despite correct Caution: The drilled holes will cause per- handling). The ends of the door bar must always manent damage to the door frame. lie fully on the door frame. -
Page 34: Suggested Exercises
End position Warming up neck muscles 4. Tense your stomach muscles and pull the foot 1. Turn your head slowly to the left and to the right. with the loop several centimetres away from 2. Repeat this movement 4 - 5 times. you to the side. Your upper body and hips 3. - Page 35 Strengthening your arm and chest Strengthening back muscles muscles (figure K) (figure M) Caution! Please pay attention to Caution! Please pay attention to the maximum extension length the maximum extension length Attach the article to the upper part of the door Attach the article to the lower part of the door frame as illustrated. frame as illustrated. Starting position Starting position 1. Grip the bar from below. Keep your upper 1.
-
Page 36: Stretching
4. Pull your shoulder blades in towards your Starting position spine. Your head is an extension of your spine 1. Stand under the middle of the article with and your shoulders should stay down. your legs hip-width apart. Your upper body is 5. -
Page 37: Care And Storage
Important: Please ensure that your and repaired parts. thighs stay parallel next to one another. Repairs after the warranty are subject to a Push your hips forward and keep your charge. upper body upright. IAN: 279807 Service Great Britain Care and storage Tel.: 0871 5000 720 Please do not forget that regular maintenance (£ 0.10/Min.) and cleaning contribute to the safety and longe- E-Mail: deltasport@lidl.co.uk... -
Page 38: Lieferumfang
Sicherheitshinweise zur Herzlichen Glückwunsch! Montage Mit Ihrem Kauf haben Sie sich für einen hoch- wertigen Artikel entschieden. Machen Sie sich • Achtung! Der Artikel darf nur mit im vor der ersten Verwendung mit dem Artikel Türrahmen verschraubten Endkappen vertraut. benutzt werden! Lesen Sie hierzu aufmerksam die nach- • Die max. Ausdrehweite von 98 cm ist an folgende Gebrauchsanweisung. - Page 39 • Verwenden Sie den Artikel ausschließlich für • Die Trainingsbänder sind ausschließlich für seinen bestimmungsgemäßen Zweck. den Gebrauch in Verbindung mit dem Türreck • Dieser Artikel darf nur von Personen ver- zu verwenden. Die Trainingsbänder dürfen an wendet werden, die mit den Sicherheitshin- keinen anderen Gegenständen befestigt wer- weisen vertraut sind.
-
Page 40: Montage
Bei Beschädigungen dürfen Sie den Artikel Ziehen Sie die Verschraubung nicht fest an, da nicht mehr verwenden. die Sicherheitsbügel für die spätere Montage • Schützen Sie den Artikel vor hohen Tempe- im Türrahmen frei drehbar sein müssen (Abb. E). raturen und Feuchtigkeit. •... -
Page 41: Aufwärmen
und steigern Sie die Häufigkeit und Übungs- Aufwärmen der Beinmuskulatur intensität schrittweise. Je häufiger und regel- 1. Stellen Sie sich auf ein Bein und heben Sie mäßiger Sie die Übungen machen, desto fitter das andere Bein mit gebeugtem Knie ca. und wohler fühlen Sie sich. 20 cm vom Boden ab. - Page 42 Verändern Sie hierfür Ihre Standposition und Ausgangsposition führen Sie Ihren der Tür zugewandten Fuß in der 1. Greifen Sie die Stange von unten. Der Ober- Schlaufe des Trainingsbandes zu sich heran. körper ist aufrecht. Wichtig: Achten Sie besonders darauf, 2. Stellen Sie je einen Fuß in eine Trainingsband- das Becken gerade und die Körperspan- schlaufe.
- Page 43 Kräftigung der Rückenmuskulatur Endposition 3. Spannen Sie Arm- und Bauchmuskulatur an (Abb. M) und ziehen Sie die Unterarme nach oben. Achtung! Beachten Sie die Die Oberarme liegen eng am Körper an. maximale Strecklänge Die Handinnenfläche zeigt zu Ihnen. Befestigen Sie den Artikel in dargestellter Positi- 4. Ziehen Sie die Schulterblätter zur Wirbelsäu- on im unteren Teil des Türrahmens.
-
Page 44: Dehnung
2. Führen Sie den rechten Arm hinter den Kopf, Kräftigung der Armmuskulatur bis die rechte Hand zwischen den Schulter- (Abb. P) blättern liegt. Achtung! Beachten Sie die 3. Greifen Sie mit der linken Hand den rechten maximale Strecklänge Ellenbogen und ziehen Sie diesen nach Befestigen Sie den Artikel in dargestellter Positi- hinten. - Page 45 Die Garantiezeit wird durch etwaige Repara- turen aufgrund der Garantie, gesetzlicher Ge- währleistung oder Kulanz nicht verlängert. Dies gilt auch für ersetzte und reparierte Teile. Nach Ablauf der Garantie anfallende Repara- turen sind kostenpflichtig. IAN: 279807 Service Deutschland Tel.: 0800-5435111 E-Mail: deltasport@lidl.de Service Österreich Tel.:...
Need help?
Do you have a question about the 279807 and is the answer not in the manual?
Questions and answers