Table of Contents
Advertisement
Quick Links
IMPORTANT
Read this manual carefully before
assembling, using or servicing this grill.
Keep this manual for future reference. If
you have questions about assembly,
operation, servicing or repair of this grill,
please call Coleman at 1-800-835-3278
or TDD: 316-832-8707.
Event Grill
9995A Series
INSTRUCTIONS FOR USE
© 2004 The Coleman Company, Inc.
www.coleman.com
The handling, storage and
transportation of gas cylinders
must be in accordance with
ANSI/NFPA 58, Storage and
Handling of Liquified Gases, or
CSA B149.1, Natural Gas and
Propane Installation Code.
• 9-volt Battery included
• 20# L.P. gas cylinders
not included
For Outdoor Use Only
The owner shall post in a
prominent location instructions
to be followed in the event the
user smells gas. This infor-
matin shall be obtained by
consulting the local gas
supplier.
GAS BARBECUE
ANSI Z83.11 • CSA 1.8 (2002)
FOOD SERVICE EQUIPMENT
®
Advertisement
Table of Contents

Related Manuals for Coleman 9995A Series 9995A700


Summary of Contents for Coleman 9995A Series 9995A700
-
Page 1: Instructions For Use
Coleman at 1-800-835-3278 or TDD: 316-832-8707. Event Grill 9995A Series INSTRUCTIONS FOR USE © 2004 The Coleman Company, Inc. www.coleman.com The handling, storage and transportation of gas cylinders must be in accordance with ANSI/NFPA 58, Storage and Handling of Liquified Gases, or CSA B149.1, Natural Gas and... -
Page 2: Table Of Contents
• NEVER use charcoal briquettes or lighter fluid in a gas grill. (Fig. 6) • Grill is hot when in use; to avoid burns, DO NOT touch any hot grill • NEVER leave the grill unattended while it is in use. (Fig. 8) •... -
Page 3: General Installation
WARNING Keep any electrical supply cord away from any heated surface. During assembly of grill and when attaching or replacing the L.P. gas cylinder, insure that the gas supply hose is free of kinks and is at least 3" away from hot surfaces such as the grill housing. -
Page 4: Portable L.p. Gas Barbecue Cylinders
WARNING • If the grill is not in use, the gas must be turned off at the supply cylinder(s). • Cylinders must be stored outdoors out of the reach of children and must not be stored in a building, garage or any other enclosed area. -
Page 5: L.p. Gas Cylinder
Do not use another hose and regulator assembly other than the one supplied with the grill or a Coleman replacement pressure regulator assembly. The pressure regulator and hose assembly provided is factory set at an outlet pressure of 11 inches water column (1/2 psi). -
Page 6: Transporting The Cylinder
Handle a full cylinder with care. Gas is under high pressure. DANGER • NEVER store a spare L.P. gas supply cylinder under the grill body or inside grill enclosure or in the vicinity of any heat producing appliance. (Fig. 12) • NEVER fill the cylinder beyond 80% full. -
Page 7: To Set Up
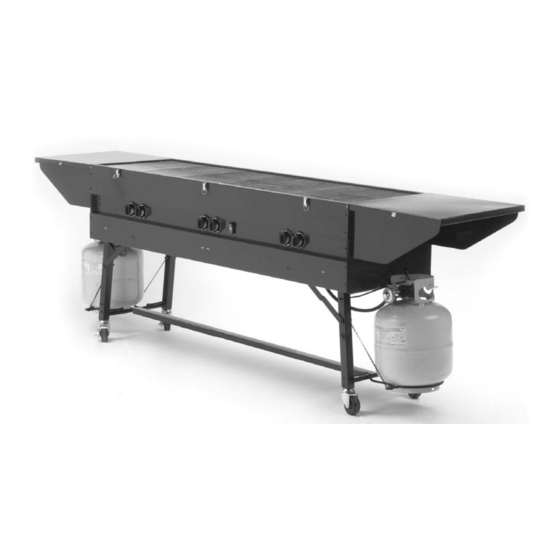
(2) people available to set up this grill. See replacement parts list for parts identification. Step 2 Unlock Grill Legs as shown. Carefully lower both Left and Right Grill Legs into the locked position. Step 3 Attach Leg Brace LEG BRACE as shown. -
Page 8: How To Check For Leaks
FLANGE Repeat the same order for attaching the Left Side Shelf as you did on the Right Side Shelf. Remove Center Lid and set aside until ready for storage of the grill. To Set Up Step 7 Install two Grease... -
Page 9: Fixing A Fuel Leak
3. Stop a leak by tightening the loose joint, or by replacing the faulty part with a replacement part recommended by Coleman. DO NOT attempt to repair the cylinder valve if it should become damaged; the cylinder MUST be replaced. -
Page 10: Match Lighting
Insert a match in the holder end of the extension, strike the match and place the match near the burner from above. Turn on BURNER CONTROL KNOB while holding match near burner. You must use another match to ignite the second side of the grill. Tear Down/Clean Step 1 Make sure Burner Valves are in OFF position. - Page 11 Step 6 Center Lid goes on first. Step 7 Lift up on Right Side Shelf to remove from grill and fold in flaps as shown. Step 8 Place folded up Right Lid (Shelf) on grill. IMPORTANT: Make sure Lid fits into Channel on Center Lid.
-
Page 12: General Use And Correct Burner Flames
WARNING After each time the grill is set up or moved, and before lighting the grill, verify that the Valve Orifices are properly located inside the six openings to the Burners. One View Port for each of the six Valve Orifices is located underneath the grill as shown in Fig. -
Page 13: Storage
Store grill in a dry, clean and safe place. Maintenance WARNING • BURN HAZARD • Do not touch or attempt any maintenance on grill for at least one hour after use. • Make sure all controls are off and propane tank has been removed before doing maintenance. -
Page 14: Replacement Parts List
Replacement Parts 9995 Event Grill Parts List Part No. Description 9943-1501 Control Knobs w/graphics 9990-5481 Castors w/lock (2) 9995-1191 Heat Tent w/hardware 9995-1511 Cooking Grate 9995-1551 Igniter Switch w/wires 9995-1571 Bumpers w/hardware 9995-2021 Burner w/hardware 9995-2051 End Lid 9995-2161 Grease Pan... - Page 15 Notes...
-
Page 16: Warranty
The Coleman Company, Inc. • 3600 N. Hydraulic • Wichita, KS 67219 U.S.A. Coleman ® and HOW TO OBTAIN WARRANTY SERVICE Take the product to an authorized Coleman service center.
Need help?
Do you have a question about the 9995A Series 9995A700 and is the answer not in the manual?
Questions and answers