Advertisement
Quick Links
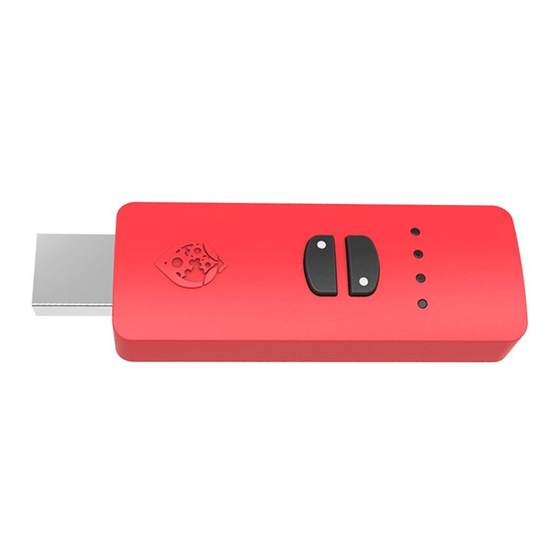
Switch Up
M anual V1.2
TM
For videos and tutorials and more information about the Switch Up
TM
device please visit:
https://www.switch-up.ca
WARNING: READ THIS BEFORE
ATTEMPTING TO USE YOUR SWITCH UP
DEVICE
BEFORE YOU CONNECT THE SWITCH UP
TM
DEVICE TO THE SWITCH
TM
DOCK, YOU
MUST NAVIGATE TO THE SWITCH
TM
"SYSTEM SETTINGS" AND SET "PRO
CONTROLLER WIRED COMMUNICATION" TO "ON". Not doing so will result in an
"Error Code 2011-0301", requiring you to disconnect the Switch Up
TM
from the console,
then reboot the Switch
TM
, and then change the setting to "ON". You can now plug in
your Switch Up
TM
and enjoy without issue.
Advertisement

Related Manuals for Collective Minds Switch Up


Summary of Contents for Collective Minds Switch Up
- Page 1 Switch Up M anual V1.2 TM For videos and tutorials and more information about the Switch Up TM device please visit: https://www.switch-up.ca WARNING: READ THIS BEFORE ATTEMPTING TO USE YOUR SWITCH UP ...
- Page 2 The “Controller and Sensors” setting for the Pro Controller Wired Communication must be set to “ON”. ...
- Page 3 This error will occur if the Pro Controller Wired Communication is set to “OFF”. You are now required to disconnect the Switch Up TM from the Switch TM console and then reboot the Switch TM console. Now go to the “Controller and Sensors” settings and then from the ...
-
Page 4: Initial Setup
Before using the Switch Up TM device, it is important to make sure your device is updated. TM To do this download the Collective Minds Updater software below and use the application to update your Switch Up TM... - Page 5 Plug in your S witch Up TM device into an open USB port. Once the S witch Up device is detected, click on the Device Name in the Update Tool. On the Firmware Selection screen simply click Continue. Your ...
- Page 6 MUST NAVIGATE TO THE SWITCH TM “SYSTEM SETTINGS” AND SET “PRO CONTROLLER WIRED COMMUNICATION” TO “ON”. Not doing so will result in an “Error Code 2011-0301”, requiring you to disconnect the Switch Up TM , then reboot the TM...
- Page 7 WIRELESS CONTROL: To use a wireless controller with your Switch Up TM you will have to first pair your wireless TM controller with the Switch Up device. Each controller has a simple wireless pairing ...
- Page 8 Xbox One TM Wireless Bluetooth Controller Pairing - Simply put your Xbox TM controller into sync mode and press the Bluetooth Sync button on your Switch Up TM device. Step by Step Instructions below. 1. Ensure your Switch Up...
- Page 9 4. Now press the Bluetooth pairing button on the Switch Up device. The LED will flash BLUE to show Bluetooth pairing has begun. 5. Within 30 seconds the LED will be WHITE on the Switch Up TM device and the ...
- Page 10 4. The player indicators at the bottom of the Switch TM Pro Controller will now begin to cycle. 5. Now press the Bluetooth pairing button on the Switch Up TM device. The LED will flash BLUE to show Bluetooth pairing has begun. ...
- Page 11 4. The player indicators at the bottom of the Wii U TM Pro Controller will now begin to cycle. 5. Now press the Bluetooth pairing button on the Switch Up TM device. The LED will flash BLUE to show Bluetooth pairing has begun. ...
- Page 12 TM controller into Bluetooth pairing mode by pressing the SYNC button until the player LED’s on it begin to cycle. 8. Now press the Bluetooth pairing button on the Switch Up TM device. The LED will flash BLUE to show Bluetooth pairing has begun. ...
- Page 13 IMPORTANT NOTE: REMEMBER THAT THIS IS A GLOBAL BUTTON SWAP. EVERYTHING WILL BE SWAPPED - ALL CONTROLLER TYPES, SWITCH UP TM MODES AND MODS WILL BE SWAPPED AS A RESULT! EVEN IF YOU UNPLUG AND PLUG IN ...
- Page 14 Take advantage of a simple to use menu system with classic style button codes to toggle the various mods. Use the Switch Up TM device to play Mario with Joy-Con TM /Switch...
-
Page 15: Master Reset
indicator). MASTER RESET MASTER RESET will RESET ALL MODS to their default state and button map for situations where you have lost track of what you have toggled ON. ENTER MENU MODE - HOLD the MINUS button (XB: VIEW / PS: SHARE) until the Mode Select LED turns ... - Page 16 MARIO MOD INSTRUCTIONS EASY DIVE Use the Easy Dive mod to make Mario dive while mid-air at will, without the hassle of tricky button combinations. The DEFAULT button that activates this mod is the L bumper, but it can be swapped to the R bumper. ...
- Page 17 EASY HATTY Use the Easy Hatty mod to make Mario cover distances to areas never before thought reachable with up to 2 throws of Mario’s hat. Mario will automatically jump onto the hat after throwing it each time. The DEFAULT button that activates this mod is the X button ▲...
- Page 18 EASY SWIM When the Easy Swim mod is ON, Mario will automatically and endlessly swim at maximum speed which avoids the headaches of timed button presses. When Mario enters the water: CLICK in the LEFT STICK button and the RIGHT STICK button TOGETHER at the same time to toggle ON Easy Swim, and you will feel a HEAVY ...
- Page 19 GROUND POUND + The Ground Pound + mod features a built in bounce for Mario to reach vertical heights that were previously unreachable. The DEFAULT trigger that activates this mod is the ZL trigger, but it can be swapped to the ZR trigger. ...
- Page 20 Step 4 PRESS the following D-Pad sequence: ↑ ← ↑ →. From top to TM bottom, the Switch Up will light up a GREEN Player LED as you enter the 4 button code. If you have begun entering the wrong code, wait for the Player LED's to shut off, and try again. ...
- Page 21 incorrectly, the Mode Select LED will light up YELLOW for a few seconds, and then you can try again. Step 6 PRESS UP D-Pad to toggle ON Frog Coin Generator. The Mode Select LED will now flash in sync with the 4 GREEN Player LED’s.
- Page 22 Step 4 PRESS the following D-Pad sequence: ← ← ↑ →. From top to bottom, the Switch Up TM will light up a GREEN Player LED as you enter the 4 button code. If you have begun entering the wrong code, wait for the Player LED's to shut off, and try again. ...
- Page 23 Step 4 PRESS the following D-Pad sequence: → ← ↑ →. From top to TM bottom, the Switch Up will light up a GREEN Player LED as you enter the 4 button code. If you have begun entering the wrong code, wait for the Player LED's to shut off, and try again ...
- Page 24 Step 2: From Menu Mode, you can now enter the specific code in sequence for the boss you are about to face. Step 3: As you are entering the 4 button code, from top to bottom, the Switch Up TM will ...
- Page 25 the same user. Mario will now be spawned at the correct positioning for starting the boss fight. Boss 14 Cookatiel is launched differently from the other bosses, as after entering the code your map will be opened, then you need to hover over the “Top of the Peak Climb” checkpoint flag, and finally PRESS the UP D-Pad to start the boss fight. ...
- Page 26 https://www.switch-up.ca/aut o-boss-battle?lightbox=dataIt Mollusque em-jo7tgwes9 Boss 12 ↓ ← ← ↑ Lanceur Seaside Kingdom https://www.switch-up.ca/aut o-boss-battle?lightbox=dataIt em-jo7tgwev Boss 13 ★ ↓ ← ← ↓ Spewart #2 Luncheon Kingdom https://www.switch-up.ca/aut o-boss-battle?lightbox=dataIt em-jo7tgwev1 Boss 14 ↓ ← ↑ ↓ Cookatiel ...
- Page 27 https://www.switch-up.ca/aut o-boss-battle?lightbox=dataIt Mushroom em-jo7tgwew9 Boss 25 ↓ → ↓ ↓ Cookatiel #2 Kingdom ♥ https://www.switch-up.ca/aut Ruined Dragon Mushroom o-boss-battle?lightbox=dataIt em-jo7tgwex Boss 26 ★ ↓ ↑ ← ↓ #2 Kingdom https://www.switch-up.ca/aut o-boss-battle?lightbox=dataIt em-jo7tgwex1 Boss 27-31 ↓ ↑ ↑ ↑ Boss Gauntlet ...
- Page 28 You can even Q UICK SAVE. Take advantage of a simple to use menu system with classic style button codes to toggle the various mods. Use the Switch Up TM device to play Zelda with Joy-Con TM /Switch...
- Page 29 PURPLE LED indicator / Resumed: LIGHT rumble Mode Select GREEN LED indicator). MENU MODE NAVIGATION NAVIGATION INFO Enter MENU MODE ENTER MENU MODE - HOLD MINUS button (XB: VIEW / PS: SHARE) until the Mode Select LED turns WHITE. Settings MENU MODE ...
-
Page 30: Quick Save
You MUST MATCH the Change Jump Button mode with your in game “Change Jump button” setting for the mods to function correctly. MODE JUMP button MODE OFF OFF; the Switch Up TM is MATCHED to “Change Jump Button: OFF”. ON ON; the Switch Up... - Page 31 LINK MODS ENHANCED WEAPON MODES Use the Enhanced Weapon Mode mods to provide you with significant advantages in combat. There are a few details you need to know first: ● You can ONLY have 1 Enhanced Weapon Mode selected at a time. ...
- Page 32 BOMB PARRY When the Bomb Parry mod is ON, you have the ability to parry Link’s bomb and explode enemies in front of Link without him taking any damage and only minor damage to his shield. Bomb Parry is very effective when Link is faced with overwhelming odds. T his mod is ONLY intended for the square remote bomb, as the circle remote bomb can ...
- Page 33 the Aim button during the sequence, and then RELEASE whichever button you are HOLDING when you want to shoot. While Link is swinging his weapon and before he jumps, to cancel an attack early and dodge in the desired direction, MOVE either LEFT, RIGHT, FORWARDS or BACKWARDS and CLICK in the LEFT STICK button. ...
- Page 34 spear weapon, then HOLD the Attack button and it will keep rapidly attacking until you RELEASE the Attack button. To cancel an attack early and dodge in the desired direction, MOVE either LEFT, RIGHT, FORWARDS or BACKWARDS and CLICK in the LEFT STICK button. Bomb Parry ...
- Page 35 INFINITE SPRINT When the Infinite Sprint mod is ON, take the pain out of traversing Hyrule as this mod allows Link to endlessly sprint while moving in any direction, without being affected by the in game stamina. By default, you MUST be HOLDING the Sprint button, but if you set it to “Infinite Sprint - Always Active”, this is no longer required (see both the important ...
- Page 36 default “Infinite Sprint - On Hold” and “Infinite Sprint - Always Active”. (DEFAULT: LIGHT rumble indicator / ALTERNATE: HEAVY rumble indicator). HORSE MODS AUTO HORSE When the Auto Horse mod is ON, you can again take the pain out of traversing Hyrule as this mod makes Link’s horse automatically sprint and it will replenish its stamina ...
- Page 37 EASY TAME & SOOTHE When the Easy Tame & Soothe mod is ON, it makes Link automatically tame or soothe a horse as fast as possible, which is an in game mechanic to build a relationship with the horse for better steering, or for taming a wild horse. ...
- Page 38 HORSE STAMINA REFRESH Use the Horse Stamina Refresh mod for a chance to reset your horse’s stamina. This mod is NOT designed to be used alongside Auto Horse, and it will simply toggle OFF Auto Horse, Infinite Sprint and Easy Tame & Soothe if any of these mods are active. Y ou MUST have a shield and a bow equipped. ...
- Page 39 SHARE) until the Mode Select LED turns WHITE. Step 4 PRESS the following D-Pad sequence: ↑ ← ↑ →. From top to bottom, the Switch Up TM will light up a GREEN Player LED as you enter the 4 button code. If you have begun entering the ...
- Page 40 SHARE) until the Mode Select LED turns WHITE. Step 3 PRESS the following D-Pad sequence: ↓ ← ↑ →. From top to bottom, the Switch Up TM will light up a GREEN Player LED as you enter the 4 button code. If you have begun entering the ...
- Page 41 OFF PRESS MINUS button (XB: VIEW / PS: SHARE) to toggle OFF Rupee Generator when you are done. The Mode Select LED will stop flashing and the 4 Player LED’s will shut off. You will be able to control your game again. ...
Need help?
Do you have a question about the Switch Up and is the answer not in the manual?
Questions and answers