Table of Contents
Advertisement
Advertisement
Table of Contents

Subscribe to Our Youtube Channel
Related Manuals for Zodiac NZO 600


Summary of Contents for Zodiac NZO 600
- Page 1 Owner's Manual Volume 2...
- Page 2 VOLUME 2 OWNER'S MANUAL DIVIDED INTO VOLUMES: - VOLUME 1 DEALS IN GENERAL WITH THE OPERATING PRECAUTIONS AND SAFETY RECOMMENDATIONS TO BE OBSERVED ON NOTE: BOARD THE BOAT AND ON THE WATER. - VOLUME 2 DEALS WITH TECHNICAL SPECIFICATIONS ASSEMBLY PROCEDURE BOAT EQUIPMENT.
-
Page 3: Table Of Contents
CONTENTS PAGE I - GENERAL DESCRIPTIONS -Technical characteristics table---------------------------------------------- -Technical characteristics description-------------------------------------- -Location of functional items------------------------------------------------- II - BUOYANCY CHAMBER -Installing the buoyancy chamber on the hull----------------------------- - Securing at the bow ----------------------------------------------------------- -Inflation system----------------------------------------------------------------- -Pressure-------------------------------------------------------------------------- III - PROPULSION SYSTEM IV - HOW TO DRIVE YOUR BOAT V - INSTALLATION AND CIRCUIT -Fuel--------------------------------------------------------------------------------... - Page 4 Zodiac Nautic cannot be held liable for modifications it has not approved. Always keep your boat fully maintained and take into account the deterioration which occurs over time or, if applicable, significant or inappropriate usage.
- Page 5 GENERAL INTRODUCTION Refer to Manual Volume 1: GUARANTEE GENERAL TERMS AND CONDITIONS CONTACT YOUR DEALER TO FIND OUT WHAT YOU CAN AND, MOST IMPORTANT, CANNOT DO. YOU COULD RISK YOUR WARNING SAFETY AND LOSE YOUR WARRANTY. The manufacturer shall assume no liability if the directives laid down in this manual are not complied with.
- Page 6 DESCRIPTION - Technical characteristics table TECHNICAL CHARACTERISTICS TABLE ZODIAC NZO 600 Dimensions (in meters) Meters Feet 5.99 19’8” Overall length 5.03 16’6” Inside length 2.54 8’4” Overall width 1.30 4’3” Inside width 2’ Buoyancy chamber diameter All dimensions indicated have a tolerance of +/- 2.5%...
- Page 7 DESCRIPTION - Technical characteristics table TECHNICAL CHARACTERISTICS TABLE ZODIAC NZO 680 Dimensions (in meters) Meters Feet 22’4” Overall length 5.82 19’1” Inside length 2.54 8’4” Overall width 1.30 4’3” Inside width 2’ Buoyancy chamber diameter Dimensions indicated have a tolerance of +/- 2.5%...
- Page 8 DESCRIPTION - Technical characteristics The maximum payload has been calculated according to ISO 6185 standard. Operating at or near maximum payload is only advised in calm water and at reduced speeds. Weight shown not including accessories The recommended power corresponds to optimum operation of the boat's capabilities for an average load.
- Page 9 Owner’s manual Volumes 1 & 2 Anchor + chain stopper • Foot pump • Picnic table (NZO 680) • Repair kit • Icebox * Theoretical capacity of the tank. For more information on available optional accessories, see your Zodiac Nautic dealer. Page 9/ 52...
- Page 10 DESCRIPTION - Technical characteristics GENERAL DESCRIPTION ASSOCIATED WITH THE WATERLINE Z 600 MLDC LOAD MLAC LOAD MOC LOAD 0.9m 0.89m 0.77m 1.56m 1.57m 1.7m 0.51m 0.52m 0.65m Z 680 MLDC LOAD MLAC LOAD MOC LOAD 0.87m 0.86m 0.83m 1.53m 1.55m 1.69m 0.51m 0.53m...
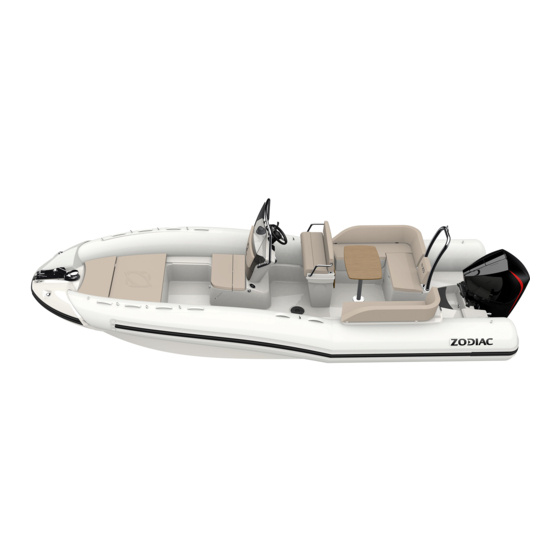
- Page 11 DESCRIPTION - Location of functional items Location of functional items NZO 600 options. Red/green bow light Hull drain hole Mooring bollards Inflation valves Bow roller Removable buoyancy chambers Anchor locker below upholstery Buoyancy chamber handles Forward locker under upholstery Rubbing strake...
- Page 12 DESCRIPTION - Location of functional items Location of functional items NZO 680 options. Red/green bow light Hull drain hole Mooring bollard Towing chain plates Bow roller Removable buoyancy chambers Anchor locker below upholstery Buoyancy chamber handles Forward locker under upholstery Rubbing strake Inflation valves Folding bathing ladder...
- Page 13 Location of functional items 5 6 7 8 Handle/handrail Bilge pump switch 12V connector Ventilation switch Steering wheel + hydraulic steering Navigation light switch Fuel filler cap Deck light switch (NZO 680) Bolster locker Glove compartment with 12V socket Cutting table Retractable work surface Sink (optional tap) Page 13/ 52...
- Page 14 DESCRIPTION - Location of functional items Red/green bow light Bow ring on the hull Forward mooring cleat Folding bow roller Page 14/ 52...
-
Page 15: Buoyancy Chamber -Installing The Buoyancy Chamber On The Hull
BUOYANCY CHAMBER – Installing the buoyancy chamber on the hull INSTALLING THE BUOYANCY CHAMBER The buoyancy chamber is delivered installed on the hull. Follow the instructions below when replacing the buoyancy chamber. NOTE: The buoyancy chamber is fitted to the hull with the buoyancy chamber deflated. -
Page 16: Securing At The Bow
BUOYANCY CHAMBER – Installing the buoyancy chamber on the hull - Repeat for the other side of the buoyancy chamber. - Bring the buoyancy chamber forward beneath the nose of the deck. - Once again, pull the buoyancy chamber as far aft as possible, entering the boltrope into the mini rail at the upper aft position. - Page 17 BUOYANCY CHAMBER – Inflation system INFLATOR a. adaptor b. tube nozzle c. tube connector d. inflation port * An electrical (12 V) high output inflator is available as an option. (Contact your dealer.) "EASY - PUSH" VALVES To change position In inflating position In deflating position Push...
- Page 18 BUOYANCY CHAMBER – Inflation system INFLATING THE BUOYANCY CHAMBER Activate all valves in the inflation position. Attach the hose connector to the inflator inflation port. To inflate your boat properly, the inflator should be correctly placed on the ground. The boat inflates rapidly if the inflator is used smoothly and without haste. DO NOT USE A COMPRESSOR OR COMPRESSED AIR CYLINDER.
- Page 19 BUOYANCY CHAMBER - Pressure CORRECT PRESSURE The correct pressure for the buoyancy chamber is 240 mb/ 3.4 PSI. Temperature of the surrounding air or Ambient temperature Pressure inside the water will proportionally influence the buoyancy tube level of internal pressure in the +1°C +4 mb / 0.06 PSI buoyancy tube.
-
Page 20: Propulsion System
IN CASE OF OVERPRESSURE EASY - PUSH VALVE Release air by depressing the valve plunger PROPULSION SYSTEM Comply with Zodiac Nautic's recommendations engine manufacturer's recommendations regarding engine assembly. For optimum use of your boat, seek advice from your dealer. Page 20/ 52... -
Page 21: How To Drive Your Boat
HOW TO DRIVE YOUR BOAT NAVIGATION Refer to Manual Volume 1 Before starting Battery switch set to ON, energised Fuel cock to ON. Put on and connect the circuit Ventilate for 4 Operate the starter. breaker* minutes * IF THE COXSWAIN FALLS OVERBOARD, THE IMMEDIATE STOPPING OF THE ENGINE CONSIDERABLY REDUCES THE RISKS OF SERIOUS OR FATAL INJURY CAUSED BY BEING RUN OVER BY THE DANGER... - Page 22 HOW TO DRIVE YOUR BOAT WHEN UNDERWAY, KEEP THE TANK ACCESS HATCH AND ALL LOCKERS CLOSED. BREAKING WAVES CAN POSE SIGNIFICANT DANGERS FOR WARNING STABILITY AND FLOODING. MAKE SURE THAT THE ANCHORING SYSTEM (ANCHOR AND BOW ROLLER) ARE CORRECTLY SECURED. WARNING Anchoring locker Bolster locker...
- Page 23 HOW TO DRIVE YOUR BOAT LIFTING THE ENGINE BEFORE REMOVING THE ENGINE FROM THE WATER, SWIVEL IT FULLY TO PORT. YOU RISK DAMAGING THE CABLES IF THE ENGINE IS ALIGNED WITH THE BOAT’S CENTRELINE OR WARNING POINTING TO STARBOARD. Operation in shallow water: When using the boat in shallow water, the outboard engine may be raised above the lifting range to avoid grounding.
-
Page 24: Installation And Circuit -Fuel
ITEM DESIGNATION REF. Fuel/water separator filter (supplied for single-engine configuration) Fuel tank (130 litres => NZO 600), (230 litres=> NZO 680) Filling hole Vent Fuel circuit closing valve Gauge transmitter Page 24/ 52... - Page 25 INSTALLATION AND CIRCUIT – Fuel FUEL SEPARATOR FILTER In order to protect the engine, a water / fuel separating filter is NOTE: placed on the engine’s fuel supply circuit. The water/fuel separator filter is located in the after locker on the starboard side (for a dual engine installation, contact your dealer to get you a second filter): ITEM REF.
- Page 26 INSTALLATION AND CIRCUIT – Fuel ITEM REF. DESIGNATION Filter head, secured to boat Replaceable filter cartridge IT IS VITAL TO REPLACE THE CARTRIDGE AFTER EVERY 50 HOURS OF USE. WARNING Page 26/ 52...
- Page 27 INSTALLATION AND CIRCUIT – Fuel CHANGING THE FILTER’S CARTRIDGE Follow ZODIAC’s recommendations and those of the filter’s manufacturer. Place a draining funnel under the position of the cartridge to be replaced. Before replacing the filter, the pressure in the fuel feed system must be released.
- Page 28 INSTALLATION AND CIRCUIT – Fuel RECOMMENDATIONS IN THE EVENT OF A PETROL LEAK OR A FIRE, THE PETROL CIRCUIT CLOSING VALVE LOCATED ON THE TANK ENABLES THE TANK TO BE CUT OFF FROM THE PETROL CIRCUIT AND MUST REMAIN CLOSED. DANGER HAVING A FULL TANK AVOIDS CONDENSATION APPEARING ON EACH OUTLET.
- Page 29 INSTALLATION AND CIRCUIT - Electricity SWITCHES REF NUMBER DESIGNATION Bilge fan Bilge pump Navigation light Deck lighting (NZO 680) Switch location Switch location Page 29/ 52...
- Page 30 INSTALLATION AND CIRCUIT - Electricity Battery switch Turn off the engine and all electrical equipment before closing the battery switch. The battery switch enables the supply to the console box to be cut off. THE BATTERY SWITCH MUST ALWAYS BE THE LAST SWITCH NOTE: TO BE CLOSED AND FIRST TO BE SWITCHED ON.
- Page 31 INSTALLATION AND CIRCUIT - Electricity FUSES The fuse box is located inside the console forward locker, against the console. (See box interior on page 39) Locker Console Fuses Page 31/ 52...
- Page 32 OFF (2). WHEN LYING AT ANCHOR, PUT THE BILGE PUMP SWITCH ON RECOMMENDATION AUTOMATIC MODE. ZODIAC RECOMMENDS THE USE OF A TARPAULIN OR NOTE: MOORING COVER IN ORDER TO PREVENT WATER INGRESS IN THE EVENT OF RAIN. Page 32/ 52...
- Page 33 INSTALLATION AND CIRCUIT - Electricity 1. Pump housing 2. Intake strainer Disconnect the grille, Clean the strainer/propeller of any debris liable to cause a blockage with hot soapy water. NAVIGATION LIGHTS Actuate this 3-position button to light the navigation lights. Off position.
- Page 34 VENTILATED ENVIRONMENT. ALWAYS PROTECT YOUR EYES WHEN WORKING CLOSE TO A BATTERY. If you do not plan to use your Zodiac® for a month or more, remove the battery and store it in a cool, dark and dry place. Fully recharge the battery before reusing it.
- Page 35 INSTALLATION AND CIRCUIT - Electricity GENERAL CABLE BUNDLE WIRING DIAGRAM Page 35/ 52...
- Page 36 INSTALLATION AND CIRCUIT - Electricity Page 36/ 52...
- Page 37 INSTALLATION AND CIRCUIT - Electricity FUSE BOX Page 37/ 52...
- Page 38 INSTALLATION AND CIRCUIT - Electricity OPTIONS Cigar lighter Bilge fan connector Miscellaneous Radio lighting Depth sounder Audio warning Miscellaneous electronic equipment Searchlight Shower pump Alarm system Max power 60W max. Refrigerator Σ 180W max. You must make sure that the total power of the accessories in column A you add is 180W (15A) or less AND that the max power of an accessory in column B is 60W (5A) or less.
- Page 39 INSTALLATION AND CIRCUIT - Draining WATER DRAINING ITEM REF. DESIGNATION Engine recess drain Deck self-bailer Page 39/ 52...
- Page 40 INSTALLATION AND CIRCUIT – Draining HULL DRAIN HOLE Out of the water (on trailer, cradle, etc.) OPEN POSITION, DRAIN HOLE REMOVED. Boat in the water, sailing or at anchor CLOSED POSITION, DRAIN PLUG FITTED. (MAKE SURE THE PLUG IS PROPERLY CLOSED) ITEM REF.
-
Page 41: Steering
INSTALLATION AND CIRCUIT - Steering STEERING A hydraulic actuator is supplied as standard with the boat. It is used in the single engine configuration. Comply with the steering manufacturer's recommendations (installation, use and maintenance). For optimum use of your boat, seek advice from your dealer. Page 41/ 52... -
Page 42: Firefighting
INSTALLATION AND CIRCUIT - Firefighting FIREFIGHTING WE RECOMMEND YOU KEEP AN EXTINGUISHER ON BOARD, AND COMPLY WITH THE LAWS APPLICABLE IN YOUR WARNING COUNTRY. DO NOT PLACE INFLAMMABLE MATERIAL CLOSE TO OR ABOVE COOKING EQUIPMENT. WARNING BEFORE ACTUATING THE EXTINGUISHER, STOP THE ENGINE AND THE FAN. - Page 43 INSTALLATION AND CIRCUIT - Anchoring/mooring DESCRIPTION OF ESSENTIAL FUNCTIONAL ITEMS ITEM DESIGNATION REF. Bow roller Anchor locker Bollard Chain plate THE CLEATS CAN ONLY BE USED FOR OCCASIONAL MOORING OF THE BOAT. WARNING FOR PERMANENT MOORING, USE THE CHAIN PLATE PROVIDED AT THE STERN.
-
Page 44: Handling -Storage
HANDLING - Storage STORAGE THE BOAT MUST REST ON THE KEEL (SEE SKETCH BELOW). WARNING NZO 600: Page 44/ 52... - Page 45 HANDLING - Storage NZO 680: Page 45/ 52...
-
Page 46: Lifting
HANDLING - Lifting TRANSPORT The trailer installation recommendations are specified in VOLUME I of the owner's manual. LIFTING The boat has no hoisting devices. ALL EQUIPMENT MUST BE UNLOADED FROM THE BOAT FOR LIFTING. BEFORE LAUNCHING THE BOAT, OPEN THE DRAIN HOLE TO WARNING DRAIN ANY RAINWATER FROM THE COCKPIT (CLOSE THE DRAIN HOLE AGAIN BEFORE LAUNCHING)) -
Page 47: Labelling
LABELLING DESCRIPTION OF SAFETY LABELS AND REGISTRATION PLATES Page 47/ 52... - Page 48 LABELLING 30 KNTS MAXIMUM MAKE SURE THAT THE LABELS ARE PRESENT AND LEGIBLE. CONTACT YOUR DEALER TO OBTAIN NEW ONES IF NECESSARY. Page 48/ 52...
-
Page 49: Location / Installation Of Optional Accessories
OPTIONS LOCATION / INSTALLATION OF OPTIONAL ACCESSORIES Audio pack: Example of the positioning of a 7" 16/9 GPS. Radio Secondary radio control Loudspeaker positions Canvas sunshade: Page 49/ 52... - Page 50 OPTIONS Synthetic teak deck: Shower + sink tap kit: Sink + tap Shower kit Water filling Shower Page 50/ 52...
- Page 51 OPTIONS Forward sun lounger: Electric windlass: Electric windlass Anchor, chain and chain stopper: Anchor Chain stopper Page 51/ 52...
- Page 52 OPTIONS Picnic table (NZO 680): Icebox: Icebox Page 52/ 52...
- Page 53 Manuel du Propriétaire Owner's Manual -Manuale del Proprietario Eignerhandbuch- Manual del propietario Tome 2 - Volume 2- Teil 2 - Tomo 2 N-ZO 600 680 ZT04103 Edition 5...
- Page 54 2 chemin de la Val Priout 31450 AYGUESVIVES FRANCE NZO 600-680 plan : 609020E Edition 5...
Need help?
Do you have a question about the NZO 600 and is the answer not in the manual?
Questions and answers