Advertisement
Quick Links
Note: This electrolarynx is designed to
increase intelligibility by giving you the
option to add prosody (i.e. NOT be
monotone). Please read all instructions to
learn all features, especially Sections 4 & 11.
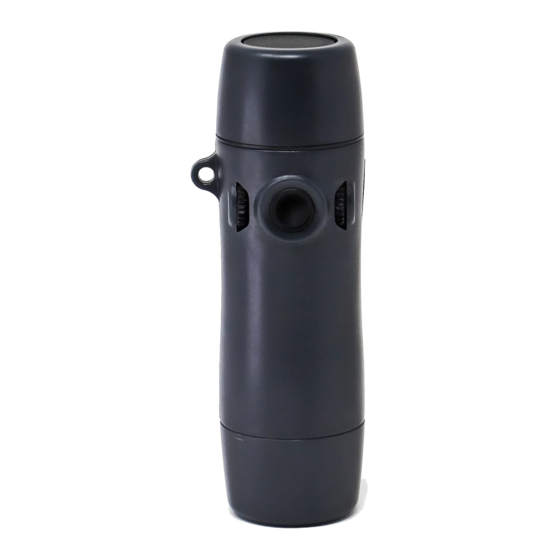
1.
A – Sound-Head (x2)
B – Sound-Head Spacer
C – Power Button &
Pressure Sensor
D – Volume Knob
E – Body
F – Battery
G – Battery Cap
H – Battery Connector
I – Oral Tube (2 + 2)
J – Oral Adapter
K – Tone (Pitch)
Adjustment Knob
LED – LED Indicator
Light
M – MODE Button
U – USB Dust Cover
V – USB Charge Jack
2. When Your Electrolarynx Arrives (Contents)
1. Adjust the Base-Tone and Mode (Section 4)
2. Choose your Sound-Head (Section 5)
3. Decide if the Sound-Head spacer is used (Section 5b)
4. Set the MODE (Section 6)
5. Charge your battery the first night you receive it, then once a week
(Section 7)
6. General Care/Troubleshooting (Section 8)
7. See tips on using an electrolarynx in Sections 9-10
8. Use the EMOTION™ Button to be more intelligible! (Section 11)
9. Get more out of your TruTone Plus (Section 12)
10. Warranty & Warnings are on the last page.
3. Volume Level
Set the volume by turning the Volume Knob (D). Do not force the knob.
Turn UP towards the Sound-Head for a higher volume. Turn DOWN
towards the battery cap to reduce volume. All the way DOWN is OFF,
which is handy when you do not want to accidentally activate the device.
4. Adjusting Tone
•
The Tone Adjustment Knob (K) is located to the left of the Power
Button.
•
Turn UP towards the Sound-Head Cap for a higher tone.
•
Turn DOWN towards the Battery Cap for a lower tone.
•
A TIP: Hold the power button down while you make your initial
adjustment.
5. Sound-Head
•
Optional Extra Sharp Sound-Head – (With the gray Sound-
Button) If you have hard neck tissue, the Sharp Sound-Head Cap has
a sharper sound, which may penetrate tissue better. This may also be
helpful if you work in a loud environment. This cap is not as smooth
sounding, so the voice may not be as pleasant.
5b. Sound-Head Spacer
•
If you regularly use a higher tone, you may remove the Sound-Head
Spacer (B); Unscrew the Sound-Head Cap, remove the Spacer, and
screw the Cap back on.
•
Test the device, listening to the tonal qualities. If you prefer the tonal
qualities without the spacer, be sure to store the Spacer in a safe
place, such as the box your device came with.
6. Setting the MODE:
The MODE Button is inside, under battery cap; the arrow on the battery
points towards the button. (NO TOOLS!)
NOTE: For users with a Legacy TruTone® electrolarynx, the MODE
button replaces the red Range adjustment.
6a. Changing modes:. To change the mode, press both the Mode button
and the Power button. (The timing is not critical.) The MODE changes
immediately, but if you continue to hold the Power button, the device will
beep to indicate the new MODE setting. The number of beeps and the tone
of the beeps indicate which mode it is in.
6b. MODES 1 & 2: Are like the original TruTone® electrolarynx, with
preset Ranges. Mode is nearly monotone,
hear a variation.
Mode 2 has an increased range on the button,
approximately 1/2 octave, depending on your tone setting.
7. Batteries & Charging
•
Use only approved Li-Ion Batteries.
•
Install Battery (F) as shown; it only fits one way. The Battery
Connector (H) alignment tab points up, with the red wire to the right.
•
Use until volume begins to fade, which is at 80% drained. You will
still have up to another week or more of battery life (depending on
your talk time), and battery life will be extended by the volume
reduction.
7a. Indicator Light, Battery Low:
The LED light turns on if the battery is 80% drained (or more) when you
press the Power button to let you know it is fully functioning, but
approaching time to charge.
7b. Charging
•
You may charge on a schedule, proactively; i.e. once a week, or once
every two weeks.
•
To charge, pull the USB Dust Cover (U) out at the top end, revealing
the USB Charge Jack (V).
•
Plug in a Micro-USB Cord into the USB Charge Jack (V).
•
Charger Specifications: 5v, 750mA minimum (or .75A minimum).
7c. Indicator Light, Charging:
•
When charging, the LED indicator light turns on solid.
•
When charging is complete, the LED indicator light flashes.
•
Unplug the unit when the charging is complete to conserve power.
8. General Care and Troubleshooting
1.
Cleaning – Wipe with a damp cloth. Do not use oils, electrical
contact cleaner, or other chemicals as they may cause damage.
Rubbing Alcohol is safe. Do NOT use a soaking wet cloth. Use of an
overly wet cloth may allow excess liquid to penetrate the device and
cause damage.
2.
Water Damage – Remove the caps and USB Dust Cover from the
Copyright 2020, Griffin Laboratories, Inc.
so if you are intentional, you will
GriffinLab.com
PL-00544 A, 08-17-2020
body and unplug the battery. Place into a sealed container with dry
rice for two days before testing.
3. Low Volume or Muffled Sound – Try using or removing the Sound-
Head Spacer. Charge the Battery.
4. Excessive Buzzing – Ensure you have a complete seal between the
device and the neck, all the way around the flat surface of the Sound-
Head. Try different positions. Adjust the tone and volume level. Try
the Oral Adapter.
5. Unsteady Tone – Try a MODE with a lower sensitivity
6. Oral Adapter Use – A sanitary cover, large finger cot, or even plastic
wrap is recommended for use with the oral adapter to keep the device
clean and moisture free.
9. Electrolarynx Neck Placement
•
Place the Sound-Head (A) against your neck and activate the power
button. Do not cover stoma.
•
Speak as sound is carried into your mouth. Do not force air out.
•
Ensure an airtight seal between the Sound-Head and your neck.
•
Try different positions until you get the best sound. NOTE: Even a
1/8" (3mm) position change can have a great impact on the sound
volume.
•
Try cheek placement, or use the oral adapter in cases of a tender neck
or excess buzzing.
9a. Neck Placement Tips
•
Adjusting the Base Tone up or down may produce a better voice.
•
Mid-Range tones are easier to hear for most people.
•
See Toubleshooting, section 8.3
10. Optional Oral Adapter and Oral Tubes
•
Insert Oral Tube (I) into top of Oral Adapter (J). Ensure the tube does
not protrude into the cap area.
•
Place Oral Adapter over Sound-Head (A).
•
Place Oral Tube into mouth, at corner of mouth.
•
Activate Electrolarynx. Speak around Oral Tube.
•
NOTE: The tube is optional! You may hold the device with the oral
adapter to the corner of your mouth!
10a. Oral Adapter Use Tips
•
The larger rigid Oral Tubes do a very good job of getting sound into
your mouth, but can be more difficult to speak around.
•
The soft clear Oral Tubes are easier to speak around, but may not get
as much sound into your mouth. If your tongue blocks the sound, you
may want to cut an angle on the end to prevent blockage.
•
You may hear excess "buzzing" (soft clear tubes). Try getting a better
seal between the Oral Adapter and the Tube. Remove the Oral Tube
from the Oral Adapter and push it back in again.
•
Practice talking with the Oral Tube. Form words around the tube
before turning on the electrolarynx.
•
A good position for many people is found by placing the tip of the
tube just behind your front teeth, and to one side, or toward the back
of the mouth just ahead of where the tongue touches the roof of your
mouth when you make the "G" sound (i.e. "GO").
11. Using the Pressure Sensitive EMOTION™ Button to increase
intelligibility—it's EASY!
WHY LEARN THIS? By increasing and decreasing pressure on the button
you will be able to add emotion to your speech. This can help your voice
sound more natural, and can help the listener understand you better, so you
will have greater intelligibility—a benefit proven in a study by the
University of Minnesota. Small changes in tone are enough to remove the
, 1-800-330-5969
Advertisement

Related Manuals for Atos TruTone PLUS Electrolarynx


Summary of Contents for Atos TruTone PLUS Electrolarynx
- Page 1 a sharper sound, which may penetrate tissue better. This may also be body and unplug the battery. Place into a sealed container with dry helpful if you work in a loud environment. This cap is not as smooth rice for two days before testing. sounding, so the voice may not be as pleasant.
- Page 2 Once you have the timing accurate, speak using the • Use caution when replacing the battery. Incorrect installation of the For more help, contact Atos Medical, Inc, or visit device. Practice this a few times. battery may result in a hazardous situation, such as extreme heat or http://TruToneEmote.com/Help.html...
Need help?
Do you have a question about the TruTone PLUS Electrolarynx and is the answer not in the manual?
Questions and answers
an electrolarynx we have is not working after being charged. the green light is flicking to say it is charged
The Atos TruTone PLUS Electrolarynx may not be working despite the green light indicating it is charged due to several possible reasons:
1. Low Volume or Muffled Sound – Try using or removing the Sound-Head Spacer, adjusting the tone and volume, or testing the Oral Adapter.
2. Excessive Buzzing – Ensure a complete seal between the device and the neck, adjusting its position for better contact.
3. Environmental Factors – Ensure the device is within the recommended operating conditions (+5°C to +25°C, 15% to 93% relative humidity).
4. Component Issues – Small parts may become dislodged, affecting function. Check for any loose or missing parts.
5. Water Damage – If exposed to moisture, place the device in a sealed container with dry rice for two days before testing.
If the issue persists, further troubleshooting or professional servicing may be required.
This answer is automatically generated