
Related Manuals for Proline P601IMCIXT


Summary of Contents for Proline P601IMCIXT
- Page 1 PROLINE CUISINIERE VITROCERAME P601IMCIXT MANUEL D'UTILISATION PROLINE REFRIGERATEUR BRF40 Besoin d'aide ? Rendez-vous sur votre communauté https://sav.darty.com...
- Page 2 P60 IMCIXT P60 IMCWHT Cuisinière électrique autoportante Freestanding Electric Cooker Vrijstaand elektrisch fornuis MANUAL DE INSTRUCCIONES...
-
Page 3: Table Of Contents
Table des matières AVERTISSEMENTS ......................... 2 INSTRUCTIONS IMPORTANTES DE SÉCURITÉ ................5 DESCRIPTION ..........................6 INSTALLATION ..........................7 Positionnement de la cuisinière ..................7 Mise à niveau de la cuisinière .................... 8 Installation des chaî nes anti-basculement et des crochets ......... -
Page 4: Avertissements
MERCI DE BIEN VOULOIR LIRE LES CONSIGNES DE SÉCURITÉ ATTENTIVEMENT AVANT L'UTILISATION DE L'APPAREIL ET DE LES CONSERVER POUR CONSULTATION ULTERIEURE. AVERTISSEMENTS Cet appareil est destiné à un usage domestique uniquement. Toute utilisation autre que celle prévue pour cet appareil, ou pour une autre application que celle prévue, par exemple une application commerciale, est interdite. - Page 5 MISE EN GARDE: Si la surface est fêlée, déconnecter l'appareil de l'alimentation pour éviter un risque de choc électrique. Lors de son utilisation, l'appareil devient chaud. Il convient de veiller à ne pas toucher les éléments chauffants à l'intérieur du four.
- Page 6 MISE EN GARDE: Risque d'incendie: ne pas entreposer d'objets sur les surfaces de cuisson. L’appareil ne doit pas être installé derrière une porte décorative pour éviter sa surchauffe. MISE EN GARDE: Les parties accessibles peuvent devenir chaudes au cours de l'utilisation. Il est recommandé d’éloigner les jeunes enfants.
-
Page 7: Instructions Importantes De Sécurité
ÉTUI CARTON BARQUETTE ET FILM PLASTIQUE À JETER À RECYCLER CONSIGNE POUVANT VARIER LOCALEMENT > WWW.CONSIGNESDETRI.FR INSTRUCTIONS IMPORTANTES DE SÉCURITÉ L’appareil doit être utilisé exclusivement à l’usage pour lequel il a été conçu conformément à ce manuel d'instructions. Le fabricant décline toute responsabilité liée à des dommages résultants d'un usage incorrect ou irresponsable. -
Page 8: Description
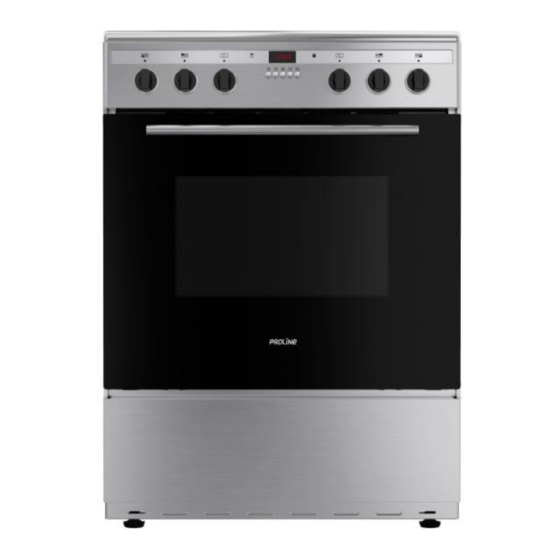
DESCRIPTION 1. Zones de cuisson à induction 2. Panneau de contrôle 3. Poignée de la porte du four 4. Porte du four 5. Tiroir de rangement 6. Pieds réglables Accessoires du four 1 grille : pour rôtir et griller des aliments Plateau : pour cuire de grandes quantités d'aliments, par exemple des gâteaux moelleux, des pâtisseries, des aliments congelés, etc. -
Page 9: Installation
INSTALLATION Les instructions suivantes doivent être lues par un technicien qualifié pour garantir que l'appareil est correctement installé, réglé et techniquement entretenu conformément aux réglementations actuelles. Important : Débranchez toujours la cuisinière de l'alimentation électrique pour effectuer un réglage, un entretien, etc. Positionnement de la cuisinière 600 mm minimum L'appareil peut être installé... -
Page 10: Mise À Niveau De La Cuisinière
Mise à niveau de la cuisinière Votre cuisinière est fournie avec 4 pieds pour niveler l'appareil sur un plan horizontal. Si nécessaire, ces pieds peuvent être vissés dans les coins du châssis de la base de la cuisinière. Installation des chaî nes anti-basculement et des crochets Pour éviter que la cuisinière ne bascule vers l'avant si un enfant monte sur la porte du four ou si les utilisateurs placent un poids extrême sur la porte ouverte, les deux chaî... -
Page 11: Branchements Électriques
50mm Paroi latérale du placard 50mm 2. Enfoncez la cheville d'expansion dans le trou, puis fixez le support anti-basculement au fond du placard en serrant la vis. 3. Poussez la cuisinière dans son emplacement en insérant solidement le pied gauche ou droit dans le support anti-basculement. Branchements électriques IMPORTANT ! Les branchements électriques doivent uniquement être effectués par un électricien qualifié... -
Page 12: Fonctionnement
FONCTIONNEMENT Lors de la première utilisation de la cuisinière, une odeur peut être émise, qui s'arrête après un certain temps d'utilisation. Cette odeur est due à l'enduit temporaire des éléments et liners du four, ainsi qu'à l'humidité absorbée par l'isolation. Veillez à... - Page 13 DESCRIPTION DE LA SURFACE DE CUISSON 1. Zone de cuisson à induction 1500W 2. Zone de cuisson à induction 2000W 3. Zone de cuisson à induction 1500W 4. Zone de cuisson à induction 2000W 5. Écran d'affichage de la puissance W de 0 à...
-
Page 14: Utilisation Du Four
DÉTECTION DES PETITS ARTICLES NON MAGNÉTIQUES Lorsqu'un ustensile de cuisson non magnétique (par exemple en aluminium) ou d'une taille inappropriée, ou un autre petit article (par exemple un couteau, une fourchette ou une clé) a été laissé sur une zone de cuisson, le symbole clignote et la zone se met automatiquement en veille après environ 1 minute. - Page 15 RÉGLAGE DE L'HORLOGE Pour activer l'utilisation du four, vous devez d'abord régler l'horloge au format 24 heures. Le four ne peut pas fonctionner tant que l’horloge n’est pas réglée. 1. Après avoir branché l'appareil, la lettre ‘A’ clignotera sur l'affichage. 2.
- Page 16 RÉGLAGES DU PROGRAMMATEUR / MINUTEUR DU FOUR Réglage de la durée de cuisson Sélectionnez la durée de cuisson pour allumer le four pendant une période donnée. À la fin de cette durée, le four s’éteindra automatiquement. La durée de cuisson programmable maximale est de 9 heures. Par exemple, si un plat a besoin de 2 heures de cuisson, vous pouvez régler le four afin qu'il s'éteigne deux heures plus tard.
- Page 17 9. Lorsque l'heure réglée de fin de cuisson sera atteinte, l'alarme retentira et le four s'arrêtera automatiquement. La lettre "A" clignotera. L'alarme peut être arrêtée en appuyant sur Pour annuler le réglage, appuyez simultanément sur et sur . La lettre "A" disparaî tra de l'affichage. Réglage du minuteur Le minuteur peut être réglé...
-
Page 18: Entretien Et Nettoyage
ENTRETIEN ET NETTOYAGE Avant de nettoyer le four, éteignez-le et débranchez-le de l’alimentation électrique et attendez qu’il ait complètement refroidi. Nettoyez l’extérieur de l’appareil avec un chiffon légèrement humide. Séchez-le intégralement. N’utilisez jamais de nettoyant chimique ou abrasif. Sortez la grille et le plateau. Lavez-les dans de l’eau savonneuse chaude. Rincez-les et séchez-les entièrement avant de les réutiliser. -
Page 19: Spécifications
SPÉCIFICATIONS Voici la fiche technique de la plaque de cuisson domestique conformément à la réglementation de l'Union européenne n° 66/2014 Numéro de modèle P601IMCIXT P601IMCWHT Type de plaque de cuisson Plaque de cuisson électrique Nombre de foyers et/ou de zones de cuisson Technologie de chauffe (foyers de cuisson et zones Zone de cuisson à... - Page 20 Exigences Ecodesign conformément au règlement UE N° 66/2014 Options Valeur Étape 1 Étape 2 Étape 3 mesurée 1 an après l'entrée 2 ans après l'entrée 5 ans après son entrée en 85.7 en vigueur < 146 en vigueur < 121 vigueur cavité...
-
Page 21: Mise Au Rebut
MISE AU REBUT En tant que distributeur responsable, nous accordons une grande importance à la protection de l’environnement. Nous vous encourageons à respecter les procédures correctes de mise au rebut de votre appareil, des piles et des éléments d’emballage. Cela aidera à préserver les ressources naturelles et à garantir qu’il soit recyclé d’une manière respectueuse de la santé... - Page 22 Table of Contents WARNINGS ........................2 IMPORTANT SAFETY INSTRUCTIONS ................5 OVERVIEW ........................6 INSTALLATION ....................... Positioning the Cooker ..................... 7 Levelling the Cooker ....................8 Fitting the Anti-tilt Chains and Hooks ............... 8 Electrical Connection ....................9 OPERATION ........................10 Using the Hob ......................
-
Page 23: Warnings
PLEASE READ THE FOLLOWING INSTRUCTIONS CAREFULLY BEFORE USING THE APPLIANCE AND KEEP FOR FUTURE REFERENCE. WARNINGS This appliance is intended for domestic household use only and should not be used for any other purpose or in any other application, such as for non-domestic use or in a commercial environment. - Page 24 WARNING: If the surface is cracked, switch off the appliance to avoid the possibility of electric shock. During use the appliance becomes hot. Care should be taken to avoid touching heating elements inside the oven. WARNING: The appliance and its accessible parts become hot ...
- Page 25 WARNING: Accessible parts may become hot during use. Young children should be kept away. The temperature of accessible surfaces may be high when the appliance is operating. The door should preferably be closed in all cooking modes. Do not hang any cloth or garment to the handle of the oven.
-
Page 26: Important Safety Instructions
IMPORTANT SAFETY INSTRUCTIONS The appliance should only be used for its intended purpose as described in the instruction manual. The manufacturer declines all responsibility for damage resulting from improper and irresponsible use. The appliance must be properly installed and grounded by a qualified technician. We will not be responsible for any damage that might be caused by failure to comply with these instructions. -
Page 27: Overview
OVERVIEW 1. Induction cooking zones 2. Control panel 3. Oven door handle 4. Oven door 5. Storage drawer 6. Levelling feet Oven accessories 1 Rack for roasting and grilling food Tray: for cooking large quantities of food such as moist cakes, pastries, frozen food etc. -
Page 28: Installation
INSTALLATION The following instructions should be read by a qualified technician to ensure that the appliance is installed, regulated and technically serviced correctly in compliance with current regulations. Important: Disconnect the cooker from the electricity when making any adjustment, maintenance operation, etc. Positioning the Cooker Min.60 cm. -
Page 29: Levelling The Cooker
Levelling the Cooker Your cooker is supplied with 4 feet for levelling the appliance. If necessary, these feet can be screwed into the housings in the corners of the cooker base. Fitting the Anti-tilt Chains and Hooks To prevent the cooker from tipping forwards in the event of children standing on the oven door or users putting extreme weight on the door when in open position, two supplied chains MUST BE fixed to the back of the cooker which should at all times be secured to the threaded hooks which are securely fixed to the wall. -
Page 30: Electrical Connection
Wall 50mm Cabinet side 50mm 2. Hammer the expansion plug into the hole, then fix the anti-tilt bracket to the cabinet bottom by tightening the screw. 3. Slide the cooker into place, ensuring that the left or right foot is securely slided into the anti-tilt bracket. -
Page 31: Operation
OPERATION When you operate the cooker for the first time, an odour may be emitted, this will cease after a period of use. This odour is due to temporary finish on oven liners and elements and also any moisture absorbed by the insulation. Ensure that the room is well ventilated (e.g. - Page 32 COOKING SURFACE LAYOUT 1. Induction cooking zone 1500 W 2. Induction cooking zone 2000 W 3. Induction cooking zone 1500 W 4. Induction cooking zone 2000 W 5. Power level display from 0-9 The cooking zone, up to a limit, automatically adapts to the diameter of the pan. To obtain the best efficiency of your hob, please place the pan in the centre of the cooking zone.
-
Page 33: Using The Oven
ERROR CODES These error codes are for guidance only and all faults should be diagnosed and repaired by a qualified technician. Display Possible causes Possible solution Contact the store where you have purchased the F3 – F8 Temperature sensor failure appliance. - Page 34 This function is suitable for cooking small Radiant grill quantities of food. This function is suitable for cooking large pieces Convention with fan of meat. This function is suitable for single traditional Conventional cooking. This function is suitable for casseroles, curries Bottom heat and any slow cooking.
- Page 35 4. Repeatedly press or press & hold to set the required length of cooking time. The display will show the letter ‘A’. 5. Press The display will show the sum of the current time plus the set cooking time. 6.
-
Page 36: Cleaning And Maintenance
CLEANING AND MAINTENANCE Switch off and disconnect the appliance from the power supply and allow it to cool completely before cleaning. Clean the outside of the appliance with a slightly damp cloth. Dry it thoroughly. Never use abrasive or chemical cleaning agents. Remove rack and tray. -
Page 37: Specifications
SPECIFICATIONS Below is the sheet of domestic hob according to EU regulation No. 66/2014. Model identification P601IMCIXT P601IMCWHT Type of hob Electric hob Number of cooking zones and/or areas Heating technology (induction cooking zones and Induction cooking zones and cooking... -
Page 38: Disposal
Freestanding cooker specifications: Rating / Supply Voltage and frequency 220V-240V~ 50 Hz - 60Hz Oven power 3000W 7000W: Hob power Left rear and right front: 2000W Left front and right rear: 1500W Oven lamp power Top heating element (W) 950W Grill heating element (w) 2000W Bottom heating element (W) - Page 39 Inhoudsopgave WAARSCHUWINGEN ..................... 2 BELANGRIJKE VEILIGHEIDSINSTRUCTIES ............... 6 BESCHRIJVING VAN DE ONDERDELEN ................7 INSTALLATIE ........................8 Het fornuis op een juiste positie plaatsen .............. 8 Het fornuis waterpas zetten ................... 9 De anti-kantelkettingen en haken installeren ............9 Elektrische aansluiting ..................10 BEDIENING ........................
-
Page 40: Waarschuwingen
LEES DE VOLGENDE AANWIJZINGEN ZORGVULDIG DOOR VOORDAT U HET APPARAAT GEBRUIKT EN BLIJF VOOR TOEKOMSTIG GEBRUIK. WAARSCHUWINGEN Dit apparaat is alleen bestemd voor huishoudelijk gebruik en mag niet voor andere doeleinden of toepassingen worden gebruikt, zoals niet-huishoudelijk gebruik of in een commerciële omgeving. - Page 41 WAARSCHUWING: Schakel het apparaat uit wanneer het oppervlak gebarsten is, om een mogelijke elektrische schok te vermijden. Het apparaat wordt heet tijdens de werking. Raak de verwarmingselementen in de oven niet aan. WAARSCHUWING: Het apparaat en de toegankelijke delen ...
- Page 42 Installeer het apparaat niet achter een decoratieve deur om oververhitting te vermijden. WAARSCHUWING: De toegankelijke delen kunnen tijdens de werking heet worden. Houd jonge kinderen uit de buurt. Tijdens de werking van het apparaat kan de temperatuur van ...
-
Page 43: Belangrijke Veiligheidsinstructies
BELANGRIJKE VEILIGHEIDSINSTRUCTIES Gebruik dit apparaat alleen waarvoor het is bedoeld, zoals beschreven in deze gebruiksaanwijzing. De fabrikant aanvaardt geen enkele aansprakelijkheid voor schade die het gevolg is van verkeerd en onverantwoord gebruik. Het apparaat moet door een vakbekwame technicus worden geï nstalleerd en geaard. We zijn niet verantwoordelijk voor enige schade veroorzaakt door het negeren van de instructies die in deze gebruikershandleiding zijn vermeld. -
Page 44: Beschrijving Van De Onderdelen
BESCHRIJVING VAN DE ONDERDELEN 1. Inductiekookvelden 2. Bedieningspaneel 3. Handgreep voor ovendeur 4. Ovendeur 5. Opberglade 6. Stelvoetjes Oventoebehoren 1 rekken Voor het roosteren en grillen van levensmiddelen Ovenplaat: voor het bakken van grote hoeveelheden levensmiddelen zoals cakes, gebak, bevroren levensmiddelen, etc. of voor het opvangen van vet/morserij van vleessappen. -
Page 45: Installatie
INSTALLATIE De volgende instructies moeten door een vakbekwame technicus worden gelezen om te verzekeren dat het apparaat volgens de geldende voorschriften wordt geï nstalleerd, geregeld en technisch wordt onderhouden. Belangrijk: Ontkoppel het fornuis van de voeding voordat u het afstelt, onderhoudt, reinigt, etc. -
Page 46: Het Fornuis Waterpas Zetten
Het fornuis waterpas zetten Het fornuis is voorzien van 4 voetjes om het apparaat waterpas te zetten. Indien nodig kunt u deze voetjes vastschroeven in de behuizing in de hoeken van de bodem van het fornuis. De anti-kantelkettingen en haken installeren Om te vermijden dat het fornuis naar voren kantelt wanneer een kind op de ovendeur staat of gebruikers overmatig veel gewicht op de deur plaatsen wanneer deze open is, MOETEN de twee meegeleverde kettingen aan de achterkant van het... -
Page 47: Elektrische Aansluiting
De anti-kantelbeugel aan de grond bevestigen 1. Boor een gat in de bodem van de kast. De afstand tussen het gat aan de zijkant van de muur of kast moet minstens 50mm zijn. 50mm Kastzijde 50mm 2. Hamer de plug in het gat, en maak de anti-kantelbeugel vervolgens aan de bodem van de kast vast door de schroef vast te draaien. -
Page 48: Bediening
BEDIENING Bij ingebruikname van het fornuis is het mogelijk dat een lichte geur wordt afgegeven, dit verdwijnt na enige tijd. Deze geur is te wijten aan een tijdelijke coating op de ovenpakking en -elementen en eventueel vocht dat door de isolatie werd geabsorbeerd. - Page 49 INDELING VAN HET KOOKOPPERVLAK 1. Inductiekookveld 1500 W 2. Inductiekookveld 2000 W 3. Inductiekookveld 1500 W 4. Inductiekookveld 2000 W 5. Weergave van vermogenniveau tussen 0-9 De kookvelden worden, tot een bepaalde grens, automatisch aangepast aan de diameter van de pan. Om de beste efficiëntie uit uw kookplaat te halen, plaats de pan in het midden van het kookveld.
-
Page 50: De Oven Gebruiken
DETECTIE VAN KLEINE, NIET MAGNETISCHE ITEMS Als een pan van een ongepaste grootte of een niet magnetische pan (bijv. aluminium) of een klein voorwerp (bijv. mes, vork, sleutel) op het kookveld wordt achtergelaten, knippert het symbool en gaat het kookveld na circa 1 minuut automatisch in stand-by. - Page 51 DE KLOK INSTELLEN Om de oven te kunnen gebruiken, stel eerst de klok in de 24 uur-notatie in. De oven zal bij inschakeling niet werken als de klok niet is ingesteld. 1. Eenmaal het apparaat op de voeding is aangesloten, knipperen en de letter ‘A’...
- Page 52 DE OVENTIMER INSTELLEN De kookduur instellen Selecteer de kookduur om de oven gedurende een bepaalde tijd in te schakelen. De oven wordt na het verstrijken van deze tijd automatisch uitgeschakeld. De maximale programmeerbare kookduur is 9 uur. Bijv. als een gerecht 2 uur moet koken, kunt u de oven instellen zodat deze 2 uren later automatisch wordt uitgeschakeld.
- Page 53 De timer instellen De afteltimer kan tot 23 uur en 59 minuten worden ingesteld. 1. Druk op Het scherm geeft weer en het symbool knippert. 2. Druk herhaaldelijk op of houd ingedrukt totdat de gewenste tijd wordt weergegeven. 3. Na ca. 3 seconden geeft het scherm opnieuw de kloktijd weer om aan te geven dat de instelling bevestigd is. ...
-
Page 54: Reiniging En Onderhoud
REINIGING EN ONDERHOUD Schakel het apparaat uit, haal de stekker uit het stopcontact en laat het apparaat volledig afkoelen voordat u het reinigt. Maak de buitenkant van het apparaat schoon met een licht bevochtigde doek. Veeg vervolgens grondig droog. Gebruik geen schurende of chemische schoonmaakmiddelen. Verwijder het rooster en de ovenplaat. -
Page 55: Technische Gegevens
TECHNISCHE GEGEVENS Hieronder vindt u de technische fiche van de huishoudelijke kookplaat overeenkomstig EU-verordeningsnr. 66/2014 Identificatie van model P601IMCIXT P601IMCWHT Type kookplaat Elektrische kookplaat Aantal kookvelden en/of -zones Verwarmingstechnologie (inductiekookvelden en Inductiekookvelden en kookzones -kookzones, stralingselementen, volle platen) Voor cirkelvormige kookvelden of -zones: diameter van Linksachter: 18 cm Auto bruikbaar oppervlak per elektrisch verwarmd kookveld;... - Page 56 Ecodesign-vereisten overeenkomstig het EU-verorderingsnr. 66/2014 Item Gemeten waarde Fase 1 Fase 2 Fase 3 1 jaar na de 2 jaar na de 5 jaar na de 85.7 inwerkingtreding inwerkingtreding <121 inwerkingtreding ruimte <146 <96 Specificaties van het vrijstaand fornuis: Voedingsspanning en frequentie 220V-240V~ 50 Hz - 60Hz...
-
Page 57: Verwijdering
VERWIJDERING Als verantwoordelijke handelaar dragen we zorg voor het milieu. We moedigen u aan om de juiste verwijderingsprocedure voor uw apparaat en verpakkingsmateriaal te volgen. Dit draagt bij tot het behoud van de natuurlijke rijkdommen door deze te recyclen zodat zowel de menselijke gezondheid en het milieu worden beschermd.
Need help?
Do you have a question about the P601IMCIXT and is the answer not in the manual?
Questions and answers