
Related Manuals for Minix NEO J50C-4 Max


Summary of Contents for Minix NEO J50C-4 Max
- Page 1 NEO J50C-4 Max INTEL PENTIUM SILVER MINI PC WITH WINDOWS 10 PRO (64-bit) PRE-INSTALLED English User Guide Ultra Compact Gemini Lake Mini PC [Intel J5005 CPU]...
-
Page 2: Specifications
Specifications Processor Intel Pentium Silver J5005 Intel UHD Graphics 605 Memory 8GB DDR4 (upgradeable to 16GB) Memory Slot 2 x SODIMM slot, support dual channel Storage Pre-installed 240GB SSD Storage Expansion 1 x 2280 M.2 slot (SATA 6Gbps) Wireless Connectivity 802.11ac Dual-Band Wi-Fi, Bluetooth 4.1 Operating System Windows 10 Pro (64-bit) - Page 3 Contents MINIX NEO J50C-4 Max 12V (3A) Power Adapter VESA Mount HDMI Cable...
- Page 4 Combining 240GB SSD pre-installed storage, 8GB of DDR4 memory and Windows 10 Pro (64-bit) ensures NEO J50C-4 Max is ready to run out of the box. A small solution packed full of big ideas. NEO J50C-4 Max can be easily mounted to a VESA compatible monitor, no tools are required for mounting once the included bracket has been installed.
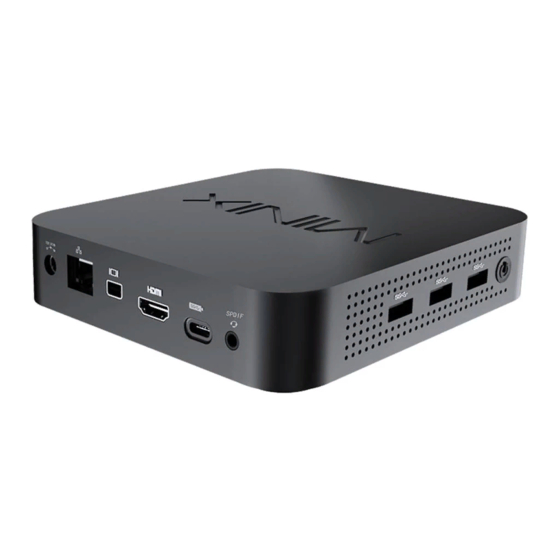
- Page 5 Overview Power LED - The LED glows blue when NEO J50C-4 Max is on. Power Button - To power on the NEO J50C-4 Max, press and hold the power button for 1-2 seconds until the power LED glows. To power off the NEO J50C-4 Max, press and hold the power button for 8 seconds.
- Page 6 HDMI Port - Connect the NEO J50C-4 Max via HDMI to a TV or PC monitor using included HDMI cable. Mini DP Port - Connect the NEO J50C-4 Max via Mini DP to a PC monitor. Pleae note, an active adapter is required to convert Mini DisplayPort output to HDMI/DVI output.
- Page 7 Control You may control NEO J50C-4 Max via one of the following input methods: 1. Wired mouse and keyboard 2. Wireless/Bluetooth mouse and keyboard We recommend using MINIX NEO W2.
-
Page 8: Basic Setup
Basic Setup NEO J50C-4 Max connects to your TV or PC monitor via either a Mini DP, HDMI or USB-C port. Mini DP and HDMI support both audio and video, USB-C only supports video output. Step 1 (if required): Place VESA mount bracket onto monitor. - Page 9 Step 4: Power on. Press and hold the power button for 1-2 seconds to power on NEO J50C-4 Max, the blue power LED should then glow. Step 5: Turn on TV/PC monitor and select the input. Simply turn on your TV or PC monitor, and select the...
- Page 10 MINIX Forum – www.theminixforum.com. NEO J50C-4 Max is fully compatible with our range of USB-C accessories, including USB-C to USB-C cable [NEO C-MUC] and USB-C to 4K @ 60Hz HDMI cable [NEO C-4K].
- Page 11 MINIX Technology Limited. MINIX and the MINIX logo are trademarks of MINIX Technology Limited. All other marks and trademarks are properties of their respective owners.
- Page 12 Note: This equipment has been tested and found to comply with the limits for a Class B digital device, pursuant to part 15 of the FCC Rules. These limits are designed to provide reasonable protection against harmful interference in a residential installation. This equipment generates, uses and can radiate radio frequency energy and, if not installed and used in accordance with the instructions, may cause harmful interference to radio...
- Page 13 Contact Us EMAIL: support@minix.com.hk WEBSITE: www.minix.com.hk MINIX FORUM: www.theminixforum.com FACEBOOK: www.facebook.com/minixtech www.minix.com.hk...
- Page 14 NEO J50C-4 Max INTEL PENTIUM SILVER MINI PC MIT VORINSTALLIERTEM WINDOWS 10 PRO (64-bit) Kurzanleitung Ultra kompakter Gemini Lake Mini PC [Intel J5005 CPU]...
- Page 15 Ausstattung Prozessor Intel Pentium Silver J5005 Intel UHD Graphics 605 Arbeitsspeicher 8GB DDR4 (erweiterbar auf 16GB) Steckplätze 2 x SODIMM slot, unterstützt dual channel Speicher Eingebaute 240GB SSD Speichererweiterung 1 x 2280 M.2 slot (SATA 6Gbps) Funkverbindung 802.11ac Dual-Band Wi-Fi, Bluetooth 4.1 Betriebssystem Windows 10 Pro (64-bit) Video Anschlüsse...
- Page 16 Beinhaltet MINIX NEO J50C-4 Max 12V (3A) Netzteil VESA Mount HDMI Kabel...
- Page 17 Kurzüberblick Danke, dass Sie sich für einen MINIX NEO J50C-4 Max entschieden haben. Der NEO J50C-4 Max ist ein ultra kompakter mini Desktop PC. Vollgestopft mit einer unglaublichen Ausstattung, liefert er eine Leistung weit über seiner kleinen Bauform. Ausgestattet mit 240GB SSD, 8GB DDR4 RAM und Windows 10 Pro (64-bit) ist der NEO J50C-4 Max sofort nach dem auspacken einsatzbereit.
- Page 18 10/100/1000Mbps. 12V DC Stromanschluss - Schließen Sie hier das mitgelieferte Netzteil an. Der NEO J50C-4 Max benötigt selbst nur ca. 1A im Betrieb. Das mitgelieferte Netzteil kann bis zu 3A liefern um sicherzustellen, dass zusätzlich angeschlossene Geräte, wie eine externe Festplatte,...
- Page 19 HDMI Ausgang - Schließen Sie eine Fernseher oder Monitor über das mitgelieferte HDMI Kabel an den NEO J50C-4 Max an. Mini DP Port - Verbinden Sie den NEO J50C-4 Max über den Mini Displayport mit einem PC Monitor. Beachten Sie, dass der NEO J50C-4 Max nur Mini DP auf D-Sub oder Mini DP auf Mini DP/DP unterstützt.
-
Page 20: Bedienung
Bedienung Sie können den NEO J50C-4 Max mittels einer der folgenden Arten bedienen: 1. Konventionell mit kabelgebundener Maus und Tastatur 2. Kabellose / Bluetooth Maus und Tastatur Wir empfehlen die Verwendung einer MINIX NEO W2. - Page 21 Schritt 1 (falls notwendig): Befestigen Sie die VESA Halterung am Monitor. 1. Schrauben einsetzen und anschrauben. 2. Sie können den NEO J50C-4 Max in jeder Richtung einsetzen. Schritt 2: HDMI Kabel anschliessen. Das eine Ende des Kabels kommt in den HDMI Port Ihres Fernsehers oder PC Monitors.
- Page 22 Eingangs betrieben werden. Auch in Verbindung mit verschiedenen mit USB-C ausgestatteten Monitoren. Nachdem das USB-C Kabel angeschlossen wurde, warten Sie bitte ca. 5 Sekunden bevor Sie den NEO J50C-4 Max in Betrieb nehmen. Schritt 4: Einschalten. Halten Sie den Taster für 1-2 Sekunden gedrückt, bis die LED blau leuchtet.
- Page 23 Eingangsleistung. Der USB-C Anschluss unterstützt nur 5V/3A Ausgangsleistung. ASUS MX27U und LG 27UD88 Monitore sind vollständig kompatibel mit dem NEO J50C-4 Max. Eine Liste mit weiteren kompatiblen USB-C Monitoren finde Sie unter www.theminixforum.com. Der NEO J50C-4 Max ist vollständig kompatibel mit den von uns angebotenen USB-C Zubehör wie USB-C auf USB-C...
- Page 24 Sprache übersetzt werden oder vergleichbares. Ausgenommen, die originale Ausführung liegt für den Kunden bei und der expliziten Genehmigung durch MINIX Technology Limited. MINIX und das MINIX Logo sind eingetragene Markenzeichen der MINIX Technology Limited. Alle anderen Markennamen, Produktnamen oder Marken gehören den jeweiligen Eigentümern.
- Page 25 Erklärung zur Frequenzstörung (Interference Statement) der amerikanischen Bundesbehörde Federal Communication Commission (FCC) Dieses Gerät wurde getestet und hält gemäß Teil 15 der FCC-Richtlinien die Grenzwerte eines Digitalgeräts der Klasse B ein. Diese Grenzwerte wurden entwickelt, um den Anwendern einen ausreichenden Schutz vor schädlichen Störungen in Wohnräumen zu bieten.
- Page 26 Kontaktiere uns EMAIL: support@minix.com.hk WEBSEITE: www.minix.com.hk MINIX FORUM: www.theminixforum.com FACEBOOK: www.facebook.com/minixtech www.minix.com.hk...
- Page 27 NEO J50C-4 Max MINI PC INTEL PENTIUM SILVER CON WINDOWS 10 PRO (64-bit) PRE-INSTALLATO Manuale Utente in Italiano Mini PC con Gemini Lake Ultra Compatto [Intel J5005 CPU]...
-
Page 28: Specifiche Tecniche
Specifiche Tecniche Processore Intel Pentium Silver J5005 Intel UHD Graphics 605 Memoria 8GB DDR4 (espandibile fino a 16GB) Slot Memoria Slot 2 x SODIMM, supporto al dual channel Archiviazione Memoria Integrata da 240GB SSD Espansione Archiviazione Slot 1 x 2280 M.2 (SATA 6Gbps) Connettività... - Page 29 Contenuti MINIX NEO J50C-4 Max Adattatore Alimentatore 12V (3A) Montaggio VESA Cavo HDMI...
- Page 30 Riepilogo Grazie per aver acquistato MINIX NEO J50C-4 Max. NEO J50C-4 Max è un mini PC desktop ultra compatto che ha un incredibile potenza, dando performance ottimali ben oltre la sua dimensione compatta. La combinazione di 240GB di memoria SSD integrata, 8GB di memoria DDR4 e Windows 10 Pro (64-Bit) permettono al NEO J50C-4 Max di essere subito utilizzabile.
- Page 31 Riepilogo LED Alimentazione - Il LED diventa blu quando il NEO J50C-4 Max è acceso. Tasto Alimentazione - Per accendere il NEO J50C-4 Max, tieni premuto il pulsante d’alimentazione per 1-2 secondi fino a che il LED di alimentazione si accende. Per spegnere il NEO J50C-4 Max, tieni premuto il pulsante di alimentazione per 8 secondi.
- Page 32 Porta HDMI - Collega il NEO J50C-4 Max alla TV o al monitor del PC via HDMI usando il cavo HDMI incluso in confezione. Porta Mini DP - Collega il NEO J50C-4 Max alla TV o al monitor del PC via Mini DP. È importante far notare che NEO J50C-4 Max supporta solo la conversione da Mini DP a D-Sub o la connessione Diretta da Mini DP a Mini DP/DP.
- Page 33 Controllo Puoi controllare il NEO J50C-4 Max tramite uno dei seguenti metodi di input: 1. Mouse e tastiera con cavo convenzionali 2. Mouse e tastiera Wireless/Bluetooth Suggeriamo l’utilizzo del MINIX NEO W2.
-
Page 34: Setup Base
Setup Base Il NEO J50C-4 Max si collega alla tua TV o monitor PC via Mini DP, HDMI o porta USB-C. Mini DP e HDMI supportano sia audio che video, la USB-C supporta solo l’output video. Step 1 (se necessario): Monta l’attacco VESA al monitor. - Page 35 NEO J50C-4 Max. Step 4: Accendi. Tieni premuto il tasto di accensione per 1-2 secondi per accendere il NEO J50C-4 Max, il LED blu di alimentazione dovrebbe quindi accendersi. Step 5: Accendi la TV/monitor PC e seleziona l’input.
- Page 36 USB-C sul forum MINIX – www.theminixforum.com. Il NEO J50C-4 Max è pienamente compatibile con la nostra gamma di accessori USB-C, incluso il cavo da USB-C a USB-C [NEO C-MUC] e il cavo da USB-C a HDMI 4K @ 60Hz...
- Page 37 MINIX Technology Limited. MINIX e il logo MINIX logo sono marchi di fabbrica di MINIX Technology Limited. Tutti gli altri segni o marchi di fabbrica sono proprietà dei rispettivi proprietari.Il contenuto di questa guida può...
- Page 38 Note: Questa apparecchiatura è stata testata e trovata conforme ai limiti di un dispositivo digitale di Classe B, conformemente alla parte 15 delle regole FCC. Questi limiti sono emanati per fornire ragionevole protezione contro interferenze dannose in un’installazione residenziale. Questa apparecchiatura genera, usa e può irradiare energia radioattiva e, se non installata e usata in accordo con le istruzioni, può...
- Page 39 Contattaci E-MAIL: support@minix.com.hk SITO WEB: www.minix.com.hk MINIX FORUM: www.theminixforum.com FACEBOOK: www.facebook.com/minixtech www.minix.com.hk...
- Page 40 NEO J50C-4 Max INTEL PENTIUM SILVER MINI PC CON WINDOWS 10 PRO (64-bit) PRE-INSTALADO Guía de usuario en Español Mini PC Gemini Lake [Intel J5005 CPU] Ultra Compacto...
-
Page 41: Especificaciones
Especificaciones Procesador Intel Pentium Silver J5005 Intel UHD Graphics 605 Memoria 8GB DDR4 (ampliable a 16GB) Slot de Memoria 2 x SODIMM, soporta dual channel Almacenamiento interno Memoria integrada de 240GB SSD Expansión de almacenamiento 1 x slot 2280 M.2 (SATA 6Gbps) Conectividad Inalámbrica 802.11ac Dual-Band Wi-Fi, Bluetooth 4.1 Sistema Operativo... - Page 42 Contenidoss MINIX NEO J50C-4 Max Adaptador de corriente de 12V (3A) Montaje VESA Cable HDMI...
- Page 43 Una pequeña solución llena de grandes ideas. El NEO J50C-4 Max puede ser fácilmente montado en un monitor compatible con el montaje VESA. Una vez instalado el soporte no es necesaria ninguna herramienta para montarlo.
- Page 44 LED de encendido - El LED se ilumina en azul cuando el NEO J50C-4 Max está encendido. Botón de Encendido - Para encender el NEO J50C-4 Max, pulse el botón de encendido durante 1-2 segundos hasta que el LED de encendido se ilumine.
- Page 45 Puerto HDMI - Conecte el NEO J50C-4 Max vía HDMI a un TV o un monitor usando el cable HDMI incluido. Puerto Mini DP - Conecte el NEO J50C-4 Max vía Mini DP a un monitor. Tenga en cuenta que el NEO J50C-4 Max solo soporta la conversión de Mini DP a D-Sub o conexión directa...
- Page 46 Control Puede controlar el NEO J50C-4 Max mediante los siguientes métodos de entrada: 1. Un ratón y teclado convencionales por cable 2. Un ratón y teclado inalámbricos o Bluetooth Le recomendamos usar los teclados y touchpads inalámbricos MINIX NEO W2.
-
Page 47: Configuración Básica
Paso 2: Conecte el cable HDMI. Conecte un extremo del cable HDMI al puerto HDMI en su TV o monitor y el otro extremo en el puerto HDMI del NEO J50C-4 Max. Los puertos Mini DP y USB-C pueden ser usados simultáneamente o por separado;... - Page 48 NEO J50C-4 Max. Paso 4: Encendido. Pulse el botón de encendido durante 1-2 segundos para encender el NEO J50C-4 Max, el LED de encendido se iluminará. Paso 5: Encienda su TV/monitor y seleccione la entrada correcta.
- Page 49 El puerto USB-C solo soporta alimentación de corriente de salida de 5V/3A. Los monitores ASUS MX27U y LG 27UD88 son totalmente compatibles con el NEO J50C-4 Max. En el foro de MINIX puede encontrar una lista completa de los monitores USB-C compatibles – www.theminixforum.com.
- Page 50 MINIX Technology Limited. MINIX y el logotipo de MINIX son marcas comerciales de MINIX Technology Limited. Todas las demás marcas y marcas son propiedad de sus respectivos propietarios.
- Page 51 Nota: Este equipo ha sido probado y cumple con los límites para un dispositivo digital de Clase B, de acuerdo con la parte 15 de las Reglas de la FCC. Estos límites están diseñados para proporcionar una protección razonable contra interferencias dañinas en una instalación residencial.
- Page 52 Contáctenos E-MAIL: support@minix.com.hk SITIO WEB: www.minix.com.hk MINIX FORUM: www.theminixforum.com FACEBOOK: www.facebook.com/minixtech www.minix.com.hk...
Need help?
Do you have a question about the NEO J50C-4 Max and is the answer not in the manual?
Questions and answers