Table of Contents
Advertisement
Advertisement
Table of Contents

Related Manuals for KETRON MIDJAY

Summary of Contents for KETRON MIDJAY
-
Page 3: Table Of Contents
• Output / Connections • Menu Controls • Controls • Power On Setup • Wave Playing Waves • Loading Songs Into the MIDJAY (USB) Wave Menu Connection Procedure and Use Common Functions The Manipulation of Wave Files • Hard Disk Recording... -
Page 4: Safety Instructions
AC Power Adaptor To connect the instrument to the wall socket you will need the supplied KETRON AC Power Adaptor. Use of other AC adaptors could result in damage to the instrument’s power circuit. So be sure to ask for the right kind. -
Page 5: Introduction
TURNING ON THE MIDJAY When you turn on the unit, the “MIDJAY” logo will be displayed for a couple of seconds while it boots up. Next the current Operating System release will be shown on the unit as well. The Operating System resides in flash and can always be updated to include new functions (as requested by our customers). -
Page 6: Output / Connections
MIDI In/Out/Thru: Output for MIDI connection toward devices equipped with this type of interfacing. USB: USB component for the connection of the MIDJAY to the Computer. This type of connection is recommended for the procedures of transfer and reorganization of Files. -
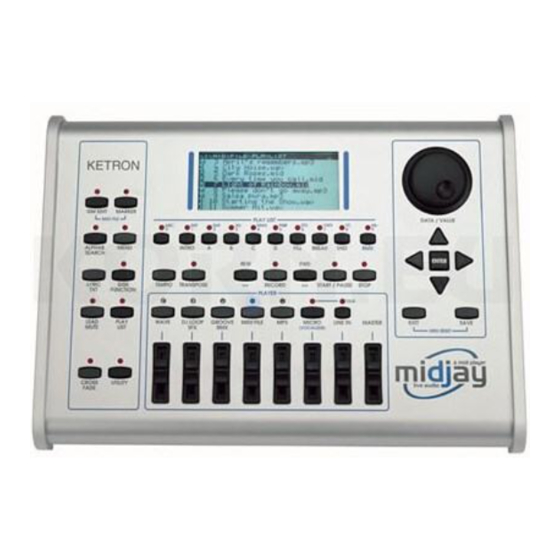
Page 7: Controls
CONTROLS The controls of the MIDJAY are clearly laid out for easy operation. The buttons on the left side of the unit are used for functions and in some cases, these functions will change depending on the current situation/use of the unit. - Page 8 Split point of the Arranger. [Record] This button is used to record all activity that happens on the MIDJAY in real time or record a signal coming in through the Line IN input jack. The File is stored as a Wave File directly onto the Hard Disk.
-
Page 9: Wave
Wave Files). The second column shows the number assigned to each File within the Folder as it was loaded into the Hard Disk of the MIDJAY. This makes searching for a File numerically easier (using the numbers 0-9)... if you remember the number that was assigned to the File in question. -
Page 10: Common Functions
Folders, will remain current in time. New Files, that are stored afterwards in the MIDJAY, will be added at the end, with progressive numbers and in alphabetical order, without changing the pre-existing list and numerical assignments. -
Page 11: The Manipulation Of Wave Files
Rather than ‘meeting the music’, why not have the music ‘meet you’ in the range you feel more comfortable with? Can this be done? With MIDJAY, yes it can. -
Page 12: Folder Auto Play Function
While working in “Transpose” Mode, press the Edit key. 4 sound processing Modes will appear. This is due to the fact that different sound results are obtained with different transposition materials. However... the choice is yours. Select the Mode with the Cursor keys and turn on the feature with Enter. It is possible to record the Wave on Hard Disc Recording with a modified transposer value. -
Page 13: Dj Loop/Groove/Effects (Sfx)
2. The top of the screen shows the Folder location “C:\SFX_LOOP” and it lists all the various Sub-Folders within this Master Folder. The first column shows the Folder-type sign. The second column shows the number assigned to each Folder/File as it was loaded into the Hard Disk of the MIDJAY. ∧... -
Page 14: Grooves
GROOVES When you select this Groove Folder, you will be brought to a screen showing you all the Groove Files within the Folder. Highlight and select the Groove you wish to listen to and press Enter to load the Groove. “Grv. Loading” will be displayed while the Groove loads. -
Page 15: Playing Midi Files
(You can use Folders to easily group and associate different kinds of Songs or artists for an example). The second column shows the number assigned to each File within the Folder as it was loaded into the Hard Disk of the MIDJAY. ∧ ∨... -
Page 16: Saving An Edited Midi File
MIDI information leaving the MIDJAY via the MIDI out ports to another MIDI device. • Edit [*]: This is used to access the “Voice Edit” screen to Edit the current Voice selected. The editable parameters include:- •... -
Page 17: Instantly Mute A Part From A Song Lead Mute
At the end of the procedure, press again the MIDI File key and the Stop key in order to complete the registration. 3. At this point, MIDJAY will show a display indicating that the executed File has been edited and that it needs to be saved (“File: ... has changed. Save changes?”). -
Page 18: More Functions Associated With Midi File Midi File Menu
Your real Drummer is locked in right there with you as you perform. 5. You can also toggle between the original Drum tracks of your MIDI File (Remix OFF) and those of MIDJAY (Remix ON), buy repeatedly pressing the Remix button as you perform. -
Page 19: Playing Mp3 Files
The top of the screen shows the Folder location “C:\MP3” and it lists all the contents of this Folder. The first column shows the type of File with a sign. The second column shows the number assigned to each File within the Folder as it was loaded into the Hard Disk of the MIDJAY. ∧... -
Page 20: Playback Of Multiple File Types (Multiplay)
1. Select and play a Wave File as shown above under “Wave Files”. The Wave LED stays ON. 2. As this File is playing, press the MP3 button to access the MP3 Folder on the Hard Drive of the MIDJAY (or MIDI File or any other). -
Page 21: Automatic Cross Fade
(in order to use the footswitch, it is necessary to enable the “Up Txt and Down Txt” features, in the Footswitch Menu). It is possible to view the Text File on the MIDJAY, even if the corresponding musical File is not playing. In such a case, please follow this procedure: 1. -
Page 22: Play List
This is considered as an instant Play List. Even though this list is retained in memory even when you move to other functions and back, if you do not save this list, it will be lost once the MIDJAY is turned OFF. -
Page 23: Editing A Play List
Better still you can (if using Wave Files) turn ON the Cross Fade button and have each Song automatically fade out while the new one fades in leaving the MIDJAY in control - at least for now! The Play List can also be controlled by the optional FS6 or FS13 Footswitch pedal. -
Page 24: Menu Controls
GM MIDI In: Use this Mode when playing MIDI Files or other MIDI data from an external Sequencer or software on a PC. Also use this if playing back Files on MIDJAY but using MIDJAY as the Master controller (via the MIDI Out connection) to control an external Sequencer or software. - Page 25 Connection with a KETRON Keyboard: 1. When using a KETRON SD1 Plus, SD1, XD or X Keyboard: To control the MIDJAY, it is important to set the MIDI Transmit Global value to 01. This will allow you to use a single channel to control both the Left [Style] and Right [Voices] parts of the MIDJAY unit with one Split point on the Keyboard.
-
Page 26: Power On Setup
This contrast value can also be saved on Power On Setup. • MASTER TUNE: This is used to ‘Tune’ the Voices of the MIDJAY to those of any other instruments being used at that time. The default value is 440Hz but this can be varied +/- 100 and also saved under the Power On Setup File (see Power On Setup below). -
Page 27: Loading Songs Into The Midjay (Usb)
MIDJAY and Save). • It would be wise to occasionally back up all the Songs within the Hard Drive of your MIDJAY to your Computer... just incase you need them some day. The BIN Files should also all be copied for should incase you want to return the MIDJAY to the factory settings, these Files will be needed to restore say the initial Voice settings of the MIDJAY. -
Page 28: Hard Disk Recording
7. When done, simply press the Record button once more to stop recording. Go back to the Wave Folder and look for the new File you just created and play it. Now sit back and watch MIDJAY go to work for you. All actions that you took during the Record Mode will now be played back, including all Files that were played as well. -
Page 29: Multi-Track Recording
2. For those who already have a great CD collection, you could connect your CD Player, Mini Disk or Disk- man directly to the MIDJAY’s Line IN (found on the left side of the unit) and while still playing those CDs, control the volume directly from the Line IN volume slider on the MIDJAY panel. -
Page 30: Voices
Cursor keys to select the Voice you wish to use for your performance. 5. To access the other Voices found on the MIDJAY, press the Exit button to toggle to the “Voice” screen which will display the other Voices grouped in to Voice Groups (e.g. all Piano Voices are within the “Piano Voice”... -
Page 31: Changing Voices Preset
A warning message will appear advising you if you want to overwrite the File “PROGRAMV.BIN”. This File is what keeps all the settings for the Voices currently within the MIDJAY. Select “OK” to save or “Cancel” to go back to the original Voice (without the new changes) and press Enter. -
Page 32: Styles
Split button (while the Style button is light), and changing the value with the Alpha Dial wheel. Note that due to the extremely large Hard Disk and with the new quick fast Disk operation, KETRON decided to eliminate the memory storage usually required to store a limited number of Styles or Patterns at any given time. -
Page 33: Other Style Functions
Left of the Split point of the Keyboard. • Highlight “Bass Lowest” and press Enter to select this (within 4 seconds). This allows MIDJAY to play just the lowest note that constitutes the Bass phrase. • Highlight “Balance” and use the Alpha Dial wheel to change its value. This value controls the value of the Left side, i.e. -
Page 34: How To Record On Computer A Sequence With Style And Voice Played In Real Time With Midjay
PLAYED IN REAL TIME WITH MIDJAY 1. Set the function Play Mode of MIDJAY to Keyboard. 2. Connect the MIDI Out of the MIDI controller to MIDI In of MIDJAY and the MIDI Out of MIDJAY to MIDI In of Computer. -
Page 35: Registrations
With an external Microphone attached to the Microphone input jack at the back of the MIDJAY and the balance on the side properly adjusted, you can sing or talk as you perform with the MIDJAY as well. If the optional Vocalizer is installed, you can even add more Voices as you sing with the unit. -
Page 36: Disk
DISK The MIDJAY Disk control is similar to that used by common PC-based programs. This type of control allows you to Copy, Move, Delete, Rename, and, furthermore, it allows you to create New Folders. COPYING FILES FROM FLOPPY DISKS TO HARD DISK 1. -
Page 37: Renaming Files On Hard Disk
RENAMING FILES ON HARD DISK 1. Choose the Folder in which you intend to rename the Files; enter its content by pressing Enter. 2. Press Disk. 3. Select a File to rename and press Enter. (An arrow appears next to the selected Files). 4. -
Page 38: Updating The Midjay
USB Connected message disappears from the display. • Turn OFF and turn on again the MIDJAY. The instrument will display the message “New OS File has been found. Install?”. This prompt explains that a new Operating System has been detected and asks if it should be installed. -
Page 39: Technical Specifications (Release 2.0)
TECHNICAL SPECIFICATIONS (RELEASE 2.0) • Panel: Alpha Dial, 8 Volume slider controls, 40 direct easy access tabs. • Display: LCD 192 x 80 back-lit. Contrast control. • Wave Table: Over 240 Voices, 64 Presets, 22 Drum Sets, 72 Live Drums. GM standard. •...
Need help?
Do you have a question about the MIDJAY and is the answer not in the manual?
Questions and answers