
Related Manuals for Zodiac YACHTLINE 360


Summary of Contents for Zodiac YACHTLINE 360
- Page 1 Volume 2 YACHTLINE 360 / 400 611 133 A CAREFULLY READ THIS MANUAL BEFORE PUTTING YOUR ZODIAC INTO SERVICE.
-
Page 2: Table Of Contents
VOLUME 2 DESCRIPTION - BUOYANCY TUBE PROPULSION SYSTEM INSTALLATION AND CIRCUITS CONTENTS PAGE I - GENERAL DESCRIPTION I-1-Technical characteristics--------------------------------------------------------- 2 - 3 I-2-Inventory---------------------------------------------------------------------------- 4 - 5 I-3-Location of parts------------------------------------------------------------------ 6 - 7 I-4-Handling----------------------------------------------------------------------------- 8 - 10 II - BUOYANCY TUBE II-1-Major stages in fitting the buoyancy tube---------------------------------- II-2-Installing the buoyancy tube on the hull------------------------------------ 12 - 13... -
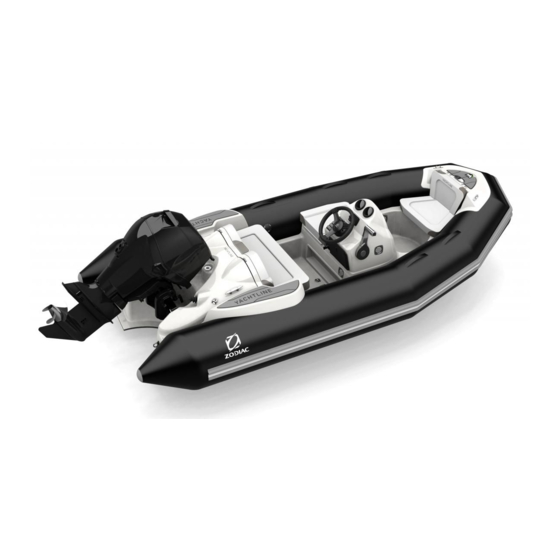
Page 3: I-1-Technical Characteristics
DESCRIPTION - TECHNICAL CHARACTERISTICS I-1-TECHNICAL CHARACTERISTICS Dimensions YL 360 YL 400 3.60 4.00 11’ 8” 13’ 1” (ft) 2.40 6’ 7” 7’ 10” (ft) 1.77 1.77 5’ 10” 5’ 10” (ft) 0.86 0.86 2’ 10” 2’ 10” (ft) 0.455 0.455 1’... - Page 4 DESCRIPTION - TECHNICAL CHARACTERISTICS NOTE Dimension tolerance: +/- 4% The maximum payload has been calculated according to ISO 6185 standards. We recommend that you exercise caution when the boat is at maximum capacity. The weights indicated do not include any accessories The recommended power corresponds to optimal use of the boat's NOTE capacities for an average load (4 people).
- Page 5 Seat with handles for the Yachtline 400 Page 5 / 31...
-
Page 6: I-2-Inventory
DESCRIPTION - INVENTORY I-2-INVENTORY HULL • Polyester hull • Counter-moulded, anti-slip deck • Added transom and "flap" hull shape • Console with storage • 1 bow ring • 1 anchor locker + locker forwards of the console (only on the 400 YL) •... - Page 7 DESCRIPTION - Inventory STANDARD EQUIPMENT • 1 Fixed tank (35 litres + fuel gauge transmitter + water/fuel separator) with vent and anti- overflow device • Navigation lights and deck lights • 1 battery tray • 1 battery isolation switch • Pre-fitted electric equipment to add extra accessories •...
-
Page 8: I-3-Location Of Parts
DESCRIPTION – LOCATION OF ITEMS I -3- LOCATION OF PARTS Page 8 / 31... - Page 9 DESCRIPTION – LOCATION OF ITEMS REF. DESCRIPTION Forward mooring cleat Navigation lights Front polyester step Anchor locker Console Switches Steering wheel Glove compartment Tilting aft seat Towing / mooring rings Transom Lifting rings Base of white light mast Aft anchoring cleats Tank filling system Tank maintenance access hatch Bow ring...
-
Page 10: I-4-Handling
DESCRIPTION - HANDLING I -4-HANDLING I-4-1 Transport: The trailer installation recommendations are specified in VOLUME I of the owner's manual. I-4-2 Storage: YL 360 (measurements in mm) The boat must rest on the bow line (see sketch below). WARNING Page 10 / 31... - Page 11 YL 400 (measurements in mm) The boat must rest on the bow line (see sketch below). WARNING Page 11 / 31...
- Page 12 DESCRIPTION - HANDLING I -4-3-Lifting: The lifting sling is available as an option; you must only use an AVON sling for lifting. WARNING These values are an example 1.25 1.45 360 YL 4’1” 3’3” 4’8” 4’6” (ft) 1.25 1.45 400 YL 4’1”...
-
Page 13: Ii-1-Major Stages In Fitting The Buoyancy Tube
BUOYANCY TUBE – COMMISSIONING II-1-FITTING THE BUOYANCY TUBE – MAIN STEPS When assembling the boat, it is important that you follow the procedure in the correct order. Proceed step by step, checking the reference pages for procedure explanations. PROCEDURE PAGE SECTION Inventory upon opening 1. -
Page 14: Ii-2-Installing The Buoyancy Tube On The Hull
BUOYANCY TUBE – COMMISSIONING II-2 INSTALLING THE BUOYANCY TUBE ON THE HULL IF THE BUOYANCY TUBE WAS STORED AT A TEMPERATURE BELOW 0°C / 32°F, LEAVE IT AT 20°C / 68°F FOR 12 HOURS BEFORE UNFOLDING. NOTE The buoyancy tube is fitted to the hull with the buoyancy tube deflated. - Page 15 BUOYANCY TUBE – COMMISSIONING Install the internal rubber guard Fix the internal protective flap After fixing the internal protective flap on the hull, pull the buoyancy tube gently towards the forward section in order to send the external protective flap over the forward nose (do not attach it at this point).
-
Page 16: Ii-3-Inflation System
BUOYANCY TUBE – INFLATION SYSTEM II -3-INFLATION SYSTEM INFLATOR a. adaptor b. tube nozzle c. tube base d. inflation valve "EASY - PUSH" VALVES To change position in inflating position in deflating position Push The membrane is closed, the The membrane is open, the plunger is up plunger is down BUOYANCY TUBE –... -
Page 17: Buoyancy Tube
BUOYANCY TUBE - PRESSURE INFLATING THE BUOYANCY TUBE • Place the adapter corresponding to the diameter of the semi-built in valve at the inflation pump hose nozzle. Inflate the buoyancy tube, balancing the pressure between the different compartments until the partitions (a) are no longer visible (pressure = 240 mb) Never put a compartment under pressure while the others are still fully... - Page 18 between the morning and evening in hot regions) and check that the pressure does not leave the recommended pressure zone (from 220 to 270 mb / green zone). LOW PRESSURE RISK: Example: Your boat is exposed to direct sunlight on the beach (temperature=50°C) at the recommended pressure (240 mb/3.4 PSI).
-
Page 19: Propulsion System
PROPULSION SYSTEM III - Propulsion system Comply with Zodiac's recommendations and with the engine manufacturer's recommendations. For optimal use of your boat, please consult your dealer. Page 19 / 31... -
Page 20: Iv-1-Fuel Installation
INSTALLATION AND CIRCUIT - FUEL IV-1-Fuel installation IV-1-1-Fuel tank The tank is located under the steering console: REF. DESCRIPTION Tank Outlet for fuel supply to the engine Filling hole Vent Overflow compartment drain hole Gauge transmitter "Overflow" compartment Filler cap with integrated vent Tank maintenance hatch It is vital to have a gauge dial. - Page 21 INSTALLATION AND CIRCUIT – TANK AND ACCESSORIES IV-1-2-Fuel/water separator filter In order to protect the engine, a water / fuel separating filter is NOTE: placed on the engine’s fuel supply system. The water/fuel separator filter is located in the aft locker, on the starboard partition: DO NOT UNSCREW REF.
- Page 22 The metal bowl can be reused. WARNING Changing the filter cartridge: Follow ZODIAC's recommendations and those of the filter manufacturer. IV-1-3-Recommendations: ENSURING THAT THE FUEL TANK IS FULL BEFORE EACH OUTING PREVENTS CONDENSATION FROM FORMING.
-
Page 23: Iv-2-Electrical Diagram
INSTALLATION AND CIRCUIT - ELECTRICITY IV -2-ELECTRICAL DIAGRAM Page 23 / 31... -
Page 24: Iv-3-Battery
Always protect your eyes when working close to a battery. IF YOU DO NOT PLAN TO USE YOUR ZODIAC® FOR A MONTH OR MORE, REMOVE THE BATTERY AND STORE IT IN A COOL, DARK AND DRY PLACE. Fully recharge the battery NOTE: before reusing it. -
Page 25: Iv-4-Storage Of Navigation Light Mast
INSTALLATION AND CIRCUIT – CONNECTION of options IV-4-STORAGE OF NAVIGATION LIGHT MAST To not damage the navigation light mast when closing the seat, always stow it as shown on the photo above. WARNING To facilitate fitting the mast in the fittings, you may use soapy NOTE water. -
Page 26: Iv-5-Connection Of Options
INSTALLATION AND CIRCUIT – CONNECTION of options IV -5-CONNECTION OF OPTIONS IV-5-1-Precautions: The boat is provided as standard with a bilge pump, navigation lights and a deck light. However, 4 locations remain available on the fuse box (under the console) for the connecting of additional accessories under certain conditions: ... - Page 27 INSTALLATION AND CIRCUIT – CONNECTION of options Example 1 You want to add: A 72 W VHF, A 36 W GPS, A 60 W radio, A 72 W cigar lighter, A 20 W clock. Miscellaneous Bilge fan lighting Miscellaneous Radio 60 W 20 W (clock) electronic equipment...
- Page 28 INSTALLATION AND CIRCUIT – CONNECTION of options Example 3 You want to add: A 60 W GPS, A 60 W radio, A 120 W horn. Miscellaneous Bilge fan lighting Miscellaneous Radio 60 W 120 W electronic equipment Depth sounder Shower pump ...
-
Page 29: Iv -6-Bilge Pump Operation
INSTALLATION AND CIRCUIT – CONNECTION of options IV -5-4-Connecting accessories on the console: Depending on the level of equipment of your tender, Zodiac recommends placing it in the following manner (see templates supplied with the boats) which optimises the space available. IV -6-BILGE PUMP OPERATION The bilge pump is not wired to the battery switch and operates independently;... - Page 30 6185-3 to ensure that all such installations do not invalidate the initial assessment. Also ensure that the subsequent installation of consoles and other structural elements not initially supplied with the boat is performed in accordance with the installation recommendations provided by the manufacturer and ZODIAC's recommendations. Page 30 / 31...
- Page 31 Z NAUTIC GROUP 2 chemin de la Val Priout 31450 AYGUESVIVES FRANCE YACHTLINE 360 - 400 Page 31 / 31...
Need help?
Do you have a question about the YACHTLINE 360 and is the answer not in the manual?
Questions and answers