Advertisement
Quick Links
(Moving) Clown and sea lion acrobatics : Assembly Instructions
h t t p : / / w w w. c a n o n . c o m / c - p a r k / e n /
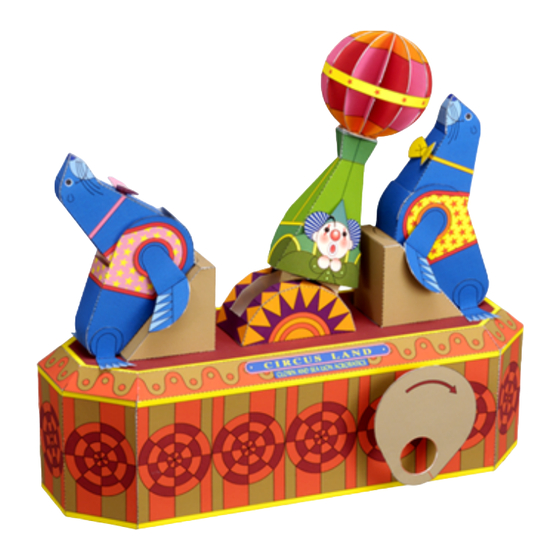
View of completed model
Assembly Instructions : Seven A4 sheets (No. 1 to No. 7)
* Build the model by carefully reading the Assembly Instructions , in the parts sheet page order.
*Hint: Trace along the folds with a ruler
and an exhausted pen (no ink) to get a sharper, easier fold.
Assembly Instructions
Mountain fold(dotted line)
Make a mountain fold.
Valley fold(dashed and dotted line)
Make a valley fold.
Scissors line(solid line)
Cut along the line.
Cut in line(solid line)
Cut along the line.
Scissors, set square, glue(We recommend stick glue), pencil, used
Tools and materials
ballpoint pen, toothpicks, tweezers, (useful for handling small parts)
Before gluing, crease the paper along mountain fold and valley
Assembly tip
fold lines and make sure rounded sections are nice and stiff.
Glue, scissors and other tools may be dangerous to young children
Caution
so be sure to keep them out of the reach of young children.
* When you turn the handle,
the sea lions flip the ball
resting on the clown's feet
back and forth to each other
continually in coordinated
motion.
Glue
The glue spot(colored dot)
shows where to apply the glue.
Glue spot(Red dot)
Glue parts with the same number together.
Glue spot(Green dot)
Glue within the same part.
Glue spot(Blue dot)
Glue to the rear of the other part.
©
Canon Inc.
Before starting assembly : Writing the number of each section on its back side
before cutting out the sections is highly recommended.
(* This way, you can be sure which section is which even after cutting out
the sections.)
Round bar : Use to give parts a curved surface.
Tweezers : Useful in working with fine parts.
Note
©
Hideharu Naitoh & unity design
Indicates where sections should
be glued together.
Indicates where to insert sections.
Do not glue the sections together.
Cut along the line.
Use care here.
Glue part 8 to the corner on the rear side
of part 9, matching the arrow on part 8
with the corner.
Roll part 6 into a cylinder and glue it in place
as shown in the illustration.
: At this stage, do not assemble these parts
into a box shape yet.
Advertisement

Related Manuals for Canon Paper Craft Clown and sea lion acrobatics


Summary of Contents for Canon Paper Craft Clown and sea lion acrobatics
- Page 1 (Moving) Clown and sea lion acrobatics : Assembly Instructions © Canon Inc. © Hideharu Naitoh & unity design Indicates where sections should Before starting assembly : Writing the number of each section on its back side be glued together. h t t p : / / w w w. c a n o n . c o m / c - p a r k / e n / before cutting out the sections is highly recommended.
- Page 2 (Moving) Clown and sea lion acrobatics : Assembly Instructions © Canon Inc. © Hideharu Naitoh & unity design Apply glue to the rear side Glue parts 11 and 12 to the rear side of part 10, on top of the cut-in line.
- Page 3 (Moving) Clown and sea lion acrobatics : Assembly Instructions © Canon Inc. © Hideharu Naitoh & unity design Parts Parts Parts Glue the other end of part 14 in place. Note : At this stage, do not assemble parts 1, 5, and 9, which you have already glued into place, into a box shape yet.
- Page 4 (Moving) Clown and sea lion acrobatics : Assembly Instructions © Canon Inc. © Hideharu Naitoh & unity design Note : Shape this piece so that the crank Reinforce the gaps from the outside will not become warped. Use a round bar to give this by using a scrap of paper or another piece a nice cylindrical shape.
- Page 5 (Moving) Clown and sea lion acrobatics : Assembly Instructions © Canon Inc. © Hideharu Naitoh & unity design Curl the clown. Parts Turn the handle at this point to check the movement. Assemble both of the two part 25s and glue them in place.
- Page 6 (Moving) Clown and sea lion acrobatics : Assembly Instructions © Canon Inc. © Hideharu Naitoh & unity design Reinforce the rear side of part 37 (48) in the positions shown Use a round bar or other utensil in the illustration.
- Page 7 (Moving) Clown and sea lion acrobatics : Assembly Instructions © Canon Inc. © Hideharu Naitoh & unity design Glue the sea lions' front and rear feet in place, looking closely at the photograph of the completed model to make sure you position them at the correct angles.