Table of Contents
Advertisement
Quick Links
Advertisement
Table of Contents

Related Manuals for Yolink YS3604-UC


Summary of Contents for Yolink YS3604-UC
- Page 1 YoLink Fob (FlexFob & AlarmFob) YS3604-UC Set-up & User Guide Rev 1.0...
- Page 2 Thank you for purchasing YoLink products and for entrus ng us with your smart home needs! Your 100% sa sfac on is our goal. If you experience any problems with se ng up your new YoLink Fob (FlexFob or AlarmFob), please give us a chance to assist you, before returning your purchase.
-
Page 3: Table Of Contents
····· ···················································· · · · ·· · ··1 Introduc on ······························································································ 2 · Set Up ····································································································· · · ·5 Using the YoLink App ···················································································9 About Garage Door Control With Fobs ························································15 Maintenance ······················································································· ····20 · Specifica ons ····················································································· ·····23 ·... -
Page 4: In The Box
A. In the Box A-1. YoLink FlexFob A. YoLink FlexFob B. Visor Clip & Wall-Mount Bracket C. Quick Start Guide A-2. YoLink AlarmFob A. YoLink AlarmFob B. Visor Clip & Wall-Mount Bracket C. Quick Start Guide... -
Page 5: Introduc On
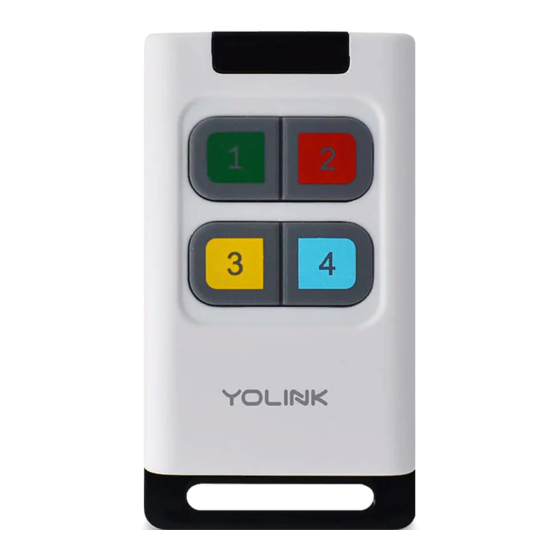
B. Introduc on B-1. FlexFob T h e Yo L i n k F l e x F o b i s a s m a r t r e m o t e t h a t c a n fl e x i b l y d e s i g n a c o n s * fo r e a c h b u o n t h r o u g h Yo L i n k a p p , c o n t r o l d e s i r e d a c o n s w i t h t h e Yo L i n k a p p o n y o u r s m a r t p h o n e o r t a b l e t o r u s i n g t h e a s s o c i a t e d b u o n o n t h e d e v i c e . - Page 6 B-2. AlarmFob T h e Yo L i n k A l a r m F o b i s a s m a r t r e m o t e w i t h f o u r p r o g r a m m a b l e b u o n s , e a c h c a p a b l e o f p e r f o r m i n g t w o p r e - s e t a c o n s * , a s d e fi...
- Page 7 The LED light indicates the current status of the YoLink Fob (FlexFob / AlarmFob): Blinking Red Once, Then Green Once Device Turned On Blinking Red And Green Alternately Restoring to Factory Defaults Blinking Green Once One-click/Long Press (0.5-2s) a Key...
-
Page 8: Set
C. Set Up C-1. Set Up - First-Time YoLink Users (Exis ng users proceed to C-2. Add Device, next page) Download the YoLink app through Apple App Store or Apple iPhone or tablet that is iOS 9.0 Google Play Store (Search in... - Page 9 C-2. Add Device Ta p “ ” b u o n , t h e n s c a n Q R C o d e o n t h e d e v i c e . F o l l o w t h e s t e p s t o a d d t h e d e v i c e Press any of the four bu ons once to turn on the device.
- Page 10 C-3. Device Placement a. Wall-moun ng: The wall-mount bracket D o n o t p l a c e t h e fo b o n o r n e a r allows for placing the fob on a wall or other s o u rc e s o f ex t re m e h e at o r co l d ver cal loca on (e.g.
- Page 11 c. Use the visor clip with the wall-mount bracket to place your fob on your car’s visor I n s e r t t h e fo b i n t o t h e b ra c ke t P l a c e t h e v i s o r c l i p o n t o y o u r c a r v i s o r (Bracket of...
-
Page 12: Using The Yolink App
D. Using the YoLink App D-1. Device Page - Tap to get device manual link, feedback, contact us informa on, etc. Details - Tap to go to Details page(refer to page 11) Ba ery Level of YoLink Fob Shown red if ba ery level is low... - Page 13 - Tap to get device manual link, feedback, contact us informa on, etc. Details - Tap to go to Details page(refer to page 11) Ba ery Level of YoLink Fob Shown red if ba ery level is low Control the Bu ons - There are two control methods: a.
- Page 14 Shown red if ba ery level is low l. Firmware Version - “#### ready now ” indicates a new update is available (refer to page 20) m. Remove Device From Current Account - Tap to delete the device from your YoLink account...
- Page 15 D-3. Edit the Bu ons You can assign a scene or automa on assigned to any of the four bu ons in the app, but you can not add the garage controller as an ac on. This is for safety reasons, to prevent accidental opera on of the door a.
- Page 16 D-4. Scene Go to the “Smart” screen (default view is “Scene” screen) There are four pre-set scenes, you can choose to either edit or delete each of them Swipe Le b. Add a scene c. Click to edit the scene b-1 Edit name 1.
- Page 17 ” in the upper le corner to go to My Profile Go to Se ngs > Third-Party Services and select the applicable service Follow the instruc ons, to authorize and add the connec on to your YoLink account Refer to the associated app or website for addi onal informa on specific to the third-party service.
-
Page 18: About Garage Door Control With Fobs
This is for safety reasons, to prevent accidental opera on of the door E-1. Pair YoLink Fob with YS4906-UC Garage Door Controller E-1-1. Pairing C h o o s e t h e f o b b u o n y o u w i l l u s e f o r a. - Page 19 P r e s s a n d h o l d t h e S E T b u o n o n t h e Yo L i n k F i n g e r f o r 5 - 1 0 s e c o n d s u n l t h e L E D q u i c k l y b l i n k s g r e e n .
- Page 20 E-1-3. Unpairing P r e s s a n d h o l d t h e a s s o c i a t e d b u o n o n t h e Yo L i n k F o b t h a t y o u p a i r e d w i t h a.
- Page 21 E-2. Pair YoLink Fob with YS4908-UC YoLink Finger (Garage Controller) E-2-1. Pairing C h o o s e t h e f o b b u o n y o u w i l l u s e f o r c o n t r o l o f t h e F i n g e r.
- Page 22 E-2-2. Opera on W h e n y o u p r e s s t h e a s s o c i a t e d b u o n , To avo i d i n j u r y o r d a m a ge , o n l y p re s s t h e Y o L i n k F i n g e r w i l l o p e r a t e ( i t w i l l t h e b u o n w h e n t h e g a r a g e d o o r o p e n o r c l o s e , d e p e n d i n g o n t h e c u r r e n t...
-
Page 23: Maintenance
F. Maintenance F-1. Firmware Update To ensure our customers have the best user experience, we highly recommend you update to the newest version firmware when an update is available In “Firmware”, if a new version is listed as available (#### ready now), click it to start the firmware update process The device’s firmware will be updated automa cally within 4... - Page 24 F-2. Factory Reset Factory reset will erase all of your se ngs and restore it to factory defaults. A er the factory reset, your device will remain in your Yolink account Holding the le bo om bu on for 20-25 seconds un l the status light blinks red and...
- Page 25 F-3. Replace the Ba eries R e m o v e Ta ke o u t t h e h a r d w a r e f r o m t h e t h e b a c k b a c k s h e l l , t h e n r e m o v e t h e t w o R e m o v e t h e s h e l l...
-
Page 26: Specifica Ons
G. Specifica ons Ba ery: 3V DC ( LR44 bu on ba eries Device Current Draw: ≤ 135mA (on), ≤ 2uA (standby) Environment: Working Temperature: -4°F - 122°F ( -20°C - 50 ) °C (op mal for 2+ year ba ery life: 50°F - 122°F (10 °C - 50 ) ) °C... - Page 27 Dimensions: Unit: inches (millimeters) 1.46 (37.0) 1.46 (13.0) 2.72 2.72 (69.0) (69.0) 2.83 (37.0) 0.51 (13.0) FRONT SIDE...
-
Page 28: Troubleshoo
- If Hub is offline, reconnect the Hub to the Internet and press the associated bu on on YoLink Fob once - If Hub is not on, power on the Hub again and the associated bu on on YoLink Fob once - If fob is out of range with Hub, reloca ng the Hub may be required... -
Page 29: Warning
I. Warning P l e a s e i n s t a l l , o p e r a t e a n d m a i n t a i n t h e Yo L i n k F o b o n l y a s o u t l i n e d i n t h i s m a n u a l . I m p r o p e r u s e m a y d a m a g e t h e u n i t a n d / o r v o i d t h e w a r r a n t y U s e o n l y n e w, n a m e b ra n d , L R 4 4 b u o n b a e r i e s Do not use zinc blend ba eries... - Page 30 I f y o u r Yo L i n k F o b d o e s g e t d i r t y, p l e a s e c l e a n i t b y w i p i n g i t d o w n w i t h a c l e a n , d r y c l o t h .
-
Page 31: Customer Service & Warranty
If you have any difficul es installing or using YoLink products, please contact our Customer Service department during business hours: US Live Tech Support: 1-949-825-5958 M-F 9am - 5pm PST Email: service@yosmart.com YoSmart Inc. 15375 Barranca Parkway, Ste G-105 Irvine, CA 92618, USA... - Page 32 FCC Cau on This device complies with part 15 of the FCC Rules. Opera on is subject to the following two condi ons: (1) This device may not cause harmful interference, and (2) this device must accept any interference received, including interference that may cause undesired opera on. Any Changes or modifica ons not expressly approved by the party responsible for compliance could void the user ’s authority to operate the equipment.
Need help?
Do you have a question about the YS3604-UC and is the answer not in the manual?
Questions and answers