Table of Contents
Advertisement
Quick Links
Advanced Paddle Keypad
FRM055
Package Contents
Advanced Paddle
Keypad
Using
Pre-drilled Holes
© UPLIFT Desk • 800-349-3839 • info@upliftdesk.com • upliftdesk.com
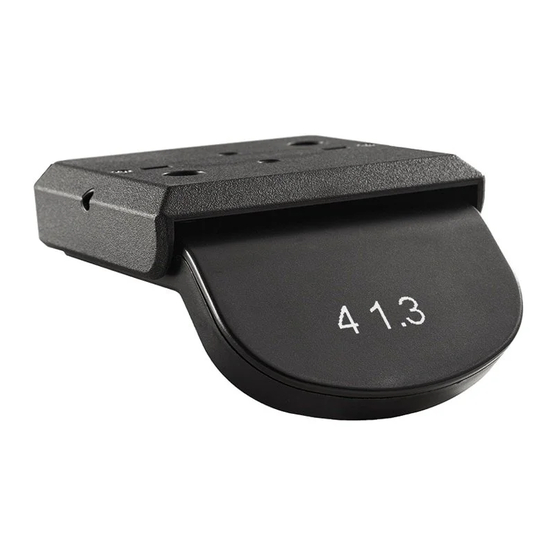
Mounting Plate
#10x5/8" Wood Screws
Without Using
Pre-drilled Holes
M4x10mm Machine Screws
(qty 4)
Step 1
Determine your mounting method. There are two
ways to attach the Keypad to your desktop:
Install Using Pre-drilled Holes: If you would like to
attach the Keypad to your UPLIFT Desk using the
pre-drilled holes on the front, left or right side, follow
the "Installation Using Pre-drilled Holes" instructions
(Step 2).
Install Without Using Pre-drilled Holes: If you do
not have an UPLIFT Desktop with pre-drilled holes or
choose to place the Keypad in a different location, fol-
low the "Installation Without Using Pre-drilled Holes"
instructions (Step 3).
Step 2 (Installation Using Pre-drilled Holes)
A. Line up the Mounting Plate with all four pre-drilled
holes and attach it with four #10x5/8'' Wood
Screws.
B. Do not over tighten to avoid stripping.
C. Skip Step 3 and proceed with Step 4.
Step 3 (Installation Without Using Pre-drilled Holes)
A. If you do not have an UPLIFT Desktop with pre-
drilled holes or choose to place the Keypad in a
different location, hold the Mounting Plate where
you would like to attach it.
B. Make a pencil mark on the desktop in the center of
each mounting hole.
C. Next drill a pilot hole at each pencil
mark using a 1/8" (or 3mm) diameter bit.
Note: DRILL NO DEEPER THAN 1/2".
To ensure this, we recommend wrapping
a piece of tape around your drill bit 1/2"
from the tip. Stop drilling just before the
tape touches the desktop.
D. Attach the Mounting Plate to the desktop using
the #10x5/8" Wood Screws. Do not over tighten
to avoid stripping.
Cable Mount
(qty 2)
(qty 3)
1/2''
Advertisement
Table of Contents

Related Manuals for Uplift Desk FRM055


Summary of Contents for Uplift Desk FRM055
- Page 1 Keypad to your desktop: Install Using Pre-drilled Holes: If you would like to attach the Keypad to your UPLIFT Desk using the pre-drilled holes on the front, left or right side, follow the “Installation Using Pre-drilled Holes” instructions (Step 2).
- Page 2 • Press down and hold one more time until the desk lowers slightly, rises and stops, then release the button. • Once the numeric height is displayed, the reset is complete and the desk is ready for use. © UPLIFT Desk • 800-349-3839 • info@upliftdesk.com • upliftdesk.com...
- Page 3 Paddle down and holding until the desk lowers then rises slightly. • Initial height reading for UPLIFT V1 & V2 Frames: 25.3’’ • Initial height reading for UPLIFT V2 Commer- cial Frame: 22.6’’ © UPLIFT Desk • 800-349-3839 • info@upliftdesk.com • upliftdesk.com...
- Page 4 C. When the number for your preferred setting ap- pears, release the Paddle. D. Complete the reset procedure by pressing the Paddle down and holding until the desk lowers then rises slightly. © UPLIFT Desk • 800-349-3839 • info@upliftdesk.com • upliftdesk.com...
- Page 5 Set the current height as the Upper Limit Set the current height as the Lower Limit Clear out the existing Upper and Lower Limit settings Go back to the main menu © UPLIFT Desk • 800-349-3839 • info@upliftdesk.com • upliftdesk.com...
- Page 6 Press Side Button to: Activate Vibration mode with one short pulse Activate Vibration mode with two short pulses Activate Vibration mode with three short pulses Deactivate Vibration mode Go back to the main menu © UPLIFT Desk • 800-349-3839 • info@upliftdesk.com • upliftdesk.com...
- Page 7 Perform Reset procedure on Page 1, Step 3. CAUTIONS & WARNINGS CAUTION: Read all instructions before assembly. Failure to assemble or operate properly may result in damage or personal injury. Retain manual for future reference. © UPLIFT Desk • 800-349-3839 • info@upliftdesk.com • upliftdesk.com 90.014.01.0469 v.C AI-FRM055-2.2...
Need help?
Do you have a question about the FRM055 and is the answer not in the manual?
Questions and answers