Table of Contents
Advertisement
Quick Links
Advertisement
Table of Contents

Summary of Contents for MicroStep Start Shaphon SH-HC31
- Page 1 Torch Height Controller SH-HC31 Manual Beijing Flourishing Start Control Technology Co., Ltd. Tel: 0086 10 8890 9235 Mobile (WhatsApp): 0086 159 0106 9532 Email: cuttingcnc@hotmail.com Skype: henryhaozq QQ: 297041476 Wechat: hzq123chat www.startsh.com...
- Page 2 Safety notice Please carefully read the manual before using the product. Safety operation Users must follow safety operation rules made by the country and the company. Mechanical danger Operation and repair of automation equipment are a little dangerous and are careful. Please be far away from the working equipment.
- Page 3 Guarantee period: within 12 month after leaving our company. Guarantee terms: during guarantee period any problems under normal operations. During guarantee period, we charge for out of guarantee terms. We charge for all problems out of guarantee period. Following situations are beyond guarantee: Any damage under abnormal operation or accident damage;...
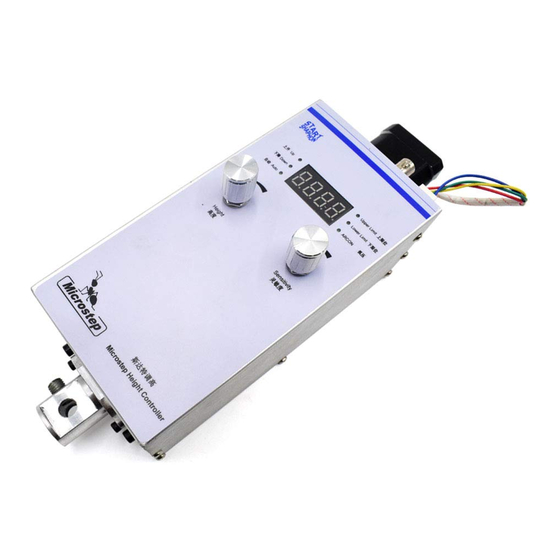
- Page 4 control and mechanical parts”, “stepper motor & driver” and “one-key calibration”, it adds new features as below, Knobs for height and sensitivity adjustment: it can statically and dynamically adjust the height and the sensitivity and save the result. The pulse adjustment knob has better lifetime and reliability than contact-type potentiometer.
- Page 5 Flame (capacitance)
- Page 6 connection SH-HC31 15-pin port definition Definition Instruction Arc voltage signal Connect arc voltage signal of plasma power source, input range DC0-5V. If plasma power source has no DC0-5V, then a voltage divider box needs to be connected. Arc voltage signal Connect arc voltage signal ground of plasma power source ground 7, 14 DC24V+...
- Page 7 Plasma/flame Connect output of CNC cutting controller or external switch, 24V signal, high level is plasma mode, low level is flame mode. Connect output of CNC cutting controller or external switch, 24V signal, low level is effective. down Connect output of CNC cutting controller or external switch, 24V signal, low level is effective.
- Page 8 The connection (plasma mode) of SH-HC31 and voltage divider box AHD1 If plasma power source is original arc voltage(1:1) , then connect –(20~200)V input. If plasma power source is 50:1 arc voltage, then connect –(0.1~5)V. And open the voltage divider box, break the jumper JP2 and connect JP1.
- Page 9 The connection (plasma mode) of SH-HC31 and the voltage divider box AHD2...
- Page 10 The connection (plasma mode) of SH-HC31 and the voltage divider box AHD3...
- Page 11 The connection (plasma mode) of SH-HC31 and the voltage divider box AHD4 If the plasma power is raw arc voltage, then connect to WK+ and ET-. And AHD4 only DIP 1 (100:1) is ON. If the plasma power is 50:1 arc voltage, then connect to WK+ and ET-. And AHD4 only DIP 3 (2:1) is ON.
- Page 12 The connection (flame mode) of SH-HC31 and CNC cutting controller CC-S3/CC-S3A The connection (plasma &flame mode) of SH-HC31 and CNC cutting controller CC-S3/CC-S3A...
- Page 13 An external relay is needed. Its coil connects pin 9 of CNC cutting controller. When change to plasma mode, pin 9 output is low, and the relay works for following purposes: 1. auto/manual signal, change from flame mode pin 21 to plasma mode pin 5. 2.
- Page 14 Sensitivity knob, adjust and set the sensitivity. In the plasma mode and the manual mode, press it for one-button location, the torch moves down, and touches the zero point switch, and then moves up to the location height and stops. In the flame mode and the manual mode, press it 2s for one-button calibration.
- Page 15 Flame mode 2-3 display and state LED display U: plasma mode, range 30~250 C: flame mode, range 3~30 E: sensitivity, range 1~10 b: initial location height/pierce, range 1~20mm H: maximum adjustment speed when auto cutting, 5~50...
- Page 16 L: initial adjustment speed when auto cutting, 1~20 P: up/down speed in manual mode, 20~80 d: auto adjustment speed ratio (the bigger the value is, more slowly the speed adjusts) Indicator lights Up: move up Down: move down Auto: in the auto mode. When the light off, in the manual mode Upper limit Lower limit Arc voltage: there is arc voltage signal input...
Need help?
Do you have a question about the Start Shaphon SH-HC31 and is the answer not in the manual?
Questions and answers