Table of Contents
Advertisement
Quick Links
Advertisement
Table of Contents

Summary of Contents for Ultraframe Classic roof
- Page 1 V18 | January 2021 CLASSIC ROOF INSTALLATION GUIDE...
-
Page 2: Table Of Contents
This guide is designed to make fitting as straightforward as possible. Before you commence installation of the roof, please; Ultraframe is rightly proud of its Classic roof. Over 1½ million Take a moment to read these two introductory pages before Classic roofs have been successfully installed over a 30 year reading the rest of this guide. - Page 3 TOOLS REQUIRED 8, 10, 13mm Deadblow Hammer No. 2 Pozi-drive Bit 5mm Wide Flat Hack Saw Drill/Screwdriver Long nose pliars Gasket Shears/ Socket Spanner or White Rubber Blade Screwdriver Snips Mallet 4.5mm Drill Bit Sealant Gun 2 x 5mm Allen Keys 17mm Open Spirit Level Tape Measure...
-
Page 4: Pre-Installation Checks
SECTION 1 PRE INSTALLATION CHECKS Unpack the roof vent sash and assemble, see section 2 page 5. At this stage do not fix the frames down - pin only to the house If possible, do this in the factory the day before. wall (one fix per side) to allow the conservatory to ‘float’. Take the glazing bars from the roof pack and check the anchor Attach the glazing bar end cap fixing blocks - as access restrictions clips are fitted (the clips are always at the top of the slope). On the (box gutter situations) may prevent easy attachment later. -
Page 5: Roof Vent Sash
SECTION 2 ROOF VENT SASH Unwrap the sash and pull two side sections out as shown above. Apply length of foam tape directly to the lower edge of the outer pane of the glass unit as shown. Start by applying the tape 70mm up the Remove any protective handling tape around the perimeter of the side of the glass unit and continuing to wrap around the lower edge unit prior to installation. -
Page 6: Main Assemblies - Overview
SECTION 3 MAIN ASSEMBLIES Ridge Assembly Glazing bar types Optional soaker sits in Pre-formed soaker Stepped flas To be used on duo-pitch roofs To be used starter bar Starter - Chambered Capping Georgian - Chambered Vic/Transom - Chambered The standard/default Saddle apron Horizontal fl To be used on l... - Page 7 SECTION 3 MAIN ASSEMBLIES Eaves Assembly Options Internal Frame/Setout Eaves beam packer to suit roof pitches 5°, 10°, 35° and 40° 5° packer 10° packer 35° packer 40° packer Standard Eaves Beam Super Duty Eaves Beam For all eaves beam details e.g. bi fold support, super bolster and combination, see page 43. Valley Section...
- Page 8 BI-FOLD SUPPORT BEAM SECTION 4 GEORGIAN INSTALLATION FITTING GUIDE PRE-FITTING NOTES: 9mm fixing holes should be pre-drilled in the eaves beam 50mm in from each end of the bolster and at a maximum of 300mm centres. The bolts should be prefitted to the bolster and secured in place using flange nuts to prevent them moving out of alignment.
-
Page 9: Georgian Roof Installation
SECTION 4 GEORGIAN INSTALLATION FITTER TIP - VIC FIXING KIT 60mm frames 70mm frames In line NOT SUITABLE FOR ‘SUPER DUTY’ EAVES BEAM When using the Victorian Fixing Kit drill a 10mm hole through the base of the eaves beam and completely through the head of the window frame. Ensure that both sides of the 10mm hole are accessible for Allen key fixing. Use a 5mm Allen Key to tighten the fixings. The eaves beam should be fixed at 450mm centres and within 200mm of each corner. THIS IS THE RECOMMENDED FIXING METHOD If installing a Bi-fold Support or Combination eaves, please refer to the seperate bi fold support installation guide supplied. - Page 10 SECTION 4 GEORGIAN INSTALLATION Fig. 1 GUTTERING ASSEMBLIES NOTE: Fit all gu ering mo f l o to installing glazing bars Pre build up gutter assembly Position the external 90° gutter angle onto the eaves beam followed by any union/outlet. Then measure between Gutter brackets the insertion lines (clearly marked on Measure & fit all gutter brackets supplied with the kit at maximum 750mm centres and the union/outlets) and cut the gutters to...
- Page 11 SECTION 4 GEORGIAN INSTALLATION Assemble & cut gutter to size - If over 4000mm span then the Build up gutter assembly; gutter & 135° union. Snap the integral gutter must be split by a straight union. Insert gutter assembly and clips on the unions over the gutter and repeat similarly to step 2b rotate into position (see Step 2).
- Page 12 SECTION 4 GEORGIAN INSTALLATION Pre-formed soaker Stepped flashings (L & R) To be used on duo-pitch roofs To be used on duo-pitch roofs Saddle apron Horizontal flashing To be used on lean-to & Ultralite & above To be used on duo-pitch roofs the saddle apron on duo-pitch roofs Fit the pre-formed soaker trim to each starter bar (if pre-ordered).
- Page 13 SECTION 4 GEORGIAN INSTALLATION Ease back the jack rafter undercladding. Each jack rafter kit is supplied with a number of washers. Trial fit the jack rafter and check that the glazing platforms are level. Adjust if Continue to attach all the glazing bars using Now start on the jack rafters. The two part necessary by adding or removing washers the location plan provided to check each jack rafter kit will already be fitted to the...
- Page 14 SECTION 4 GEORGIAN INSTALLATION FIT CONSERVAFLASH It is at this stage that pre-foamed soaker Finally when all is level and plumb, use your Take the ‘soft touch’ hub weathering shield. and stepped flashing are fitted SEE PAGE thumb to push up all the lower wedge locks. It fits by lifting the flaps on the ridge rain The roof is now set.
- Page 15 22/09/2014 ULTRAFRAME (UK) LTD. ALL DESIGN RIGHT, COPYRIGHT & OTHER INTELLECTUAL PROPERTY RIGHTS IN & TO THE DESIGNS & INFORMATION & ANY CHANGES THERE TO & DEVELOPMENTS THERE OF BY ULTRAFRAME OR ANY THIRD PARTIES STATUS: SCALE: ARE OWNED BY AND/OR ASSIGNED TO ULTRAFRAME COMPLETELY.
- Page 16 SECTION 4 FIGURE 3 - APPLIES TO ALL ROOFS WITH 35MM GLAZING FOLLOW DASHED GUIDE ON PART FOLLOW DASHED GUIDE ON PART FOLLOW DASHED GUIDE ON PART FIGURE 4 - APPLIES TO ALL ROOFS WITHOUT A GLAZING BAR AT THE FINIAL POINT MIDPOINT This step allows glazing to run through when there is not a bar at the finial point.
- Page 17 SECTION 4 GEORGIAN INSTALLATION Now glaze the side frames before glazing the roof - this provides additional rigidity whilst working above. INSTALL TIE BARS(S) BEFORE GLAZING. The rain baffle should nestle neatly to form For each glazing bar, ‘snip’ two small cuts in a continuous weather tight joint. the weathering shield and then a horizontal cut to remove ‘flap’ which facilitates the top cap sliding under.
- Page 18 SECTION 4 GEORGIAN INSTALLATION Ensure the glazing end profile sits snugly Ensure the rain baffle upper leg is lifted pri- Knock the glazing bar top cappings on behind the grommet. Now, using the fixing or to fitting the top cappings. with a Deadblow hammer. Greater care provided screw down into the bar as shown. is needed in cold weather. Keep all trims Ensure clip offers maximum support to wrapped until they are needed.
- Page 19 SECTION 4 GEORGIAN INSTALLATION Carefully point the corners on each side of Seal around the top of each glazing bar top Seal around each glazing bar top capping the capping where the gaskets abut each capping where it meets the rain baffle. Next, where it meets the inner wall of the ‘soft other run a bead of sealant along the edge where touch’ moulded weathering shield.
- Page 20 SECTION 4 GEORGIAN INSTALLATION Screw the flashing trim to the ridge top Apply a generous amount of sealant to the cap through the screw port. Use a 4.2mm x back edge of the flashing trim. Offer up the complete ridge capping onto 13mm self drilling screw (not supplied). the roof.
-
Page 21: Speedlok Removal Sequence
SECTION 4 GEORGIAN INSTALLATION OPTION 2 30° 25° 20° 15° Attach tiebar / internal rose bracket with nut Using threaded rose button, attach ridge The internal radius end capping may re- and bolt provided. and cover end to bracket. quire trimming to suit pitch (pitch lines are marked on the reverse of the internal radius end capping). -
Page 22: Slimline Ridge
SECTION 5 SPEEDLOCK REMOVAL Gently pulling the bar away will automatically Turn the whole bar over, then insert the release the head of the speedlok. screwdriver blade under the lower wedge lock. Lift to allow the wedge to ride back over the serations to its original position. - Page 23 SECTION 6 SLIMLINE RIDGE The glazing end stops fitted earlier should be Ensure that glazing stops are pushed up the Ensure that the glazing end stops have been pushed away from the centre of the bar and glazing bar and are firmly located against the positioned correctly then screw down into the tucked under the gasket side of the glazing glazing end profile.
-
Page 24: Tie Bars
SECTION 6 SLIMLINE RIDGE Seal around the joint on the jack rafter capping Peel back protective film from weathering Press firmly down on the ridge end top cap until when complete. shield and position (adhesive face down) on it clicks into position on the ridge end. glass, locating around the ridge and the hip bars. - Page 25 SECTION 7 TIE BAR INSTALLATION Upper ridge cover Measure, cut and attach the horizontal Slide the upper ridge cover over the piece Now cut the PVCu conduit to length, taking threaded bars (ensure sufficient of vertical threaded bar, and insert into the care to make allowances for its inset into engagement of the bar into the brackets) –...
-
Page 26: Box Gutter Installation
SECTION 8 BOX GUTTER INSTALLATION Place eaves beam section – with Whilst ensuring that its level, drill through Box gutter foam to be cut back 70mm undergutter trim attached – onto the side the back edge of the aluminium at 600mm to enable the box gutter to sit flush on frames. -
Page 27: Box Gutter Jointing
SECTION 8 BOX GUTTER INSTALLATION Use the balance of the Gutterbond to back Seal the top and bottom edges of the alu- Before lifting into position, point any gaps at the front edge. minium box gutter, where it abuts the house assemble the fascia board wall. -
Page 28: Box Gutter Support
SECTION 8 BOX GUTTER SUPPORT BOX GUTTER STRAP 165mm box gutters These are supplied loose and MUST BE FITTED – they are a structural requirement of the roof. The straps must be installed within 75mm of glazing bar centres ( when measured from centre of the strap to the centre of the bar). To install these straps, simply `nip up` as shown. - Page 29 SECTION 8 RAISED BACK BOX GUTTERS Remove the box Offer the box gutter into position and insert Seal the top and bottom edges of the box gutter and drill the the anchor fixings that are appropriate for gutter and follow all other steps as per host wall where the substrate and tighten up.
-
Page 30: Chambered Box Gutter
SECTION 8 CHAMBERED BOX GUTTERS Apply silicone to end face of box gutter Lay the butterfly cleat over the Drill a 5.5mm hole and Seal the top and bottom edges of the box and point underneath adaptor back to the two captivated roofing bolts, then fix the ‘butterfly’... - Page 31 SECTION 9 VALLEY INSTALLATION Cut and re-fit the glazing support trim, Now run a continuous bead of suitable Using the location plan provided, assemble where the valley meets the eaves beam. silicone down the entire length of the the various glazing bars onto the valley. Use aluminium valley profile, at the point of the the washers and nuts provided to ensure a hinged connector in the centre.
-
Page 32: Half Ridge Installation
SECTION 9 VALLEY INSTALLATION 200mm lengths valley Measure dimension C then add A and B for Valley claddings shown in situ at the ridge. undercladding. These will act as templates overall length. Mark and cut the claddings. for top and bottom scribes. Use a ‘straight Repeat process for both left and right side. edge’ placed tight to the eaves fascia Push fit the claddings into position. -
Page 33: Ventilated Wallplate Installation
SECTION 11 VENTILATED WALL PLATE FITS TO INTERNAL FRAME The aluminium wallplate body has been Offer the wallplate up to the wall and Drill through the wallplate main body and cut to length to fit in between the side position it so that the top surface of the bolt directly through each carriage to suit the frames of the conservatory. -
Page 34: Gable Installation
SECTION 12 GABLE INSTALLATION OVER 15° USE THIS DETAIL Trial fit the gable beam and the eaves beam Fit the under gutter trim to each section of To secure the gable beam (see Vic Fixing ensuring the inside face is flush with the eaves beam and gable beam, position the Kit page 8), then at this stage the guttering inside face of the window/door frames. - Page 35 SECTION 12 GABLE INSTALLATION Notch for 70mm frames Place and support the ridge ensuring the Fit the starter bar top Take the gable end cap - notch if Using plastic pop rivets ridge is central to the gable frame. Place capping in position.
-
Page 36: Drop Valley Installation
SECTION 13 DROP VALLEY INSTALLATION As with a standard ‘P’ shape, assemble as To ensure the half is in the correct side-to- With the valley lowered into position (see much of the main Georgian (Or Victorian) side position, either attach the hipped end step 5, page 27) locate the short starter roof side as possible. -
Page 37: Bolstered Glazing Bars
SECTION 14 BOLSTERED GLAZING BARS The aluminium bolster is already Take the two part cladding, Next take each bolster end This is how the finished attached to the glazing bar, and attach each piece carefully to cap, simply plug into the PVCu arrangement should look. -
Page 38: Tie Bar Replacement Kit (Tbrk)
SECTION 16 TIE BAR REPLACEMENT KIT (TBRK) Where the eaves beam sits against the host masonry wall, it has a structural Each eaves corner (90°, 135° and 150°) is Two pilot holes already exist in the next moulding attached to the eaves beam. supplied pre-fitted with two standard cleats piece of eaves beam – drill two more at This has three fixing positions cast into it... - Page 39 SECTION 16 TIE BAR REPLACEMENT KIT (TBRK) The ridge body should ideally sit 20mm away from the house wall (or 12mm from Lay the butterfly cleat over the two Drill a 5.5mm hole either side and then fix the front plate), this allows the compression captivated roofing bolts. Fit the Georgian the ‘butterfly’ cleat into the head of the plate to evenly distribute ridge loads into...
-
Page 40: Wok
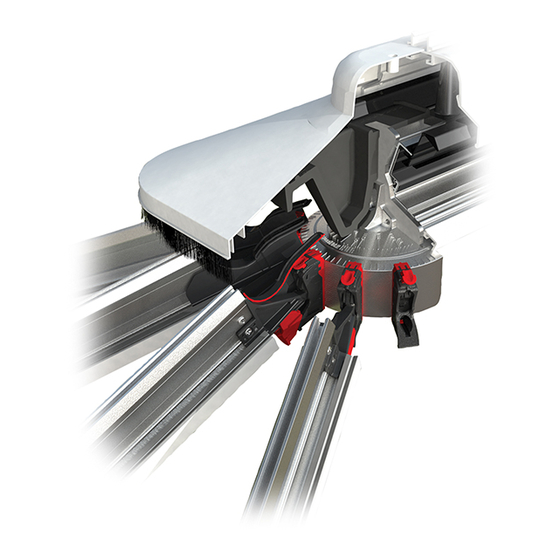
SECTION 17 FULL WOK ASSEMBLY Note to Fitters – carefully follow these notes but follow section 4 simultaneously to get a perfect ‘right first time’ installation. 1. Support the die cast aluminium hub. 2. Offer up the glazing bars, starting in the four opposing corners to ensure the hub is If finial is not required, capping supported. -
Page 41: Pagoda
SECTION 18 LANTERN Attach the foam gasket into position by This is how it should look attached to the At the corners, seal using a sealant peeling off the adhesive protective strip. rain baffle head. appropriate to the glazing material. For the lantern application, attach the PVCu Clad off the inside of the upper leg of the Now attach the PVCu eaves beam cladding window cill to the beam. - Page 42 SECTION 19 PAGODA Attach the strut at the mid point of the Slide the cleated corners into the adjacent Fasten both fixings in both cleats on every long sides. piece of pagoda beam. corner. If supplied, fasten to each corner the tie bar Now the Pagoda eaves beam is assembled Using the roof location plan, build the upper drop rod fixing bracket to the underside of into a one piece structure, temporarily...
-
Page 43: Eaves Beam - Super Duty, Bi-Fold Support
SECTION 20 EAVES BEAM Standard Eaves Super Duty Eaves Standard Eaves Super Duty Eaves Bi Fold Support Eaves Super Bolster Eaves SUPER DUTY EAVES Internal Frame/Setout BI-FOLD SUPPORT EAVES Internal Standard Eaves Super Duty Eaves Bi Fold Support Eaves Frame/Setout Bi Fold Support Eaves Super Bolster Eaves Combination Eaves... -
Page 44: Inter-Rafter
SECTION 21 INTER RAFTER Inter-Rafter Flap Inter-Rafter Sealed Unit Using the main installation guide, build the roof as normal. Attach Bolt down using the nuts Now attach the Inter-Rafter Lift the ‘flap’ on leading edge of the bars to hub end as normal weathering hood (may require the weathering hood, slide the provided - ensure glazing... - Page 45 SECTION 22 L SHAPE RIDGES - FULL RIDGE TO FULL RIDGE Lift separate sections of ridge body on to trestles. Slide twin cleats In the pre-prepped holes, use the fixings provided to fix the into position. cleats. Now carefully lift and turn the ‘L’ shaped ridge on to its back. Using Temporary support/prop the ‘L’ shaped ridge. Offer up the hip a socket spanner secure the plate on one section of the ridge to bars.
- Page 46 SECTION 22 HALF RIDGE TO HALF RIDGE EXTERNALLY section 17 HALF RIDGE TO HALF RIDGE UNDERCLADDING PREPS...
-
Page 47: L Shape Ridges/Half Ridges
SECTION 22 section 17 L SHAPE RIDGES EXTERNAL section 17 FULL RIDGE UNDERCLADDING PREPS INTERNAL... -
Page 48: Conservaflash
SECTION 23 CONSERVAFLASH Pre-formed soaker Stepped flashings (L & R) To be used on duo-pitch roofs To be used on duo-pitch roofs Saddle apron Horizontal flashing Ensure the pre-formed soaker is clipped Trial fit the stepped flashing. Start installing Place Conservaflash into the ground out To be used on lean-to & Ultralite & above To be used on duo-pitch roofs the saddle apron on duo-pitch roofs into the starter bar. -
Page 49: Roof Vent Installation
SECTION 24 ROOF VENT INSTALLATION Sash Hinge Sash frame x 3 Unwrap the sash and pull two side sections Apply length of foam tape directly to the lower For pitches below 10° it is recommended that edge of the outer pane of the glass unit as out as shown above. - Page 50 SECTION 24 ROOF VENT INSTALLATION If existing glazing is 32/35mm a packer will Run a bead of appropriate sealant ensuring Locate the external upper muntin bar with have been pre-fitted to the frame. a continuous run along the external upper the internal muntin bar, knock into place. The muntin bar.
- Page 51 SECTION 24 ROOF VENT - FITMENT OF MECHANICAL WINDER When the sealant on the mainframe has cured, Using the screws provided attach the spindle Align the winder bracket with bottom of vent re-fit the outer sash by holding vertically and bracket to the sash bracket (already attached frame (see section detail 15a for further re-engage on to the hinge, before lowering into to vent sash) taking care not to damage the...
Need help?
Do you have a question about the Classic roof and is the answer not in the manual?
Questions and answers