Table of Contents
Advertisement
Quick Links
Advertisement
Table of Contents

Related Manuals for Target FeedMaster

Summary of Contents for Target FeedMaster
- Page 1 Feed Scale TARGET FeedMaster User's Manual...
- Page 2 Enter the serial number located on the side of the controller below for future reference. Model number: TARGET FEED MASTER Serial number: Every effort has been made to ensure that this manual is complete, accurate and up-to-date. The information contained in it is however subject to change without notice due to further developments.
-
Page 3: Table Of Contents
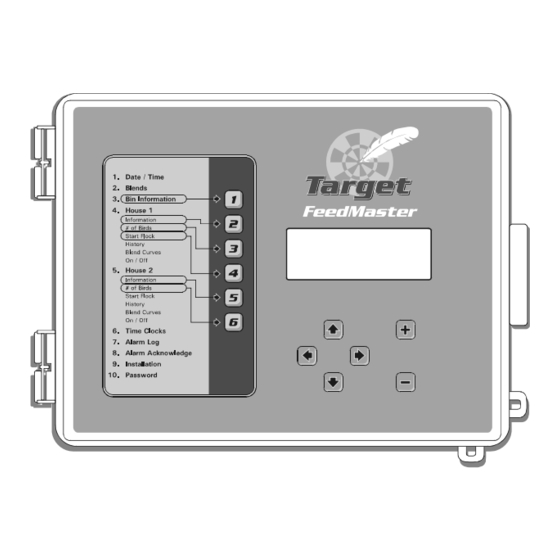
5.3.2 Viewing / Adjusting the Feed Consumption ....21 5.3.3 Ongoing Operations ..........23 5.3.4 Bin Management ............24 5.3.4.1 Adding Feed to a Bin ............24 5.3.4.2 Bin Information ..............25 5.3.4.3 Bins' Consumption History ..........26 TARGET FEED MASTER rev.09... - Page 4 9. TECHNICAL SPECIFICATIONS ........57 10. MEMORY CARD ............58 INDEX ................60 LIST OF FIGURES Figure 1: Controller Faceplate ........... 7 Figure 2: Complete Feeding System for Broilers ......10 Figure 3: Feed Distribution Process .......... 11 TARGET FEED MASTER rev.09...
-
Page 5: Introduction
• The controller should be opened and inspected once a year for moisture. Proper care will extend the life of the control. TARGET FEED MASTER rev.09... -
Page 6: List Of Symbols
Alternating current (AC). Earth Ground Terminal Primarily used for functional earth terminals which are generally associated with test and measurement cir- cuits. These terminals are not for safety earthing purposes but provide an earth reference point. TARGET FEED MASTER rev.09... -
Page 7: Terms And Symbols
The right arrow key is used to select a menu option. The left arrow key is used to return to the previous menu display. Adjustment Buttons. These two push-buttons allow the user to adjust the value of the parameter shown on display B. TARGET FEED MASTER rev.09... -
Page 8: Installation
L and N electric power lines. It shall be in close proximity to the equipment and within easy reach of the operator. It shall be marked as the disconnecting device for the equipment. TARGET FEED MASTER rev.09... -
Page 9: Controller's Operation
4.2 HOW TO USE THE FEED SCALE CONTROLLER The TARGET FEED MASTER controller has been designed with the user in mind. Thus, great care has been put into making the user interface as easy to understand as possible. -
Page 10: Figure 2: Complete Feeding System For Broilers
TARGET FEED MASTER TARGET FEED MASTER rev.09... -
Page 11: Figure 3: Feed Distribution Process
The output auger operates during switch does not detect the "Delivery Time". The weighing proxy. switch. The weighing process feed anymore. process is resumed afterwards. is resumed afterwards. TARGET FEED MASTER rev.09... -
Page 12: How The Parameters Are Grouped
The table below shows the destination of these keys. Short-cut Ke ys De stina tion Bin Information House 1 Information House 1 # of Birds House 1 Start Flock House 2 Information House 2 # of Birds TARGET FEED MASTER rev.09... -
Page 13: Feed Scale Menus
Correct.: 0 kg 4. House 1 4.2 House 1 Birds Entered: Number of Birds New Mortal.: Mortality: Tot. Mortal.: Remaining: 4. House 1 4.3 House 1 Start Start Age: Start Flock Birds Entered: Start Flock ? TARGET FEED MASTER rev.09... - Page 14 # of houses: Installation # of blends: Timed feeding: # time clocks: Units: Feed qty: /100 Time of reset: 0:00 Shut off augers at run time alarm ? Yes Use max feed? Max feed alarm ? Yes TARGET FEED MASTER rev.09...
- Page 15 Scale 1 Calib Weight: 10.0 Scale Calibr. Scale 1 Push + for next step Scale 2 Scale is: Empty Feed Weigher for 10. Password 10. Password Breeders VX.X Current mode Enter password Password User 00 ** ** TARGET FEED MASTER rev.09...
-
Page 16: Using The Controller
3- Adjust the Date and Time (s. 5.4). 4- Enter the Installer Password (03-05-14 by default) to access the in- stallation menu (s. 5.8.1). 5- Set the main settings of the controller in the "1.Settings" menu from the installation menu (s. 5.8.2). TARGET FEED MASTER rev.09... - Page 17 11 -Create blends and blend curves (if applicable) (s.5.5.1 and 5.5.2). 12- Choose the proper Blend or Bin that is used for both houses (s.5.3.3). 13- Enable the feed distribution (s.5.2.1). 14- Start the new flock (s.5.2). TARGET FEED MASTER rev.09...
-
Page 18: Starting A New Flock
If 2 houses are used, proceed the same way to start a new flock in the other house. All histories are cleared when a new flock starts, except for the alarm log and bin histories. It is recommended to check the scale's accuracy between each flock. TARGET FEED MASTER rev.09... -
Page 19: Activating The Feed Distribution
4. House 1 "6.On/Off" menu. The house's feed 6. On/Off distribution status flashes on the dis- play. 4.6 House 2 status Use the adjustment buttons to enable Status: or to disable feed distribution in the selected house. TARGET FEED MASTER rev.09... -
Page 20: Monitoring Functions
Total Mortality: total mortalities since the beginning of the flock. Remaining: Number of birds remaining in the selected house. All these values are reset when a new flock starts (s. 5.2). Note that these values are reset when a new flock starts. TARGET FEED MASTER rev.09... -
Page 21: Viewing / Adjusting The Feed Consumption
632 g per bird or per 100 birds). Consumption / 100 Today 5000 g Today: shows today's feed con- Max/day: 11000 g sumption per bird or per hundred birds (depending on the chosen option). Total: 63200 g TARGET FEED MASTER rev.09... - Page 22 0 kg Total: Shows the total feed consumption since the beginning of the flock. Correction: The user can manually adjust the feed consumption. This is useful to post up the amount of feed that is distributed manually. TARGET FEED MASTER rev.09...
-
Page 23: Ongoing Operations
Weigh - The scale weighs the feed. Dump - Feed is being dumped into the receiving hopper. Close - The scale closes. - Feed is being mixed in the receiving hopper. - Feed is being distributed. Send TARGET FEED MASTER rev.09... -
Page 24: Bin Management
Enter the amount of feed (in kg) that has been added to the selected bin. The posted value flashes for a 10 second delay then becomes added to the "Remaining Feed" menu. The "Add Feed" menu then displays zero once again. TARGET FEED MASTER rev.09... -
Page 25: Bin Information
This feature can only be accessed from the installer's mode (s. 5.8.1). This is the leftover amount of feed that falls into the scale after the bin auger motor is stopped. The overfill value is automatically defined by the controller and cannot be modified. TARGET FEED MASTER rev.09... -
Page 26: Bins' Consumption History
45 days is displayed. Press the down- Bin 1 Consumption arrow key to scroll the display. 200X/01/01 12:00 Weight To clear this history, simultaneously press and hold the + & - keys for a 3 second delay. TARGET FEED MASTER rev.09... -
Page 27: Added Feed History
Bin 1 Feed Added scroll the display and view all the 200X/01/01 12:00 whole history. Weight 1500 To clear the history, press and hold the + & - keys simultaneously for a 3 second delay. TARGET FEED MASTER rev.09... -
Page 28: Feed Consumption And Mortality History
- Consumption History per bird or per 100 birds; - Total consumption history - Consumption correction history. • Press the down-arrow key to scroll the display and look at the selected history. These histories are cleared when a new flock starts. TARGET FEED MASTER rev.09... -
Page 29: Setting Time And Date
Press the right-arrow key. The hour flashes on the display. Use the adjustment buttons to set the hour. Proceed in similar fashion to set minutes and seconds. Press the left-arrow as many times as required to exit this menu. TARGET FEED MASTER rev.09... -
Page 30: Blend Settings
Use the arrow keys to select the Bin 1: desired bin then use the adjustment Bin 2: buttons to set the desired propor- Total: 100% tion of this ingredient. The total percentage of all ingredients of the blend must equal 100%. TARGET FEED MASTER rev.09... -
Page 31: Blend Curves
BLENDS DAY NUMBER IS DECREASED. THE BLEND ON THE PREVIOUS POINT BLEND 7 IS MAINTAINED BLEND 6 BLEND 5 BLEND 4 BLEND 3 BLEND 2 BLEND 1 D340 DAYS TARGET FEED MASTER rev.09... - Page 32 Once the ten points are correctly set, 4.5 Blend Curve press the up-arrow key to select "Use Use curve ? curve?" menu. Select "Yes" to enable 1.Da Blend the curve. 2.Da Blend TARGET FEED MASTER rev.09...
-
Page 33: Time Clocks
Proceed the same way to set all 10 start and stop times of the selected clock output. If 10 cycles are not required, set the start and stop times of unused cycles to the same value. TARGET FEED MASTER rev.09... -
Page 34: Alarms
Weighing errors alarms and empty bin alarms need to be acknowledged. The controller does not operate until they are acknowledged. Use the arrow keys to select the Feed Weigher and "8. Ack Alarm" main menu. Mixer VX.X Ack. Alarm Press + to acknowledge the alarm. TARGET FEED MASTER rev.09... -
Page 35: Installation Settings
Press the right-arrow key. Proceed the same way to set the second and third two digits. Press the right-arrow key to validate the password. The message "Wrong Password" is displayed when an invalid password is entered. TARGET FEED MASTER rev.09... -
Page 36: Controller's Main Settings
If the Timed Feeding method is enabled, Time Clock 1 is automatically used to control the output auger of house 1; Time Clock 2 is used to control the output auger of house 2 (if applicable). TARGET FEED MASTER rev.09... - Page 37 When this option is enabled, feed stops being distributed when the maximum feed limit is reached. Max feed alarm? This function allows setting off an alarm when the maximum allowable amount of feed has been distributed. TARGET FEED MASTER rev.09...
-
Page 38: Scale Settings
Select "Yes" if feed is weighed in a scale with valve before being dumped in the receiving hopper; select "No" if feed is weighed directly in the receiving hopper. In this case, the weighing hopper must be mounted on load bars (see figure 2). TARGET FEED MASTER rev.09... - Page 39 It can be adjusted from 0 to 60 minutes. Accessible if feed blends are enabled (s. 5.8.2). TARGET FEED MASTER rev.09...
- Page 40 30% from bin 1 and 70% from bin 2: Mix each batch - disabled: 30 kg of bin 1 is weighed in the scale and is then dumped in the receiving hopper. The second ingredient (70kg of bin 2) then starts being weighed. TARGET FEED MASTER rev.09...
- Page 41 "No" for ingredients to be combined in the scale before the dump. If you are using a scale without valve, ingredients are auto- matically combined in the receiving hopper. Accessible if a scale with valve is enabled. TARGET FEED MASTER rev.09...
-
Page 42: Relay Assignment
REFER TO THE CONTROLLER'S WIRING DIAGRAM FOR FURTHER INFORMATION. ID #3 RELAY BOX (8 RELAYS) Module ID Assignment ID#3 use relay ID#4 use relay 1-16 ID #4 ID#5 use relay 17-32 ID #5 RELAY BOX (32 RELAYS) TARGET FEED MASTER rev.09... -
Page 43: Assigning Id Numbers To Trb Modules
1-16 of a TRB-32 module. "17-32" the ID# is associated with relays 17 to 32 of a TRB-32 module. "None" if the ID# is not associated with any relay. Select "None" for each unused ID#. TARGET FEED MASTER rev.09... -
Page 44: Assigning Relays To The Outputs
An internal relay is located in the controller to control the output auger in house 1. Select "Loc" to use this internal relay. Refer to the wiring diagram to connect the output auger to the main con- troller. TARGET FEED MASTER rev.09... - Page 45 This menu is only available if two houses are enabled (s. 5.8.2). Note that scale 1 valve is directly connected to the main controller (refer to the wiring diagram). TARGET FEED MASTER rev.09...
-
Page 46: Bin Settings
Set to yes if you want an alarm to be set off when the bin is empty. When this type of alarm is set off, the system stops operating except if a backup bin is selected (see below). TARGET FEED MASTER rev.09... - Page 47 This avoids generat- ing run time alarms when a bin is empty and has no backup bin. The follow- ing graphic illustrates the situation: BIN 1 BIN 2 BIN 3 BIN 1 BIN 2 BIN 3 TARGET FEED MASTER rev.09...
-
Page 48: Scale Calibration
"+". Calib weight: 10.0 button. The message "Saved" is dis- Push + for next step played during 2 seconds then returns Scale is: Saved to the message "Empty" again. The scale calibration is now completed. TARGET FEED MASTER rev.09... -
Page 49: Manual Mode
The scale valve is automatically con- trolled by the controller. Open / Close: The user can manually open or close the valve of the scale. The controller's feed cycles are bypassed while the valve is controlled manually. TARGET FEED MASTER rev.09... -
Page 50: Troubleshooting Guide
- Wait 5 minutes. - Apply power to the main controller : If the controller starts then there is a wiring problem. - Fix the wiring. - Replace the fuse. - Fuse F1 is blown. TARGET FEED MASTER rev.09... - Page 51 NO. - The wiring between - Fix the wiring the LCT and the main controller is incorrect. - Replace the LCT module. - The LCT is defec- tive. TARGET FEED MASTER rev.09...
- Page 52 TRB power activating manually each relay. supply. - The wiring between - Fix the wiring the TRB modules and the main controller is incorrect. - Replace the TRB module. - A TRB module is defective. TARGET FEED MASTER rev.09...
- Page 53 - The scale is unable to Weighing touch the receiving hopper. weight correctly. Error occurs. - Make sure the feeding hopper is operating correctly: repeat the first step of sec. 5.1 of this manual. - Recalibrate the scale. TARGET FEED MASTER rev.09...
-
Page 54: Installation Report
8. INSTALLATION REPORT CLIENT Name: __________________________________________ Address: __________________________________________ __________________________________________ __________________________________________ City: __________________________________________ Phone: __________________________________________ Fax: __________________________________________ E-mail: __________________________________________ INSTALLER Name: __________________________________________ Address: __________________________________________ __________________________________________ __________________________________________ City: __________________________________________ Phone: __________________________________________ Fax: __________________________________________ E-mail: __________________________________________ TARGET FEED MASTER rev.09... - Page 55 Use timed feeding? # of time clocks Units DEVICES ON TIME CLOCKS : Time clock 1 Time clock 2 Time clock 3 Time clock 4 Time clock 5 Time clock 6 Time clock 7 Time clock 8 TARGET FEED MASTER rev.09...
- Page 56 OUTPUT AUGER 1 OUTPUT AUGER 2 TIME CLOCK 1 TIME CLOCK 2 TIME CLOCK 3 TIME CLOCK 4 TIME CLOCK 5 TIME CLOCK 6 TIME CLOCK 7 TIME CLOCK 8 MIXER 1 MIXER 2 SCALE VALVE 2 TARGET FEED MASTER rev.09...
-
Page 57: Technical Specifications
0 to 40°C Storage temperature -15 to 50°C Ambient relative humidity max. 95% The room temperature where the controller is located must always remain between 32 and 104 F (0 and 40 For indoor use only. TARGET FEED MASTER rev.09... -
Page 58: Memory Card
5. Close the cover then reapply power to the controller. The transfer menu should be shown on screen (if this is not the case, simultaneously press the up- and down-arrow keys for 3 seconds to display this menu). TARGET FEED MASTER rev.09... - Page 59 Respect the following rules to make sure the transfer works properly: • Make sure the card switch is at the unlocked position before transferring a configuration on the card. • Do not move or hold the card while a transfer is ongoing. TARGET FEED MASTER rev.09...
-
Page 60: Index
Errors Posting mortalities Remaining number 20 Alarm Starting a new flock 18 Troubleshooting guide 50 Blends Activation Blend curves Feed bins see Bin Principle of operation 31 Feed blends see Blends Settings Current distributed blend 23 TARGET FEED MASTER rev.09... - Page 61 Hot keys 12 Password 35 Hour see Time Problems see Alarms Houses Proxy switch Activation Activation & operation 39 Enabling feed distribution 19 Location Ingredient selection 23 PSFS-1 Operation & Settings 49 Wiring ID numbers 43 Ingredients TARGET FEED MASTER rev.09...
- Page 62 Valve relay assignment 45 Serial number 2 Shortcut keys 7, 12 Symbols of the manual 6 Time Time clock outputs Activation Operation & Settings 33 Relay assignment Time of reset 37 Time settings Transfer error 59 Troubleshooting guide 50 TARGET FEED MASTER rev.09...
- Page 63 M 890-00379 rev.09 REV. 03...
Need help?
Do you have a question about the FeedMaster and is the answer not in the manual?
Questions and answers