Bunn G9-2T DBC Installation And Operating Manual
Bunn g9-2t dbc: operating manual
Hide thumbs
Also See for G9-2T DBC:
- Illustrated parts catalog (16 pages) ,
- Specification (2 pages) ,
- Service & repair manual (79 pages)
Advertisement
INSTALLATION & OPERATING MANUAL
To obtain the Illustrated Parts Catalog, visit the Bunn-O-Matic website, at www.bunn.com. This is absolutely FREE,
and the quickest way to obtain the catalog. Contact Bunn-O-Matic Corporation at 1-800-286-6070 to obtain a paper
copy of the required Illustrated Parts Catalog mailed via U.S. Postal Service.
33736.0000F 05/07 ©2001 Bunn-O-Matic Corporation
BUNN-O-MATIC CORPORATION
POST OFFICE BOX 3227
SPRINGFIELD, ILLINOIS 62708-3227
PHONE: (217) 529-6601 FAX: (217) 529-6644
G9-2T DBC
for use
with Smart Funnel
N
I O
U T
R Y
C A
J U
IN
A L
O N
R D
.
R S
Z A
D
A N
P E
H A
R S
T S
G E
E C
F IN
B J
N O
P E
R
G .
E P
O P
N IN
K E
IG
R E
F H
P E
F O
T O
E O
O U
U T
C H
O R
TM
www.bunnomatic.com
Advertisement
Table of Contents

Related Manuals for Bunn G9-2T DBC


Summary of Contents for Bunn G9-2T DBC
- Page 1 To obtain the Illustrated Parts Catalog, visit the Bunn-O-Matic website, at www.bunn.com. This is absolutely FREE, and the quickest way to obtain the catalog. Contact Bunn-O-Matic Corporation at 1-800-286-6070 to obtain a paper copy of the required Illustrated Parts Catalog mailed via U.S. Postal Service.
-
Page 2: Table Of Contents
SOLE OPTION AS SPECIFIED HEREIN, TO REPAIR, REPLACEMENT OR REFUND. In no event shall BUNN be liable for any other damage or loss, including, but not limited to, lost profits, lost sales, loss of use of equipment, claims of Buyer’s customers, cost of capital, cost of down time, cost of substitute equipment, facilities or services, or any other special, incidental or consequential damages. -
Page 3: User Notices
10 feet if 18-gage 3-conductor wire. FAILURE TO COMPLY RISKS EQUIPMENT DAMAGE, FIRE, OR SHOCK HAZARD LIABILITY BEFORE BUYING OR USING THIS PRODUCT 20545-0000D 01/04 © 1990 Bunn-O-Matic Corporation ELECTRICAL REQUIREMENTS WARNING Use only on a properly protected circuit capable of the rated load. -
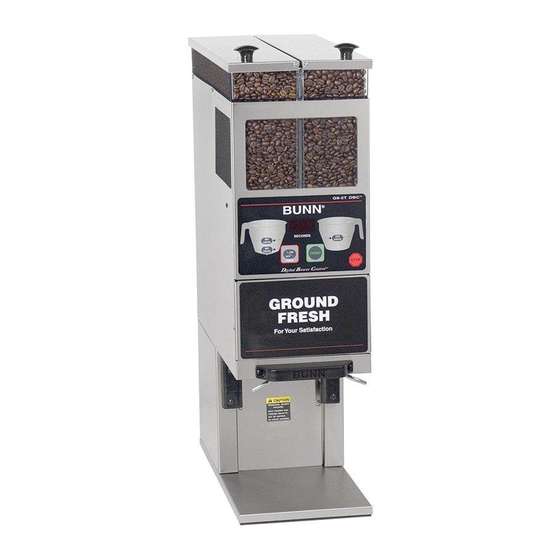
Page 4: Operating Controls
Grind Pad (a) Pressing the GRIND button initiates a timed grind cycle. Stop Pad (b) Pressing the STOP button ends the operation of the grinder. ® PAD (c) Pressing the ® pad allows programming access (see page 6). Hopper/Batch Selector Pads (d) These pads are located on the funnel depictions on each side of the grinder with a total of 6 pads. -
Page 5: Cleaning
The use of a damp cloth rinsed in any mild, non-abrasive, liquid detergent is recommended for cleaning all surfaces on Bunn-O-Matic equipment. Care should be taken not to scratch the hopper or windows with any abrasive material. Regular cleaning will keep your grinder looking new for years. -
Page 6: Communicating With A Brewer
5. To exit the setup mode, press and release the ® button anytime during this procedure. The ® button is a hidden programming pad located at the upper right corner of the BUNN Entering a coffee name using a RECIPE CARD. - Page 7 SELECTING COFFEE NAMES (Continued) NOTE: If a number is chosen from the chart below, and entered into the grinder, check to be sure the number entered represents the name of the coffee on the chart. 1. Grind into the funnel then insert the funnel into the brewer funnel rails. 2.
-
Page 8: Timer Adjustment (Control Board)
TIMER ADJUSTMENT (CONTROL BOARD) Three different batch settings are selectable for each hopper. Each batch is independently adjustable by set- ting the length of time a slide gate opens to allow beans to drop into the grinding chamber. A second time setting for each batch determines how long the grind motor continues to run after the slide gate closes. -
Page 9: Wiring Diagram
33736 030205... - Page 10 33736 030205...
Need help?
Do you have a question about the G9-2T DBC and is the answer not in the manual?
Questions and answers
Where is the hidden program button on new g9
The hidden program button on the Bunn G9-2T DBC is located at the upper right corner of the control panel.
This answer is automatically generated