Advertisement
Quick Links
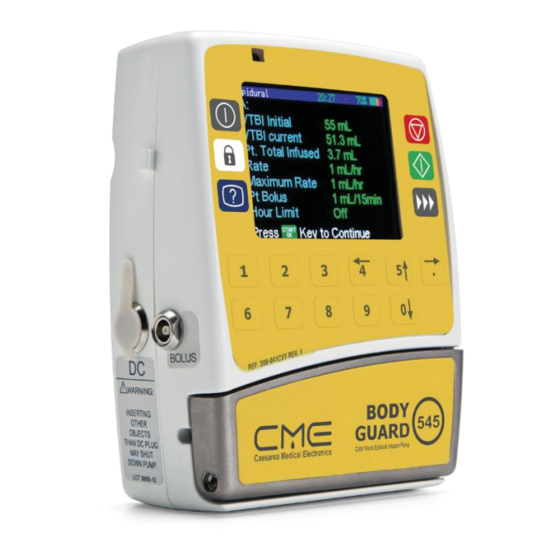
BodyGuard 545 Color Vision
Quick Reference Guide (Clinical)
Infusion Status
indicator
On/Off
button
Keypad Lock
button
Info
button
Bolus Port
connector
AC/Battery
indicator
• This guide is not intended to be comprehensive instructions
for the setup and operation of the infusion pump. For
complete pump information, refer to the BodyGuard 545 Color
Vision™ Directions For Use.
• Some screens in this guide may vary depending on the way the
pump is set up. They are for reference purposes only and may be
different than the information displayed on your system.
• Before operating the pump, users should consult the full
directions for use.
• If you need assistance with setting up or maintaining the
equipment or to report unexpected operation or events, contact
the manufacturer or manufacturer's representative.
Software Version BGCV_545_06A
TM
Backup Display
rate / VI / VTBI
Stop/No/Back/
Cancel button
Start/OK
button
Prime/Bolus
button
Door Latch
lever
Advertisement

Related Manuals for CME BodyGuard 545 Color Vision


Summary of Contents for CME BodyGuard 545 Color Vision
- Page 1 BodyGuard 545 Color Vision Quick Reference Guide (Clinical) Backup Display Infusion Status rate / VI / VTBI indicator Stop/No/Back/ On/Off Cancel button button Keypad Lock Start/OK button button Info Prime/Bolus button button Bolus Port Door Latch connector lever AC/Battery indicator • This guide is not intended to be comprehensive instructions for the setup and operation of the infusion pump. For complete pump information, refer to the BodyGuard 545 Color Vision™...
-
Page 2: Infusion Setup
Infusion Setup • Ensure the pump is secured in the pump charger. STEP 1 Ensure the pump and charger are fastened to the pole (if using pole) using the roller wheel at the BodyGuard 545 back of pump charger. Color Vision Epidural Pump Serial Number: V123456 • Switch on the pump by pressing . Start-up Production Date: 1-Jan-2000 screen appears for few seconds. Software Version BGCV545_02B • Plug the bolus cable into the side of the pump Protocol Sample labeled “Bolus”. Refer to the BodyGuard 545 Color Vision Directions for Use for more information on how to use the bolus cable. • If applicable, Protocol (drug library) is displayed at bottom of screen. Verify it is correct. Contact a clinical supervisor or biomed engineer, if needed. - Page 3 Loading Infusion Set STEP 4 • Insert the bag spike into the fluid container. • If a drip chamber is present, fill the drip chamber halfway. A drip chamber may not be part of the set. Use the available spike to pierce the reservoir. • Pull down the door latch to open the door. STEP 5 • Securely fit the black key into the pressure sensor fitment on the right side. • Locate the black key into the pressure sensor. • The two protrusions must face up. The key can only be loaded in this direction. • Ensure that the flow direction is in line with the flow direction arrows inside the pump. The arrows indicate the direction to the patient. STEP 6 • Locate the blue ring (anti-stretch locator) in the left side of the tubing channel around the air sensors. • Close the door fully until a click is heard. 3/20 QRG 999-683EN Rev. 00 |...
- Page 4 Infusion Set Priming STEP 1 • To prime and eliminate the air from the set, select the automatic prime function on the main menu. EPIDURAL 10:00 █ ■ Prime Select Protocol Change Bag View Protocol Settings View Shift Totals View Patient History View Event Log Clinician Bolus Select and press • Ensure that the patient is disconnected prior to STEP 2 starting the prime function. EPIDURAL 10:00 █...
- Page 5 Start New Infusion STEP 1 • From the main menu, scroll to Select Protocol using the arrow keys. EPIDURAL 10:00 █ ■ Prime • Press to select Select Protocol. Select Protocol Change Bag • Enter the level one access code. View Protocol Settings View Shift Totals View Patient History • Follow the instructions on the screen to proceed. View Event Log Press - Exit Menu Select and press STEP 2...
- Page 6 Start New Infusion STEP 4 • Enter patient weight in kg and confirm. • Wait until flashing is complete before moving to EPIDURAL 10:00 █ ■ the next step. A: Levobupivacaine Patient weight • Weight must be within the protocol limits. • Re-enter if necessary and confirm. Enter and Press STEP 5 • Optional: auto-bolus alert is displayed only when this function is enabled. EPIDURAL 10:00 █ ■ A: Levobupivacaine Warning ! Patient will Periodically receive an automatic bolus.
- Page 7 Start New Infusion STEP 7 • Press key to begin your infusion. • If this is not confirmed, pump will alert after 2 EPIDURAL 10:00 █ ■ minutes. Start Infusion ? Press key to start for Loading Dose & Start To stop the infusion at any time: • Press the key, recommended action. Or, • Close the roller clamp and then open the door. STEP 8 • Optional: if auto-bolus is enabled, choose whether to start with auto-bolus or to delay auto-bolus and EPIDURAL 10:00 █...
- Page 8 Clinician Bolus Delivery STEP 1 To deliver a clinician bolus during infusion: • Press the key EPIDURAL 10:00 █ ■ Clinician Bolus • Press the key. Dose • Enter the level two code and press • Enter the clinician bolus dose within the protocol (Maximum 20mL) Press Key to Start limits. Clinician Bolus may be disabled in the protocol. STEP 2 • Bolus progress is displayed on the screen. • You may stop the bolus at any time. EPIDURAL 10:00 █ ■...
- Page 9 Rate Titration, Keypad Lock, Resume/Repeat Rate Titration To change rate during infusion: • Enter a new rate and confirm with key. EPIDURAL 10:00 █ ■ A: Levobupivacaine • Enter level one code and press Rate: mL/hr • Single alarm sounds as confirmation. Patient Bolus Dose 10 mL Lockout Time 30 Minutes Auto-Bolus Dose 2 mL • Make sure the new rate is displayed on the screen. Auto-Bolus interval 15 Minutes ████████...
- Page 10 Change Bag STEP 1 At end of an infusion: • The infusion stops. EPIDURAL 10:00 █ ■ • An alarm sounds. End of Infusion • If applicable, a KVO rate will start automatically Keep Vein Open unless interrupted. Rate 2.5 mL/hr • Follow the instructions on the screen to proceed. Press Key to Menu STEP 2 If a bag change is required at end of an infusion: • Select the feature from the menu. EPIDURAL 10:00 █ ■ Prime • Continue to next screen.
-
Page 11: Low Battery
Alarms Low Battery • Approximately 30 minutes of battery operation remaining. EPIDURAL 10:00 ██ ■ • Verify that a power supply is accessible. Low Battery Connect to Charger End of Infusion • The infusion has ended. The screen may show a KVO rate if it was set up. EPIDURAL 10:00 █ ■ End of Infusion Keep Vein Open Rate 2.5 mL/hr Press Key to Menu Near End • Bag/infusion nearly finished. Prepare new bag if applicable. - Page 12 Alarms End Battery • Battery depleted. Connect to mains or replace the battery immediately. EPIDURAL 10:00 2%███ ■ Battery Connect to Charger Pump Paused Too • Pump “Stopped” or unattended for 2 minutes or Long more. Resume infusion or turn off the pump. • If the pump is turned off, you will have the option EPIDURAL 10:00 █ ■ to resume from the last position. Pump Paused Too Long Press Missing Key • The set is loaded incorrectly or a non-proprietary set has been loaded. Reload set according to the EPIDURAL 10:00 █...
- Page 13 Alarms Door Open • The pump door has opened during infusion. Check set, close door, and resume infusion. EPIDURAL 10:00 █ ■ Door Open Close door Error • A system error occurred. Follow instructions on the screen. If error persists, contact service EPIDURAL 10:00 █ ■ personnel. Restart Pump Switch off & on ERROR Air/Up Occlusion • Air in the set or occlusion above the pump. Disconnect patient and prime the air out of set. Check for occlusion. EPIDURAL 10:00 █ ■ Air/Up Occlusion Check for air / occlusion...
- Page 14 Alarms Down Occlusion • Patient side occlusion occurred. Auto resume feature monitoring back-pressure to determine if infusion can continue. EPIDURAL 10:00 █ ■ Down ◊ Press to mute Occlusion ◊ Clear occlusion in the set or infusion site — Check Set / Access check catheter for occlussion or for closed clamps Press key to mute ◊ Press key to resume infusion Despite the benefits provided by early detection of occlusions and reduced time to alarm, the pump is not designed to provide protection or detection of extravasation nor infiltration, therefore, the clinician must also check the infusion site on a regular basis and follow hospital protocols when infusion complications occur. When an alarm activates: • Infusion stops. • Infusion status indicator illuminates flashing red, flashing yellow, or solid yellow. • Alarm sound continuously until either pump is paused or problem rectified.
-
Page 15: Cleaning And Maintenance
Cleaning & Maintenance Before connecting the pump to a patient, and periodically during use, clean the unit as instructed below. • Always turn the pump off and remove the battery before cleaning. • Always unplug the charger from AC power before cleaning. • Do not clean the pump or charger with chemicals such as Xylene, Acetone, or similar solvents. These chemicals can cause damage to plastic components and paint. Use a lint- free cloth with hydrogen peroxide 10% or isopropyl alcohol 70%. • Do not steam autoclave, ethylene oxide sterilize or immerse any part of the pump or charger in any fluid Periodic maintenance is recommended every 1 year. Periodic maintenance is designed to ensure the pump’s accuracy and detect and repair any potential pump inconsistencies prior to their occurrence in the field. Refer to the direc- tions for use for information about periodic maintenance. There is no additional time required for the unit to equilibrate once removed from minimum to maximum storage temperatures. Ensure to operate the pump within the specified operating range. The expected service life of the pump and charger is 3 years. The rating of the pump is IP33. This is the moisture protection rating and indicates the degree of particle and water ingress protection. 15/20 QRG 999-683EN Rev. 00 |... -
Page 16: Intended Use
Intended Use The BodyGuard 545 Color Vision™ infusion pump system is designed for patients who require epidural pain management, requiring continuous and/ or intermittent (bolus) delivery at precisely-controlled infusion rates through clinically acceptable routes of administration such as epidural and intrathecal routes. The BodyGuard 545 Color Vision™ infusion system is for use by, or under the supervision of trained medical staff in the hospital or home care environ- ments. • Do not operate the pump near high-energy radio-frequency emitting equipment, such as electro-surgical cauterizing equipment. False alarms may occur. • Do not operate pump in an MRI environment or in the presence of strong magnetic field. Serious injury or damage to the pump may occur. Ambulance Use Pumps may be used in road ambulances by paramedics and ambulance emergency medical technicians. Pumps must be 30 cm away from other devices that may create Radio Frequency Interference. Hazards Potential strangulation may occur if cables/tubing are of excessive length. Potential choking may occur if small parts are inhaled or swallowed. Potential allergic reactions may occur due to materials used in the pump. Children, pets, fireplaces, dust, lint, direct sunlight all may affect the pump operation. 16/20 | QRG 999-683EN Rev. 00... - Page 17 17/20 QRG 999-683EN Rev. 00 |...
- Page 18 18/20 | QRG 999-683EN Rev. 00...
- Page 19 19/20 QRG 999-683EN Rev. 00 |...
- Page 20 Place Contact Information Here BodyGuard 545 Color Vision™ is a registered trademark of Caesarea Medical Electronics Ltd. or one of its subsidiaries. Caesarea Medical Electronics Ltd. MedNet GmbH Brokstrasse 10 48163 16 Shacham Street, Industrial Park Muenster, Germany Caesarea North, P.O.BOX 3009...
Need help?
Do you have a question about the BodyGuard 545 Color Vision and is the answer not in the manual?
Questions and answers