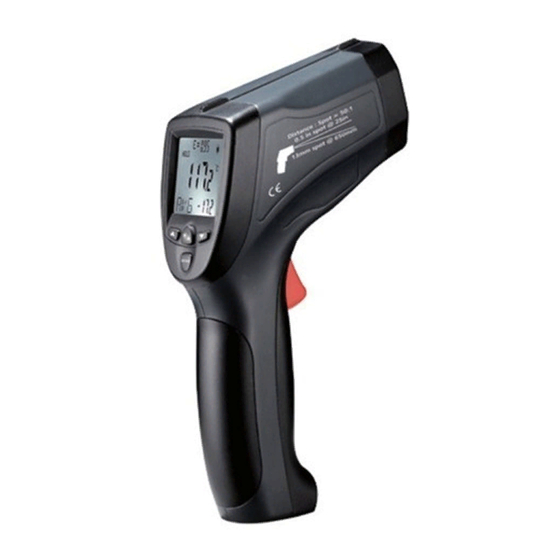
Summary of Contents for HTC IRX-67
- Page 1 Non-contact infrared thermometer User's Manual Please read this user's manual thoroughly before using this unit and keep it properly for your future reference...
-
Page 2: Table Of Contents
Contents 1. Introduction ..............2 2. Features ............... 2 3. Application ..............3 4. Safety ................4 5. Distance & Spot Size ..........5 6. Specifications .............. 6 7. Meter Description ............7 8. LCD display Description ..........8 9. Operating Instruction ..........9 10. -
Page 3: Introduction
1 . Introduction Congratulations on your purchase of our professional non-contact infrared thermometer. These units can provide fast, easy and accurate temperature readings. With the non-contact (infrared) technology, they can be used to measure the surface temperature of hard-to-reach objects like electrified equipment or moving objects, without any damage or pollution to them. -
Page 4: Application
Ø LCD display with backlight Ø Automatic measurement range selection with resolution 0.1℃/℉ Ø Trigger lock Ø High/Low Alarm Ø Auto power off 3. Application These units are widely used in Food preparation, Safety and Fire inspection, Plastic molding, Asphalt, Marine, Printing ink and dryer temperature, Diesel and Fleet maintenance, etc. -
Page 5: Safety
4. Safety ● Use with extreme caution when the laser beam is turned on. ● Do not point the beam towards eye of anyone or any animals. ● Do not allow the beam to strike the eye from a reflective surface. -
Page 6: Distance & Spot Size
5. Distance & Spot Size The meter's field of view is 50:1, for example, if the meter is 50 inches from the target spot, the diameter of the target must be at least 1 inch. Other distance ratios are shown below in the field of view diagram. -
Page 7: Specifications
6.Specifications Model IRX-67 IRX-68 IRX-69 -50℃~1380℉ -50℃~1980℉ -50℃~2280℉ Range -58℃~2516℉ -58℃~3596℉ -58℃~4136℉ -50℃~1370℉/-58~2498℉ -50℃~0℃/-58~32℉:±4℃/7.2℉ IR accuracy 0~500℃/-58~932℉:±1.5% or reading ±2℃/3.6 ℉ Above 500℃/932℉: ±2.0% or reading ±2℃/3.6℉ -50℃~1370℃/-58~2498℉:±1.5% or reading±1℃/1.8 TK accuracy ℉ 50:1 Emissivity Adjustable:0.10~1.0 Resolution 0.1℃(0.1℉) <1000 , 1℃(1℉) >1000 Response time <... -
Page 8: Meter Description
Storage Temp. -20℃~60℃(-4℉~140℉) Relative Operating:10%~90%RH; Storage:<80%RH humidity Power 9V battery, NEDA 1604A or IEC 6LR61, or equivalent Weight 286g Dimensions 198*120*59mm 7. Meter Description ① Laser Pointer ② IR Sensor ③ USB/SD interface ④ Trigger Button ⑤ Battery Compartment ⑥ Tripod Nut ⑦... -
Page 9: Lcd Display Description
8. LCD display Description ① Measurement Icon and Data hold Icon ② Current temperature value ③ Functions Icon ④ Date. Time ⑤ Low Battery Icon ⑥ USB symbol ⑦ SD symbol ⑧ High/Low Alarm Icon ⑨ Temp. values for the MAX, MIN, DIF, AVG, HAL, LAL. -
Page 10: Operating Instruction
9. Operating Instruction 1. Operating steps: ① Hold the meter by its handle grip and point it toward the surface to be measured. ② Pull and hold the Trigger to turn the meter on, the "SCAN" icon will appear and begin testing. ③... - Page 11 2.Button Function 2.1.1 In “HOLD” mode, press “ ”key, digits flashes on the sub-display. Meter enters into set mode with High alarm setting, Low alarm setting, Emissivity setting, SD card setting. As shown below. 2.2.1 In “HOLD” mode, press “ ”key, meter enters into MAX value, MIN value, AVG value, HAL value, LAL...
- Page 12 2.3.1 In “SCAN”mode, press “ ”, temperature unit switches to C, press “ ”, temperature unit switches to F. 2.3.2 In “HOLD”mode, press “ ”, it can turn on/turn off laser point. 2.3.3 In mode of “High alarm setting” “ Low alarm setting” “Emissivity setting”, press “...
-
Page 13: Software Installation
4.Battery Replacement 4.1 When the battery is not sufficient, “ ” appears in the LCD, one new 9V battery is required. 4.2 Open the battery compartment, replace the 9V battery and close the battery compartment. 10. Software installation Insert the CD into the CD-driver, the software will run the setup file directly, pls follow the installation tips to install software. -
Page 14: Software Interface Introduction
11. Software interface introduction 11.1 Toolbar functions introduction: 11.1.1 open file Open the saved data file, after opening, data and graphs presented on the surface of the PC interface, so that the staff can analyze the data and make assessments 11.1.2 save file Save the current measured data to a PC’s hard drive, you can... -
Page 15: Notes
11.1.4 print file Click this key, it can print the graph curve of the software interface 11.1.5 Start Click this key, the meter begin to transmit data to the PC in real time. Note: pls set up required parameter before performing this function 11.1.6 Turn off... - Page 16 ⑵ Field of View ! The object under test should be larger than the spot size calculated by the field of view diagram. ! The smaller the target object is, the closer the meter should be to it for accurate measuring. ! When accuracy is critical, make sure the target is at least twice as large as the spot size.
-
Page 17: Accessories
⑹ Maintenance ! Do not use volatile liquids to clean the unit, wipe it with dry soft cloth. ! Do not disassemble the unit, repair it by qualified person ! Do not immerse it in water. ! Do not store it in high temperature or humidity. ⑺... - Page 18 Emissivity Table Thermal Thermal Substance Substance emissivity emissivity Aluminum 0.30 Glass 0.90 to 0.95 Asphalt 0.95 Iron oxides 0.78 to 0.82 Concrete 0.95 Lacquer 0.80 to 0.95 Leather 0.95 Plastic 0.85 to 0.95 Ceramic 0.95 Paper 0.70 to 0.94 Copper 0.50 Sand 0.90...


Need help?
Do you have a question about the IRX-67 and is the answer not in the manual?
Questions and answers