DoorBird A1081 Series Installation Manual
Ip i/o door controller
Hide thumbs
Also See for A1081 Series:
- Installation manual (37 pages) ,
- Installation manual (48 pages)
Table of Contents
Advertisement
Available languages
Available languages
Quick Links
Advertisement
Table of Contents

Related Manuals for DoorBird A1081 Series

Summary of Contents for DoorBird A1081 Series
- Page 1 Page 2-18 Installation Manual IP I/O Door Controller A1081 Series Seite 19-37 Installationsanleitung IP E/A Tür Controller A1081 Serie Page 38-55 Manuel d‘installation Commande de porte IP E/S Série A1081 A1081 VERSION 1.6, MIN. HW 1.05...
- Page 2 You can always find the most up-to-date version of the installation manual on www.doorbird.com/support To make things easier we use the term “device” for the product “IP I/O Door Controller”...
- Page 3 Notice: Indicates a situation which, if not avoided, could result NOTIC E in damage to property. Important: Indicates significant information which is essential for the product to function correctly. Note: Indicates useful information which helps in getting the most out of the product. Hazard information WARNING ∙...
- Page 4 WARNING ∙ For safety, approval and licensing reasons (CE/FCC/IC etc.), unauthorized change and/or modification of the device is not permitted. ∙ The device is not a toy; do not allow children to play with it. Do not leave packaging material lying around. Plastic films/bags, pieces of polystyrene, etc.
- Page 5 ∙ Do not put any metal or flammable material into the device. Fire, electric shock, or device trouble could result. ∙ Existing wiring such as chime wiring, etc. may contain high voltage AC electricity. Damage to the device or electric shock could result. Wiring and installation must be done by a qualified eletrician.
- Page 6 WARNING ∙ On devices with intercom, be sure to perform a call test with low audio volume on both intercom devices. A sudden call etc. may arrive causing for example damage to your ear. ∙ If the device does not operate properly, unplug the power supply. ∙...
- Page 7 ∙ Keep the device more than 1 m (3.3') away from microwave, radio, TV, wireless router and any other wireless devices. ∙ On devices with intercom or built-in speaker or built-in microphone or signal transmission functions, keep the wires more than 30 cm (12'') away from AC 100-240 V wiring.
- Page 8 Transportation When transporting the device, use the original packaging or NOTIC E equivalent to prevent damage to the device. Warranty Information For information about the device warranty, see www.doorbird.com/warranty COMPONENTS 1x Device 1x Installation manual 1x Quickstart guide with Digital Passport...
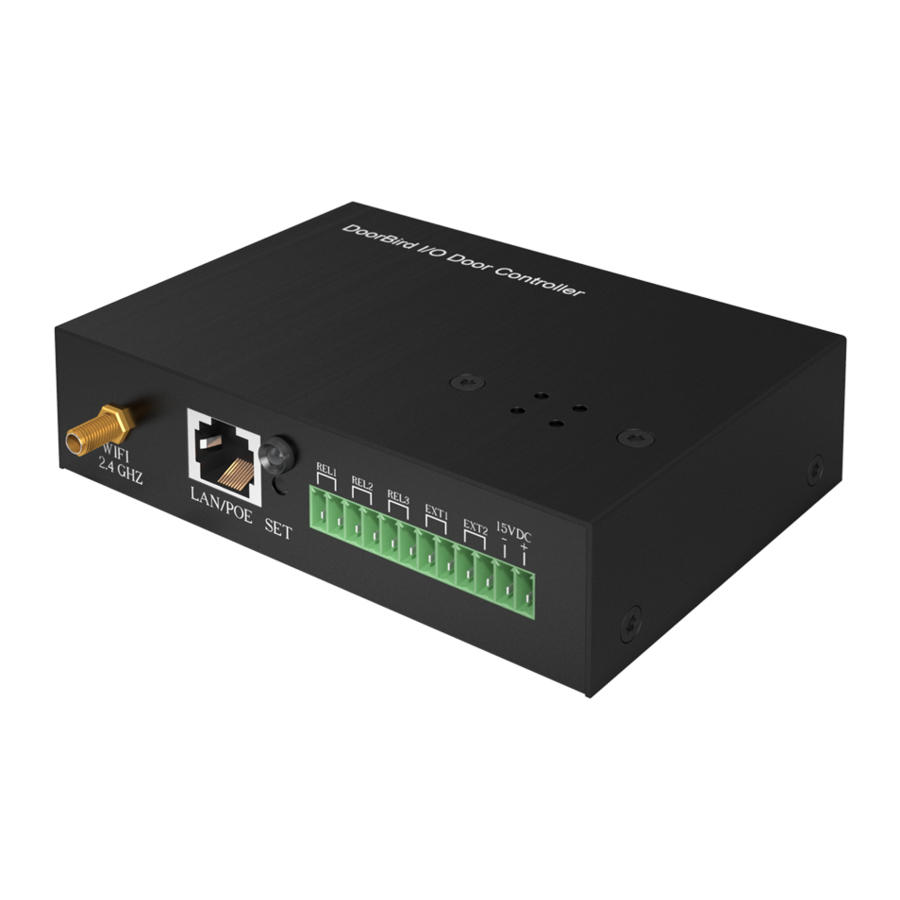
- Page 9 Antenna thread to connect the Setup button (SET) of the device, 2.4 GHz WiFi Antenna supplied to e.g. configure the WiFi interface with the device. of the device using the DoorBird App. 2) Loudspeaker Loudspeaker for Diagnostic- 6) LAN/PoE jack Sounds.
-
Page 10: Installation
Please ensure that the upload speed of your Internet connection is at least 0.5 Mbps. You can also carry out a speed test at any time via the DoorBird App. The user experience is only as good as your network speed, network stability and quality of your network components, such as your Internet Router and WiFi access points or WiFi repeaters. -
Page 11: Wifi Antenna
Press the drilling template of the device against the wall or ceiling at the desired installation site and mark the boreholes with a pencil. Remove the drilling template again. Ensure that no cables are to be found in the wall or ceiling behind the boreholes. -
Page 12: Connecting The Device
To power the device via a PoE-Switch (e.g. D-Link DGS-1008P) or PoE-Injector (e.g. DoorBird Gigabit PoE Injector) in accordance with the PoE standard IEEE 802.3af Mode A, the four wires bearing the numbers 1, 2, 3 and 6 of a Cat.5 cable or better are to be used. - Page 13 You can configure the default state of the relay (open/close) via REL1 the DoorBird App. These ports can be used to connect REL1 e.g. an electric door opener. The device does not supply power to the connected device.
- Page 14 REL3 configure the default state of the relay (open/close) via the DoorBird App. These ports can be used to connect e.g. an electric door opener. The device does not supply power to the connected device. The power supply for the electric door opener must be installed separately.
-
Page 15: Final Assembly
If you have finished the WiFi setup or have connected the device to your Internet Router by means of a network cable, go to the DoorBird App “Settings → Administration” and log in to the Administration area of the DoorBird Video... -
Page 16: Diagnostic-Led
If you have problems adding the device to the App please check if the device is online (www.doorbird.com/checkonline). If the device is not online, please check the WiFi or network cable connection again. DIAGNOSTIC-LED You can see if the device is powered on by checking the Diagnostic-LED, which lights up about 30 to 60 seconds after the power is connected. -
Page 17: Legal Notes
CE, FCC, UL, RoHS, IP50 Weather-proof Weight 174 g 4260423860346 LEGAL NOTES 10. Our products and also the components General remarks 1. DoorBird is a registered trademark of Bird contained therein (ICs, software, etc.) Home Automation GmbH. may only be used for civilian non-military purposes. - Page 18 Uhlandstraße 165 10719 Berlin Germany If necessary, indicate the presence of the device in a suitable place and in a suitable form. Web: www.doorbird.com Email: hello@doorbird.com Please observe any relevant country-specific statutory regulations concerning the use of surveillance components surveillance cameras applicable at the installation site.
- Page 19 Wenn Sie das Gerät anderen Personen zur Nutzung überlassen, übergeben Sie auch diese Bedienungsanleitung. Die stets aktuelle Version der Installationsanleitung finden Sie unter www.doorbird.com/de/support Zur Vereinfachung der Begriffe verwenden wir „Gerät“ für das Produkt „IP E/A Tür Controller“ sowie „mobiles Endgerät“ für ein Smartphone/Tablet.
- Page 20 Bitte beachten: Weist auf eine gefährliche Situation hin, welche, falls NOTIC E nicht verhindert, zu Sachschäden führen kann. Wichtig: Weist auf wichtige Informationen hin, die den richtigen Betrieb des Produkts gewährleisten. Hinweis: Weist auf nützliche Informationen hin, die die optimale Verwendung des Geräts unterstützen.
- Page 21 packaging material lying around. Plastic films/bags, pieces of polystyrene, etc. can be dangerous in the hands of a child. • Always lay cables in such a way that they do not become a risk to people and domestic animals. • Voltage is applied to parts within the equipment. Do not touch any parts that are not associated with the installation, wiring, or connection.
- Page 22 liquid crystal inside. Injury could result. If necessary, gargle your mouth and clean your eyes or skin with clear water for at least 15 minutes and consult your doctor. • Do not put anything on the device or cover the device with cloth, silicone, glue, coating, separate covering etc.
- Page 23 Sicherheitsanweisungen N OT IC E ∙ Die Verwendung des Geräts muss unter Beachtung der örtlich geltenden rechtlichen Bestimmungen erfolgen. ∙ Lagern Sie das Gerät in einer trockenen und belüfteten Umgebung. ∙ Achten Sie darauf, dass das Gerät weder Stößen noch starkem Druck ausgesetzt ist.
- Page 24 ∙ Installieren Sie das Gerät in einem Bereich, der für zukünftige Inspek- tionen, Reparaturen und Wartungen zugänglich ist. ∙ Wenn das Gerät in der Nähe eines Mobiltelefons verwendet wird, kann das Gerät gestört werden. ∙ Das Gerät kann beschädigt werden, wenn es fallen gelassen wird. Mit Vorsicht behandeln.
- Page 25 Bei Bedarf transportieren Sie das Gerät in der Originalverpackung N OTIC E oder einer entsprechenden Verpackung, so dass Schäden vermie- den werden. Gewährleistung Informationen zur Gewährleistung des Geräts finden Sie unter www.doorbird.com/de/warranty KOMPONENTEN 1x Gerät 1x Installationsanleitung 1x Quickstartanleitung mit Digital Passport...
- Page 26 4) Schraubklemmenblock Schraubklemmenblock, um externe Geräte wie z.B. einen elektrischen Türöffner oder Stromversorgung mit dem Gerät zu verbinden VIDEOS Sie können die Installation durch unsere Installationsvideos auf www.doorbird.com/de/support begleiten lassen. In den Videos wird jeder Installationsschritt einzeln und gut dokumentiert dargestellt.
-
Page 27: Installation
Verwendungsart zugelassen sind. Netzwerkgeschwindigkeit und Netzwerkkomponenten Stellen Sie sicher, dass Ihre Internetverbindung über mindestens 0,5 Mbit/s Uploadgeschwindigkeit verfügt. Sie können über die DoorBird App jederzeit auch einen Geschwindigkeitstest durchführen. Das Nutzererlebnis ist nur so gut wie die Netzwerkgeschwindigkeit, Netzwerkstabilität und Qualität Ihrer Netzwerkkomponenten, wie z.B. - Page 28 Sie können das Gerät dauerhaft an einer Wand oder Decke montieren. Wenn Sie es nicht dauerhaft anbringen möchten, dann überspringen Sie bitte den Rest von diesem Schritt. Drücken Sie die Bohrschablone des Geräts am gewünschten Installationsort gegen die Wand oder die Decke und markieren Sie mit einem Stift die Bohr- löcher.
- Page 29 Stromversorgung per PoE Zur Stromversorgung des Geräts per PoE-Switch (z.B. D-Link DGS-1008P) oder PoE-Injektor (z.B. DoorBird Gigabit PoE Injektor) nach PoE Standard IEEE 802.3af Mode A werden die vier Drähte mit den Nummern 1, 2, 3 und 6 eines Cat.5 Netzwerkkabels oder besser benutzt. Es muss zwingend ein Cat.5 Netzwerkkabel oder besser zum Einsatz kommen, da Netzwerksignale nur über vollständig isolierte, abgeschirmte und verdrillte Kabel übertragen...
-
Page 30: Gerät Anschliessen
GERÄT ANSCHLIESSEN Das Gerät verfügt für ein komfortables und sicheres Anschließen der Kabel und Drähte über beschriftete Anschlussbuchsen. Sie können jetzt alle erforderlichen Kabel und Drähte mit dem Gerät verbinden. Entfernen Sie bitte die Kabel und Drähte von den Anschlussbuchsen des Geräts, die Sie nicht benötigen. - Page 31 Zustand auch bei Spannungsverlust. Sie REL1 können den Standardzustand des Relais (geöffnet/ REL1 geschlossen) über die DoorBird App konfigurieren. Diese Anschlüsse können verwendet werden, um z.B. einen elektrischen Türöffner anzuschließen. Das Gerät bietet keine Strom versorgung für einen elektrischen Türöffner.
- Page 32 EXT2, EXT2 Zweiter externer Kontakt, max. 0 V DC/AC, 0 A. Diese Anschlüsse können z.B. verwendet werden, um einen externen Sensor anzuschließen, EXT2 z.B. Türsensor oder Bewegungssensor. EXT2 Beachten Sie bitte, dass Sie keine zusätzliche N OTI C E Spannung auf den Kontakt geben. 15 VDC - Eingang 15 V DC Spannungsversorgung, Minuspol (-).
-
Page 33: Diagnose-Led
DOWNLOAD UND INSTALLATION DER APP Laden Sie sich die App “DoorBird" von Bird Home Automation aus dem Apple App Store bzw. Google Play Store auf Ihr mobiles Endgerät. Die stets aktuelle Version der App Bedienungsanleitung finden Sie unter www.doorbird.com/de/support... - Page 34 Mobiles Endgerät: Neuestes iOS auf iPhone/iPad, neuestes Android auf Smartphone/Tablet Internet: High-Speed Festnetz Breitband Internetanschluss, DSL, Kabel oder Glasfaser, kein Socks- oder Proxyserver Systemanforderungen Netzwerk: 802.11 b/g/n 2.4 GHz oder Ethernet Netzwerk, mit DHCP Kompatibel mit allen DoorBird IP Video Türstationen.
- Page 35 4260423860346 LEGAL NOTES General remarks 9. Our products compliance with 1. DoorBird is a registered trademark of Bird technical guidelines, electrical Home Automation GmbH. telecommunications regulations applicable 2. Apple, the Apple logo, Mac, Mac OS, in Germany, the EU and the USA.
- Page 36 Uhlandstraße 165 this function if required. 10719 Berlin Germany If necessary, indicate the presence of the device Web: www.doorbird.com in a suitable place and in a suitable form. Email: hello@doorbird.com Please observe any relevant country-specific statutory regulations concerning the use of...
-
Page 37: Manuel D'installation
Si vous transmettez cet appareil à d’autres personnes dans le futur, transmettez-leur également ce manuel. Vous trouverez la toute dernière version du manuel d’installation à l’adresse www.doorbird.com/support. Pour simplifier les termes, nous utiliserons le mot « appareil » pour parler du produit «... - Page 38 Remarque : indique une situation dangereuse qui, si rien n’est fait NOTICE pour l’éviter, peut entraîner des dommages matériels. Important : indique la présence d’informations importantes garantissant le fonctionnement correct du produit. Indication : indique la présence d’informations utiles en vue de l’utilisation optimale de l’appareil.
- Page 39 MISE EN GARDE polystyrene, etc. can be dangerous in the hands of a child. • Always lay cables in such a way that they do not become a risk to people and domestic animals. • Voltage is applied to parts within the equipment. Do not touch any parts that are not associated with the installation, wiring, or connection.
- Page 40 liquid crystal inside. Injury could result. If necessary, gargle your mouth and clean your eyes or skin with clear water for at least 15 minutes and consult your doctor. • Do not put anything on the device or cover the device with cloth, silicone, glue, coating, separate covering etc.
- Page 41 Safety instructions N OT IC E • The device shall be used in compliance with local laws and regulations. • Store the device in a dry and ventilated environment. • Avoid exposing the device to shocks or heavy pressure. • Do not install the device on unstable brackets, surfaces or walls. Make sure the material is strong enough to support the weight of the device.
- Page 42 the device, it may hinder smooth communication, but this is not a malfunction. • On devices with Username/Password, the Username/Password to access the device is the customer‘s responsibility. Make sure to use a password that cannot be easily guessed by a third party. We recommend that you change the Password on a regular basis.
- Page 43 Transport Utilisez l‘emballage d‘origine ou un emballage équivalent pour NOTICE éviter d‘endommager l‘appareil. Garantie Vous trouverez les informations relatives à la garantie en consultant la page www.doorbird.com/warranty COMPOSANTS 1x Appareil 1x Manuel d’installation 1x Guide de démarrage rapide Incluant le «passport digital»...
- Page 44 Borne de raccordement à vis pour connecter des appareils externes tels que des ouvre-portes électriques et l’alimentation de l’appareil. VIDÉOS Avez-vous besoin d‘aide pour l‘installation ? Regardez nos vidéos d‘installation qui se trouvent sur http://www.doorbird.com/support Chaque étape de l‘installation y est clairement documentée.
- Page 45 INSTALLATION Toutes les étapes ci-dessous doivent être exécutées avec soin par un adulte compétent, en tenant compte de toute mesure de sécurité applicable. Veuillez nous contacter directement ou demander l‘avis d‘un spécialiste compétent. Assurez-vous que tous les fils utilisés pour l‘installation ne sont pas endommagés sur toute leur longueur et qu‘ils sont adaptés à...
- Page 46 Vous pouvez installer l’appareil de façon permanente sur un mur ou au plafond. Si vous ne souhaitez pas l’installer de manière permanente, veuillez sauter le reste de cette étape. Appuyez le gabarit de perçage de l’appareil contre le mur ou le plafond à l’endroit où...
- Page 47 Alimentation électrique via poe Pour alimenter l’appareil via un commutateur PoE (par exemple D-Link DGS-1008P) ou un injecteur PoE (par ex. l’injecteur PoE Gigabit DoorBird) conformément à la norme PoE IEEE 802.3af Mode A, il faut utiliser les quatre fils portant les numéros 1, 2, 3 et 6 d’un câble Cat.5 ou supérieur. Un câble Cat.5 ou supérieur doit être utilisé...
- Page 48 5. ETAPE : CONNECTEZ L’APPAREIL Il est possible de connecter les câbles et les fils à l’appareil de manière pratique et sûre via des ports de connexion étiquetés. Vous pouvez maintenant connecter tous les câbles et fils nécessaires à l’appareil. Veuillez retirer des ports de connexion de l’appareil tous les câbles et fils dont vous n’avez pas besoin.
- Page 49 état même en cas de perte de courant. Vous pouvez REL1 configurer l‘état par défaut du relais (ouvert/fermé) via REL1 l‘application DoorBird. Ces ports peuvent être utilisés pour connecter, par ex., un ouvre-porte électrique. L‘appareil ne fournit pas de courant à l‘appareil connecté. L‘alimentation électrique de l‘ouvre-porte électrique doit être installée séparément.
- Page 50 15 VDC - Entrée d’alimentation 15 VDC, pôle négatif (-). Veuillez connecter ici le fil noir du bloc d’alimentation (adaptateur secteur) fourni avec l’appareil, si vous n’alimentez pas l’appareil par PoE. N‘alimentez pas l‘appareil simultanément via NOTICE l‘alimentation du bloc d‘alimentation (adaptateur secteur) et l‘alimentation via PoE.
- Page 51 Si vous utilisez le WiFi pour connecter l’appareil à votre routeur Internet, allez d’abord dans l’application DoorBird sous «Paramètres → Paramètres WiFi» et suivez les instructions. Si vous avez terminé la configuration du WiFi ou si vous avez connecté...
- Page 52 Réseau: 802.11 b / g / n 2,4 GHz ou réseau Ethernet avec DHCP Compatible avec tous les interphones vidéo IP DoorBird. 1x Commande de porte IP E/S 1 x Câble réseau 1x Bloc secteur (110 - 240 V AC sur 15 V DC) avec...
-
Page 53: Mentions Légales
Le centre de données est exploité conformément aux Généralités normes de sécurité les plus strictes. 1. DoorBird est une marque déposée de Bird Home Automation GmbH. 3. Les méthodes de surveillance vidéo, audio et autres peuvent être réglementées par 2. - Page 54 électriques et électroniques. Éditeur Bird Home Automation GmbH Uhlandstaße 165 10719 Berlin Germany Web: www.doorbird.com Email: hello@doorbird.com Il est possible que la présente notice contienne des erreurs typographiques ou des erreurs d‘impression. Les informations contenues dans cette notice sont contrôlées régulièrement et les corrections sont publiées dans la prochaine...
- Page 56 www.doorbird.com...
Need help?
Do you have a question about the A1081 Series and is the answer not in the manual?
Questions and answers