
Related Manuals for Farberware FW61100043213

Summary of Contents for Farberware FW61100043213
- Page 1 BREAD MAKER Model Number: FW61100043213 UPC: 4897074552841 Customer Assistance 1-855-451-2897 (US) Please consider the option to recycle the packaging material. IM_Bread Maker_IM_US_V5_210507.indd 1 5/7/21 11:38 AM...
-
Page 2: Important Safeguards
IMPORTANT SAFEGUARDS When using electrical appliances, basic safety precautions should always be followed, including the following: • Read all instructions before use. • Do not touch hot surfaces. Use handles or knobs. • WARNING - to protect against electric shock, fire and personal injury: - do not immerse cord, plug or appliance in water or other liquids;... - Page 3 IMPORTANT SAFEGUARDS • A fire may occur if the appliance is covered or touches flammable material, including curtains, draperies, walls, and the like, when in operation. Do not store any item on top of the appliance when in operation. • Avoid contact with moving or spinning parts. •...
-
Page 4: Additional Safeguards
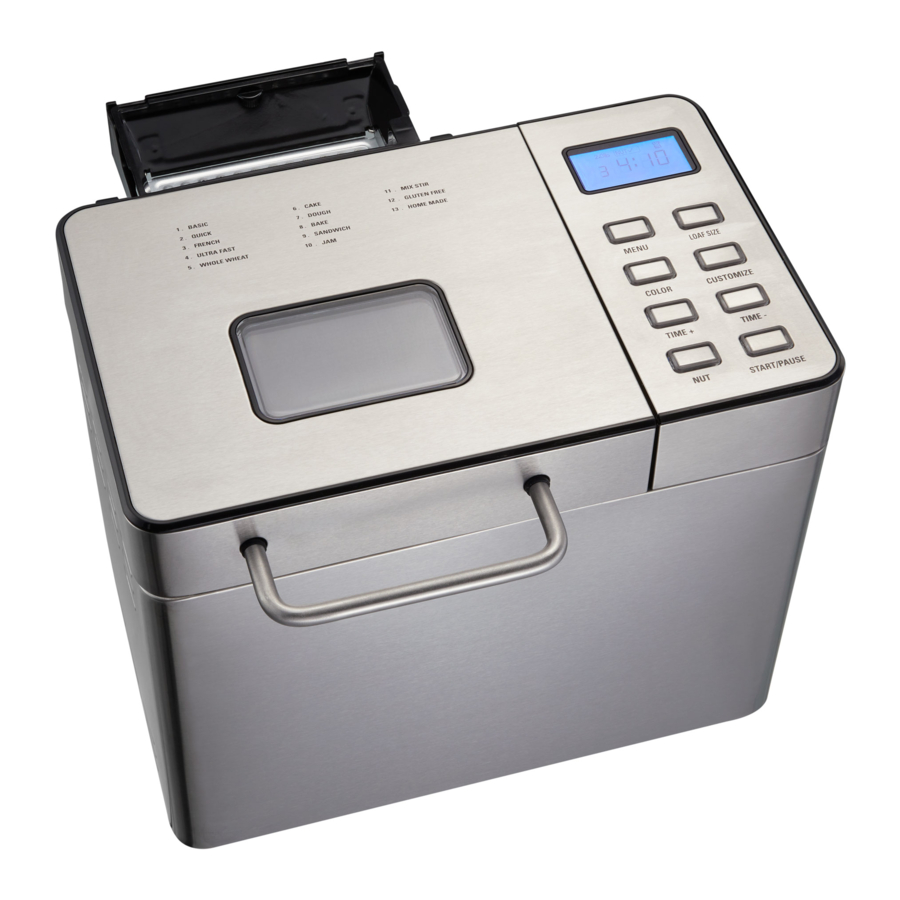
ADDITIONAL SAFEGUARDS This appliance is for HOUSEHOLD USE ONLY. WARNING: - DO NOT OPERATE THIS APPLIANCE, IF THE POWER CORD SHOWS DAMAGE OR IF APPLIANCE WORKS INTERMITTENTLY OR STOPS WORKING ENTIRELY. • A short power-supply cord is to be provided to reduce the risk resulting from becoming entangled in or tripping over a longer cord. - Page 5 ILLUSTRATIONS PARTS Lid Handle Lid with Viewing Window Kneading Paddle Drawer Housing Control Panel Bread Pan Handle Bread Air Vents Body Power Cord With Plug Anti-slip Foot (x4) Dispenser Measuring Paddle Removal Tool Measuring Spoon IM_Bread Maker_IM_US_V5_210507.indd 5 5/7/21 11:38 AM...
- Page 6 PARTS Display LOAF SIZE Button MENU Button CUSTOMIZE Button TIME - COLOR Button Button START/ TIME + PAUSE Button Button Button Crust Loaf Size Dispenser Browning Display Display Level Display Time/Delay Display Program Display Program Step Display IM_Bread Maker_IM_US_V5_210507.indd 6 5/7/21 11:38 AM...
-
Page 7: Before First Use
OPERATION WARNING: Always use oven mitts to protect your hand when handling the appliance. Escaping steam can burn and the appliance housing is hot. Before first use • Remove all packaging materials and/or other transportation means. • Remove all accessories from the appliance. •... - Page 8 OPERATION Measuring Spoon For measuring smaller ingredient quantity ( Ingredients measurement). The large spoon side is equivalent to a tablespoon, and the small spoon side is equivalent to a teaspoon. Programs This appliance is designed with several programs. There are usually 4 cycles for each program: kneading, rising, baking and keep warm.
-
Page 9: Using The Appliance
USING THE APPLIANCE OPERATION Program 1 - Basic 2 - Quick 3 - French 4 - Ultra Fast BAKE 80 min 85 min 80 min 90 min 90 min Total time 2h 40min 2h 10min 13min 20min 10min Program 5 - Whole 6 - Cake 7 - Dough 8 - Bake... - Page 10 OPERATION Program 9 - Sand- 10 - 11 - 12 - Gluten 13 - wich Free Home Stir Made Description For bak- For gluten-free ing light boiling mixing breads and length of texture jams flour. mixes. each step sandwich can be bread with marma- custom-...
- Page 11 OPERATION For the 4 (Ultra Fast) program, water temperature is critical for fermentation performance. If the water temperature is too low, the loaf will not rise to the expected size, and if the water temperature is too high, yeast is likely to lose activity and affect the fermentation performance.
- Page 12 OPERATION WARNING: Only use accessories recommended by the manufacturer. Do not place any other materials in the appliance. Do not cover or insert any objects into the Air Vents. Never let the Power Cord come in contact with the Housing during use (ill. or allow it to be trapped by the Lid (ill.
- Page 13 OPERATION IMPORTANT: Always place liquids and salt 1 first, then dry ingredients 2 and finally yeast 3 on top (ill. ). Make a small indentation on top of the dry ingredients and place the yeast into the indentation. Yeast must never come into contact with liquids and salt until the program starts.
- Page 14 OPERATION • Insert the Plug into a wall outlet (ill. ). The appliance beeps once. By default, the Display shows 2.0lb, medium browning level , program 1 - Basic, and time 3:20. • Press the MENU Button to select the required program from 1 to 13 ( Programs).
- Page 15 OPERATION Button Function Possible settings Programs CUSTOMIZE KNEAD1 Adjusting : 6 - 14 minutes Only RISE1 Button the duration : 20 - 60 minutes applicable KNEAD2 to 13 Home of each step : 5 - 20 minutes RISE2 of the 13 : 5 - 40 minutes Made Home Made...
- Page 16 OPERATION • When the program ends, the appliance beeps 10 times and switches to the keep warm function, which lasts 1 hour. • Press the START/PAUSE Button until the appliance is switched off, and then remove the Plug from the wall outlet. Danger of burns! Always pay special attention when placing or removing accessories and...
- Page 17 OPERATION NOTE: Fresh baked bread can be stored up to 3 days at room temperature. Alternatively, place the cooled bread in a sealed bag or container in the refrigerator for up to 10 days. Cooled bread placed in a sealed bag or container can also be frozen for up to 6 months.
- Page 18 OPERATION Ingredient Description Remarks Baking Used for the Ultra Store any open packet in a sealed bag or powder/soda Fast breads. container. Bread flour Unbleached flour Recommended flour for bread making. high in protein and gluten. Cake flour Soft flour with low Do not use for bread making.
- Page 19 OPERATION Ingredient Description Remarks Salt Improves bread Salt must not come into contact with flavor. yeast in the Bread Pan until the program starts. Self-rising flour All-purpose Do not use self-rising flour with the flour mixed with appliance. baking powder. Traditionally used for cookies or pancakes.
-
Page 20: Ingredients Measurement
OPERATION Ingredient Description Remarks Yeast Yeast will produce Before using, check the expiration date carbon dioxide. of the yeast. Return to refrigerator The carbon dioxide immediately after each use. will expand To check whether yeast is fresh and bread and make active: the inner fiber Pour ½... -
Page 21: Conversion Charts
OPERATION NOTE: - Clean the measuring cup in-between ingredients, such as oil. - It is recommended to use a flour sifter to aerate the flour before measuring it. - Add ingredients into the Bread Pan in the order listed in the recipe. Ensure the yeast does not come into contact with liquids and salt. - Page 22 OPERATION IMPORTANT: - Always place liquids and salt 1 first, then dry ingredients 2 and finally yeast 3 on top (ill. ). Make a small indentation on top of the dry ingredients and place the yeast into the indentation. Yeast must never come into contact with liquids and salt until the program starts.
- Page 23 RECIPES 5 - Whole Wheat 9 - Sandwich 12 - Gluten Free Loaf size (lb) Water 6 fl oz 7 fl oz 9 fl oz 12 fl oz 4½ fl oz 5½ fl oz (170 ml) (200 ml) (250 ml) (340 ml) (120 ml) (160 ml)
- Page 24 RECIPES Others 6 - Cake 7 - Dough Milk Water 11 tbsp 7½ fl oz (130 g) (210 ml) Egg white Sugar 3½ fl oz 2 tbsp (100 g) (24 g) Butter Salt 100 g 1½ tsp (10 g) Sugar Vegetable oil 10 tbsp 1¾...
-
Page 25: Hints And Tips
HINTS AND TIPS • The appliance may walk during the kneading cycle. Always position the appliance in the center of the counter, away from the edge. • It is recommended to use a scale to ensure a better measurement accuracy. •... - Page 26 CLEANING AND MAINTENANCE NOTE: - Do not immerse the Power Cord with Plug, or appliance into water or any other liquids. Do not use abrasive cleaners, steel wool or scouring pads (ill. ). Dry all parts thoroughly after cleaning, before using or storing the appliance.
-
Page 27: Troubleshooting
TROUBLESHOOTING Problem Cause Solution The appliance is Appliance not plugged in Insert the plug into the wall not working outlet. Wall outlet not energized Check fuses and circuit breaker. Appliance malfunction Disconnect the appliance from the wall outlet and contact qualified personnel to check and repair the appliance. - Page 28 TROUBLESHOOTING Problem Cause Solution The bread does not Expired yeast/flour Check the yeast/flour rise expiration date. Ensure it is fresh and stored in a sealed contained in a dark place. Liquids too hot, killed the Use liquids with a yeast temperature between 75°F (24°C) and 90°F (32°C).
- Page 29 TROUBLESHOOTING Problem Cause Solution The bread Too much yeast/water Measure ingredients collapsed accurately. Use a scale if necessary. Liquids too hot, killed the Use liquids at a temperature yeast between 75°F (24°C) and 90°F (32°C). Wrong program selected Choose the correct program for the next batch.
- Page 30 TROUBLESHOOTING Problem Cause Solution The bread bottom Bread remained in the Bread Remove the bread from is soggy Pan for too long the Bread Pan once the program ends. The Lid Window is Condensation during Avoid opening the Lid foggy kneading and rising cycles.
- Page 31 TROUBLESHOOTING Problem Cause Solution The Dispenser does Food stuck in the release Clean the Dispenser and let mechanism dry before next use. not release add-ins Damaged / malfunctioning Contact qualified personnel appliance to check and repair the appliance. Malfunctioning appliance Disconnect the appliance from the wall outlet and contact qualified personnel...
-
Page 32: Error Codes
TROUBLESHOOTING Error codes Error Cause Solution EE1 + 5 beeps Press the START/PAUSE Button, open Internal temperature too high the Lid, and let the appliance cool down for 20 minutes EE2 + 5 beeps Internal temperature Press the START/PAUSE Button, open too low the Lid, and let the appliance warm up for 20 minutes... -
Page 33: Customer Assistance
© 2021 Farberware Licensing Company, LLC. All Rights Reserved. Copyrights and Trademarks of Farberware Licensing Company, LLC, including FARBERWARE®, are used under license from Farberware Licensing Company, LLC.
Need help?
Do you have a question about the FW61100043213 and is the answer not in the manual?
Questions and answers
Where to get the gasket replacement
The provided context does not mention a gasket replacement for the Farberware FW61100043213. However, the seller "Bread Machine Parts Finder" on eBay specializes in bread maker parts, so you may check their listings for availability.
This answer is automatically generated