Table of Contents
Advertisement
Advertisement
Table of Contents

Related Manuals for MOTO GUZZI V 50


Summary of Contents for MOTO GUZZI V 50
- Page 2 This motorr;ycle has been desIgned and a/l components selected by !lUI/IlIIIIt tllll'l to torm a balanced, safe and mechanically coflesive motor vehicle. Any 01((11 1 11/"" I" unauthori? (I 1 11111' , the frame, lork, other mechanical components or the use of 111"\ alter the geometry, steering and handling quail lies of the vehicle.
- Page 3 Dear Rider, First of al/ we wish to thank you for choosing a Moto Guzzi motorcycle. By following the instructions outlined in this manual you will ensure a long and troublefree life for your machine. Before riding, please read thoroughly this manual in order to know your motorcycle's features and how to operate it safely.
- Page 4 This motorcycle has been designed and all components selected by tllo /I/(I//u/ll/ /1/1'" to torm a balanced, safe and mechanically col)esive motor vehicle. [1"WIlI/IIII I" the frame, fork, other mechanical components or the use of unaut/'0fl/Ot! , 1111\ IIII after the geometry, steering and handling quafilies of the vehicle. Ev ry OWIII"...
- Page 6 INDEX Main features Controls and accessories Identification data Warranty Instruments and controls Riding instructions Running in Maintenance Removal of wheels Lubrication and maintenance chart Lubrications Carburation Valve gearing Ignition Electrical equipment...
-
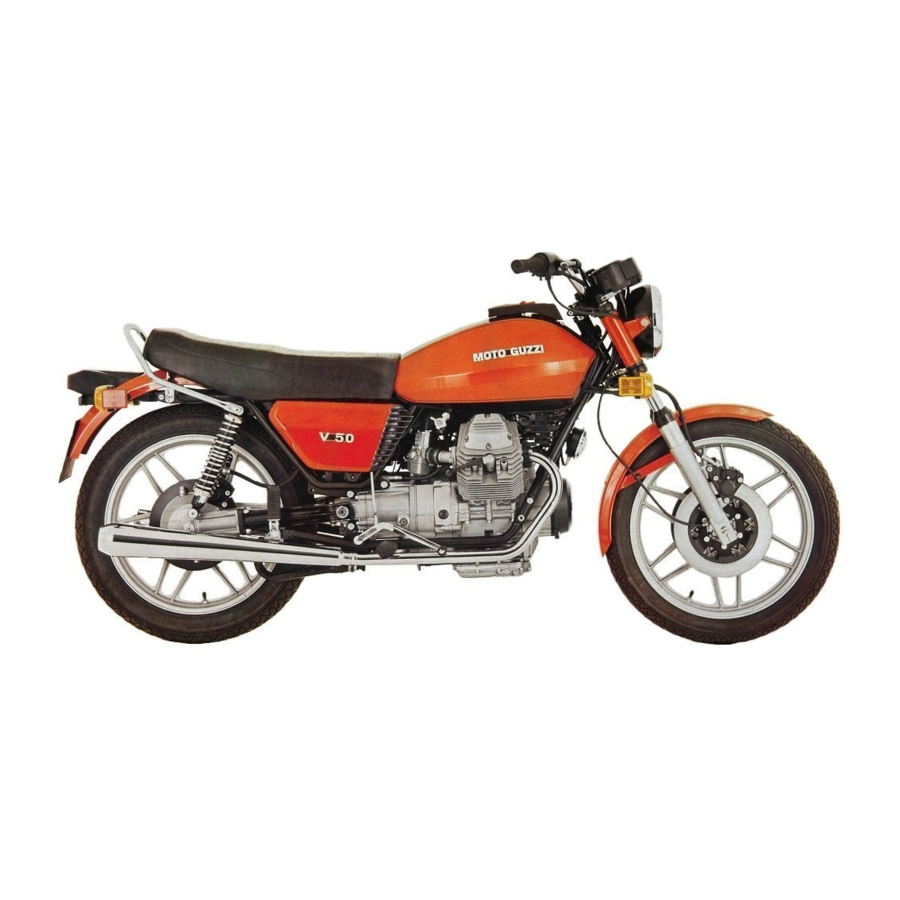
Page 7: Main Features
MAIN FEATURES Engine 2-cylinder 4-stroke Cylinder disposition «V» 90° Bore mm 74 Stroke mm 57 Displacement cc 490,201 Compression ratio 10,8: 1 Valve gearing O.H.V. push rod operated. Timing data: Inlet opens 18° before TDC; closes 50° after BDC. Outlet opens 53°... - Page 8 Electronic ignition with magnetic control. Ignition The ignition advance varies electronically accor ding to the engine revs. without involving any mechanical device. 35° 5000 Max. ignition advance: before TOe at ...;- 5500 rp m. Spark Plugs: Marelli CV 9 LP, Bosch W (0.023 Lodge HLN.
- Page 10 Cradle type, tubular structure. Fram e Telescopic front fork incorporating sealed hy Susp ensions draulic dampers. Rear swinging fork with externally adjustable springs. In light alloy with rims: Wheels front WM 3/1,85 x 1 8 CP2; rear WM 3/2, 1 5 x 18 CP2. Pirelli: front 3,25 S 1 8 (rigato)
- Page 11 Rear: hydraulic disc brake, twin braking cylinder caliper. Foot controlled, lever on the R/H side of the motorcycle. Disc Braking cylinder Master cylinder 15,875 mm The rear brake is bound by a hydraulic transmis sion to a ,twin front brake featured and dimen sioned like the right front hand controlled brake.
-
Page 12: Fuel And Oil Capacities
Fuel and oil capacities Group or p art Quanti ti es Recomm endati on (4,35 US gls.) Fuel tank (Reserve 2 Petrol super 98/100 NO-RM '/4' us pints - 3'12 imp pints) « Agip Sump 2,250 (5.8 U S pints - 4 '/2 Oi l Sint 2000»... -
Page 13: Controls And Accessories
CONTROLS AND ACCESSORIES (Pict. 2) Caliper, front brakes. Warning light panel. Rev. counter. Headlight. Front turn signals. Clutch control lever. Buttons controlling: horn, flashing light and Right front brake control lever. turn signals. Throttle control grip. Light switch. Engine starting and stopping button (emer Key switch. - Page 14 5 26 27 14 15 16 1 19 20...
-
Page 15: Identification Data
In case of parts replacement make sure that on the certificate of conformity and is valid to on Iy are used. «Original Moto Guzzi Spare Parts legal effects for the identification of the motor The use of non - genuine parts invalidates the cycle itself. -
Page 16: Warranty
Tires as well as parts or accessories which are not manufactured in the "SEI M M Moto Guzzi Factories» are out of warranty. Each new motorcycle is supplied with a service voucher book. This h·as to be carefully kept with ali other circulation papers as it is the only do... -
Page 17: Instruments And Controls
INSTRUMENTS AND CONTROLS when pressure is sufficient for normal engine lu Instrument panel (Pict. 4) brication. If not, the pressure is incorrect and the engine has to be stopped and the lubricating Tachometer with zero setter. system checked over. Rev. counter. (h) High beam indicator (blue). -
Page 18: Light Switches
Switch "A» 8» In line with the panel mark (tu rned �� clockwise). Parking light ON with switch - Position «0» Parking light. (Picl. in position «0». Key re «A» - Position Low beam. «1» movable. - Position Light off. «2»... - Page 19 Engine starting and stopping with a cold engine set the starter lever (Picl. • 28) to position «A»; button (emergency) (Picl. press starting button «A» (start). • They are located on the side of the hand To stop the engine in case of emergency: lebar.
- Page 20 2nd. 3rd. 4th. 5th. speed: pedal up; Clutch control lever • (<<E,. Pict. 5) neutral position: between 1 st. and 2nd. speed. • On the L/H side of the handlebar. To be used Before operating the gear change control pedal, for starting and gearshifting only.
-
Page 21: Fuel Filler Cap
pressing button «A» (Pic!. 8) and lifting the cover Fuel filler cap (Pie!. 8) with fuel filler cap. To check the fluid level, remove cap «8» from To lift the cover complete with fuel filler cap, reservoir « A» and ensure that the fluid always press control button «... -
Page 22: Terminal Block With Fuses
The box fits fuses of 1 6 A. The taps lever has three positions: «ON» open, arrow upwards. Fuse n. 1 : Rear brake light, turn signals. • « RES» reserve, arrow downwards. Fuse n. 2: Starter relay, front brake l ight, fla •... - Page 23 Steering locking Sad dle locking device (Picl. 13) (<<A Picl. To lock : On the L/H side, rear. turn handlebar fully to the right; To lock : • insert the key into the lock set, turn it coun push the saddle down u ntil to hear «8 hook�...
-
Page 24: Side Stand
Side stand (<<A» Pic!. 14) Should be used only for short stops. Be sure to r.aise it when re-starting or else se rious troubles may occur. -
Page 25: Riding Instructions
RIDING INSTRUCTIONS seconds in the hot season and a few minutes in Checking the cold season before returning the start lever. Before starting the engine ensure that: Should the starter lever be left on «A ( Pict. 28) whilst riding, carburation will be irregular with there is sufficient fuel in the tank;... - Page 26 To stop the engine turn the ignition key to posi- On the way tion «OFF» (Pic!. 4). To change to another gear, close the throttle, When the engi ne is stopped, remem ber to c lose pull the clutch control lever fully in and engage the fuel taps.
- Page 27 RUNNING IN Before stopping, reduce the speed grad ually to prevent the various engine assemblies from u ndergoing abrupt changes of tem perature. During the run ning in period follow strict ly these Make sure a l l the operations specified in th recom mendations : se rvice voucher are carried out at the stated Before...
-
Page 28: Maintenance
MAINTENANCE Adjusting the right front brake Adjusting the clutch control lever (Pict. 15) control lever (Pict. 16) If the free play at the handlebar lever is more or less than 4 mm, screw in or out adjuster If the free play at the handlebar is more or less than 4 mm, act on adjus·ter to obtain... -
Page 29: Checking Brake Pads Wear
braking circuits but only operate the control Checking brake pads wear «8 (Pict. 17) several times until the pistons calipers reach their normal position. Every 5000 km (3000 mi.) check the brake pad Check also the condition of the f l uid pip thickness : should they be demaged, replace them imm diately. -
Page 30: Checking The Brake Discs
mounting of the disc on the hub and play Checking the brake discs of the hub bearings. Torque wrench setting for (<<G» Pict. 17-18) the disc-hub securing screws is 2.2 2.4 kgm (15-17 Ibs/ft.). The brake discs must be accurately clean and without oil, fat, or other dirt and must not show any deep scoring. - Page 31 Periodically check the fluid level in reservoir Bleeding the air from the �A,. (Pic!. It must never lall under Ihe reser 17). braking circuits (Pict. 17-18) voir partit ion. This operation is required when the movemen l Periodically or whenever necessary top up of the control lever on Ihe handlebar or control fluid reservoir �A", after loosening cap �B.
- Page 32 fully draw control lever release it slowly «8», and wait for a few second before drawing it again. Repeat this operation until no more bub- bles come out from the pipe end in the container;...
- Page 33 keep control lever «8» ful ly drawn and lock fit a feeler gauge «A» between fl oater in ma • drain plug «C». Then remove pipe «E» and re ster cylinder and control lever end; fit rubber cover onto the drain plug. correct play: 0.05-7-0.15 m m ( 0.0019- : •...
-
Page 34: Adjusting The Steering
After adjustment, fe-lock nut B ... and steering Adjusting the steering Pict. 19) head bolt <cA". It is recommended to have this operation carried safe riding the steering has to be adjusted out by our dealers. that handlebar can move freely without any play. -
Page 35: Removal Of Wheels
REMOVAL OF WHEELS Front wheel (Pic!. 21) set up the vehicle on the center stan d and • place a block under the engine crankcase to free the wheel from the ground; u n do the screws securing the brake caliper to •... -
Page 36: Wheel Balancing
u ndo was he red n u t «A» on wheel s p i n d l e , if one point of the wheel always stops at the • • drive box side; bottom, put a su itable weight on the opposite side;... - Page 37 two persons Tires • Pire l l i Metzeler 2,4 kg/cm2 (l b/in2 34,2) The tire condition is of main i mportance as the Michelin stabil ity, riding comfort, and even the rid er's sa fety are largely dependant on the state of the These data are intended for normal use (louring).
- Page 38 It is also very important for the tire bead to be properly entered into the center rim g roove. Tires that have an arrow on their side wil l have fitted in the following way: rear w h e e l , with arrow turned t owards the •...
-
Page 39: Lubrication And Maintenance Chart
LUBRICATION AND MAINTENANCE CHART 3000 Tighten all nuts and bolts. Monthl y (or every • Check rocker clearance (see chapter 2000 Valve • mi a.) «Tappet Clearance»). Gearing Check electrolyte level in battery (see chapter • «Battery»). Elec trical Equipm ent 3000 (2000 Every... - Page 40 the fluid level and changing the brake fluid ir; Every 6000 km (4000 mi a.) braking circuits») . Repl ace the oil filter cartridge (see chapter • «Replacing of oil filter cartridge»). Lubrications Every 20.000 km (12.000 mi a.) All checkings hereunder described must be car Every 1 0.000 km (6000 mi a.) ried out by our dealers :...
- Page 41 LUBRICATIONS Let the engine idle for a few minutes before che Engine (Pict. 23) cking; oil filler dipstick must be screwed « down fully. Checking the oil level: Every 500 km (300 mi a.) check the oil level Changing the oil: •...
- Page 42 U ndo drain plugs and oil fi ller Undo cartr idge securing screw and re- • « » « » • « », cap. Pict. 23. move the group consisting of: cover gasket « », « », spring cartridge o i l fully drain from sump «...
- Page 43 This operation has to be carried out when the Ge a r box (Pic!. oil is still warm and easy to drain. Remember to drain all the old oil before introducing fresh oil. Checking the oil level: «A.. Oil filler cap. Every mi a.) check that the oil 3000...
-
Page 44: Front Fork
This operation should be done on a warm engine (CA» filler cap. when the o i l is fluid and so more easily drained. «B» vent plug. sure to drain all the old oil before introducing « C" drain plug. fresh oil. - Page 45 Rear swing arm bearings. • Other lubrications Right front brake cable. • Tacho transmission gear. • For lubricating : Use «Agip Grease 30». Steering caps and balls. •...
- Page 46 CARBURATION Carburettors (Pict. 28) Controls: carburettors De l l'Orto «VHB 24 FD (right)> > Throttle control grip, o n the R/H side of the «VHB24 FS (left)>>. handlebar. Starter control lever for starting a cold en • on the L/H side of the mo,torcycle un der a gine, screw securing intake tube to e ngine head.
- Page 47 Place your hands at each exhaust pipe end setting: Carburettor standard to make sure pressure is even. If not, act on Choke screw .. D .. of one carburettor until both exhaust Throttle pressures are the same (since the idling speed 260 A H Atomizer has to be kept at about 1000-1200 rpm, it may...
- Page 48 With the twist grip fu lly closed, check that advance by screwing in cable adjuster «F» and the clearance between the cable termi nal and loosened counternut «G» until the pressure is the same for both exhaust pipes. adjusting screws is 1 -7- 1.5 mm (0.039 -7- 0.059") both carburettors.
-
Page 49: Replacing The Air Filter
Rep lacing the air filter (Pict. 29) Every 10.000 kms (6000 m i les) or mo re frequently in case of riding on dusty roads, it is advisable to replace the air fi lter «A". This filter is accomodated in a suitable housing over the power unit together with the oi l breather assembly. -
Page 50: Valve G Earin G
VALVE G EARIN G After removing the the cyli nder head cover, ope Adj usting tappet play (Picl. 30) rate as follows : Slacken nut «A». After the first 500 1 000 kms (300 600 miles) and later on every 3000 kms (1900 miles) or any Screw i n or out adj usting screw «B .. - Page 51 IGNITION The electro nic i gn ition device req u i res practically ponents (electronic boxes and pickups) o r i n the no mai ntenance as it consists of part not subject electrical connections. to mechani cal wear. If an emergency arises, see the instructions in According ly, no periodical servicing is req u i red, the fol lowi ng chapter for a adjustment of...
- Page 52 M a n u a l a d j u s t m e n t of i g n i t i o n recom mended cl earance «A» of 0. 1 5 0.20 mm ( .0059 - .0079 " ) ( Picl. 32 ) . I n case of i n correct t i m i n g (pic!.
- Page 53 The crankshaft is rotated until the mark Check p ic k - u p clearance indicated under « » points 7 and 8. on the flywheel comes to the middle of the hole (looking through inspection hole « » Note - In case control sleeve is removed from «...
- Page 54 perature, then g radually increase the revs up to Checking the ignition timing 6000 rpm. (watch rev. counter on Instruments by means of a stroboscope panel). lam p (Pict. 33) Main purpose of this control is to ensure proper operation of the electronic box and especially to check that it times the max automatic advance correctly.
-
Page 55: Spark Plugs
At this stage direct the stroboscope lamp light Spark plugs and ensure that mark to inspection hole « » « » on the flywheel is in the middle of the inspection Spark plugs to be used are : M arelli CW 9 PL - hole itself (see If this does not occur, it «... -
Page 56: Electrical Equipment
ELECTRICAL EQUIPMENT The electrical equipment includes the following: sure (red) - high beam (blue) - gen erator war ning (red). - B·attery. - Starter motor. Generator-Alternator. - Electronic box. Battery Pick-up. Rotor (Block on the control sleeve). Battery is a 12 type with a capacity of 20 AH - Ignition coils. - Page 57 After removing the caps fill in each battery Let the battery at rest for two hours. cell suph uric acid, battery type, with specific gra Charge the battery with i n te n s ity equal to vity 1 .26 30°.
-
Page 58: Replacement Of Light Bulbs
In case new or second hand batteries are left Repl acement light bul bs unused for fairly long periods of time, it is a good rule to re -charge them every month. (Pict. 35) H eadl amp Always keep the battery terminals spotless' Undo bottom screw «A», withdraw the beam unit, clean and sm eared wi,th neutral vaseline. - Page 59 ( Pic!. H ead lig ht beam adjusting Turn signals ( P i c!. 35) Undo the screws securing reflectors to t u rn « » For a saf·e r i d i n g and not to trouble crossing signa l lights, push bulbs inwards turni n g them riders, the head l ight beam has always to be set to the left and slip them off.
-
Page 60: Key To Wiring Diag Ram
KEY TO WIRING DIAG RAM... - Page 61 Tachometer (bu l b 3 1 2 V) Turn s i g r.al flasher u n i t Rev. counter (bu l b 3 - 1 2 V) I g n i t i o n c o i l H i g h beam warn i n g l i ght ( bu l b 1 ,2 - «h ..
- Page 63 SEIMM MOTO GUZZI S. Mandello del Larlo Reglstro Socleta Lecco N. 2220...
Need help?
Do you have a question about the V 50 and is the answer not in the manual?
Questions and answers