
Related Manuals for Beko EFW6000WS


Summary of Contents for Beko EFW6000WS
- Page 1 尺寸:145x210 警告语≥3.2mm 颜色:CMYK 设计:铭 版本:V2 Tower Fan User Manual EFW6000WS EN/FR/IT/DE/RO 01M-8837593200-4520-01...
- Page 2 Please read this user manual first! Dear Customer, Thank you for preferring a Beko product. We hope that you get the best results from your product which has been manufactured with high quality and state-of- the-art technology. Therefore, please read this entire user manual and all other accompanying documents carefully before using the product and keep it as a reference for future use.
-
Page 3: Table Of Contents
CONTENTS 1 Safety instructions 2 Part figure 3 Assembly instructions 4 Operation instructions 4.1 Remote controller (Fig. 4)................8 4.2 Buttons on fan body/panel indication (Fig. -
Page 4: Safety Instructions
Safety instructions Warning Read rules for safe operation and instructions carefully. •If the supply cord is damaged, it must be replaced by manufacturer or its service agent or a similarly qualified person in order to avoid a hazard. •To protect against the risk of electrical shock, do not immerse the unit, cord or plug in water or other liquid. - Page 5 Safety instructions This symbol indicates that this product shall not be • disposed with other household wastes at the end of its service life. Used device must be returned to o cial collection point for recycling of electrical and electronic devices. To nd these collection systems please contact to your local authorities or retailer where the product was purchased.
-
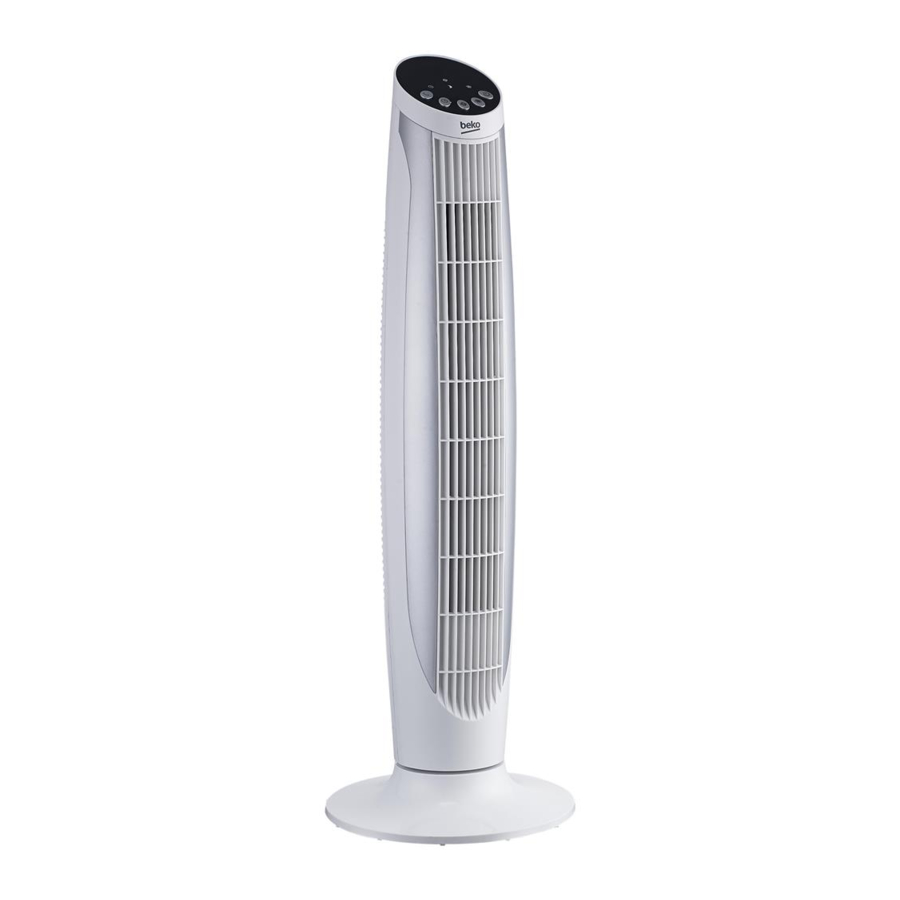
Page 6: Part Figure
Part figure 1. Body 2. Front base 3. Rear base 4. Plastic nut 5. Power cord Note: All the pictures in this manual are for explanation purpose only. Any discrepancy between the real object and the illustration in the drawing shall be subject to the real subject. -
Page 7: Assembly Instructions
Assembly instructions 1. Take out the fan body and the spare parts from the box. Put the front base onto rear base and join them together. (See Fig. 1) 2. Pass the power cord through the flute, then insert the fan body into the base. (See Fig. 3) 3. -
Page 8: Operation Instructions
Operation instructions 4.1 Remote controller (Fig. 4) a. Key instructıon 1. “ ” On/Off key The “On” key is for switching on the fan. The fan will be started at breeze step. Press the “Off” key if the fan needs to switch off. 2. -
Page 9: Buttons On Fan Body/Panel Indication (Fig. 6)
Operation instructions Battery warning as below 1. Do not dispose of batteries in fire, batteries may explode or leak. 2. Do not mix old and new batteries. 3. Do not mix alkaline, standard (carbon-zinc) or rechargeable (nickel-cadmium) batteries. c. Remote controller operation Point the remote controller at the receptor on body of the fan and press the desired button. -
Page 10: Other
Other 5.1 Maintenance instructions The fan requires little maintenance. Do not try to fix it by yourself. Refer it to qualified service personnel if service is needed. 1. Before cleaning and assembling, fan must be unplugged. 2. To ensure adequate air circulation to the motor, keep vents at the rear of the motor free of dust. Do not disassemble the fan to remove dust. - Page 11 Note: This symbol indicates that this product shall not be disposed with other household wastes at the end of its service life. Used device must be returned to o cial collection point for recycling of electrical and electronic devices. To nd these collection systems please contact to your local authorities or retailer where the product was purchased.
- Page 12 www.beko.com...
- Page 13 Ventilateur colonne Manuel d'utilisation EFW6000WS EN/FR/IT/DE/RO...
- Page 14 Veuillez d'abord lire ce manuel d’utilisation ! Chère cliente, cher client, Nous vous remercions d’avoir acheté un produit Beko. Nous espérons que ce produit vous apportera entière satisfaction. Tous nos produits sont fabriqués dans une usine moderne et font l’objet d’un contrôle de qualité...
- Page 15 Tables des matières 1 Consignes de sécurité 2 Schéma des pièces 3 Instructions de montage 4 Instructions d’utilisation 4.1 Télécommande (Fig. 4) ................8 4.2 Signalétique des touches sur la colonne/le tableau du ventilateur (Fig.
- Page 16 • • Cet appareil peut être utilisé par des enfants âgés d’au moins 8 ans • et par des personnes ayant des capacités physiques, sensorielles ou mentales réduites ou dénuées d’expérience ou de connaissance, s’ils (si elles) sont correctement surveillé(es) ou si des instructions relatives à...
-
Page 17: Consignes De Sécurité
Consignes de sécurité • Ce symbole indique que ce produit ne doit pas être jeté avec les déchets ménagers à la n de sa vie utile. Les appareils usagés doivent être retournés au point de collecte o ciel destiné au recyclage des appareils électriques et électroniques. Pour trouver ces systèmes de collecte, veuillez contacter les autorités locales ou le détaillant auprès duquel vous avez acheté... -
Page 18: Schéma Des Pièces
Schéma des pièces 1. Colonne 2. Partie avant du socle 3. Partie arrière du socle 4. Écrou en plastique 5. Cordon d’alimentation Remarque : Toutes les illustrations présentes dans ce manuel sont données uniquement à titre d’exemple. En cas de différence entre le produit réel et son illustration, la forme actuelle prévaut. -
Page 19: Instructions De Montage
Instructions de montage 1. Sortez la colonne de ventilation et les pièces détachées de la boîte. Placez la partie avant du socle sur la partie arrière, puis enclenchez-les pour les unir. (Voir Fig. 1) 2. Passez le cordon d’alimentation dans l’orifice, puis insérez la colonne du ventilateur dans le socle. (Voir Fig. -
Page 20: Instructions D'utilisation
Instructions d’utilisation 4.1 Télécommande (Fig. 4) a. Instructions relatives aux touches 1. « » Touche Marche/Arrêt La touche « Marche » permet de mettre en marche le ventilateur. Le ventilateur se met en marche sur la vitesse Brise. Appuyez sur la touche « Arrêt » pour éteindre le ventilateur. 2. -
Page 21: Signalétique Des Touches Sur La Colonne/Le Tableau Du Ventilateur (Fig. 6)
Instructions d’utilisation Avertissements relatifs aux piles ci-dessous 1. Ne tentez pas de détruire les piles par le feu car elles pourraient exploser ou fuir. 2. Ne mélangez pas piles neuves et piles usées. 3. Ne mélangez pas piles alcalines, piles standard (zinc-carbone) et/ou piles rechargeables (nickel-cadmium). -
Page 22: Autres Instructions
Autres instructions 5.1 Consignes d’entretien Ce ventilateur exige peu d’entretien. N’essayez pas de le réparer par vous-même. Si une réparation est nécessaire, veuillez contacter un technicien qualifié. 1. Débranchez le ventilateur avant son nettoyage et/ou son montage. 2. Empêchez la poussière de s’accumuler à l’arrière de l’appareil, afin de garantir une bonne circulation de l’air vers le moteur. - Page 23 Remarque : Ce symbole indique que ce produit ne doit pas être jeté avec les déchets ménagers à la n de sa vie utile. Les appareils usagés doivent être retournés au point de collecte o ciel destiné au recyclage des appareils électriques et électroniques. Pour trouver ces systèmes de collecte, veuillez contacter les autorités locales ou le détaillant auprès duquel vous avez acheté...
- Page 24 www.beko.com...
- Page 25 Ventilatore a colonna Manuale dell'utente EFW6000WS EN/FR/IT/DE/RO...
- Page 26 Leggere prima il presente manuale! Gentile Cliente, grazie per aver scelto un prodotto Beko. Ci auguriamo che lei ottenga i migliori risultati dal suo prodotto, realizzato secondo elevati standard di qualità e con una tecnologia all'avanguardia. Pertanto, legga attentamente tutto il manuale e tutti i documenti di accompagnamento, prima di utilizzare il prodotto, e li conservi per riferimento futuro.
- Page 27 SOMMARIO 1 Istruzioni per la sicurezza 2 Componenti 3 Istruzioni per il montaggio 4 Istruzioni di funzionamento 4.1 Telecomando (Fig. 4) ................8 4.2 Pulsanti sul pannello di controllo del corpo del ventilatore (Fig.
-
Page 28: Istruzioni Per La Sicurezza
Istruzioni per la sicurezza Attenzione Leggere attentamente le regole e le istruzioni per il funzionamento sicuro. •Se il cavo di alimentazione è danneggiato, deve essere sostituito dal produttore, dal servizio di assistenza o da personale qualificato al fine di evitare rischi. •Per proteggersi dal rischio di scosse elettriche, non immergere l' u nità, il cavo o la spina in acqua o altri liquidi. - Page 29 Istruzioni per la sicurezza - Pulire l' i nvolucro del ventilatore e la protezione della ventola con un panno leggermente inumidito. Questo simbolo indica che questo prodotto non deve • essere smaltito con altri ri uti domestici al termine della sua vita utile.
-
Page 30: Componenti
Componenti 1. Corpo 2. Base anteriore 3. Base posteriore 4. Dado in plastica 5. Cavo di alimentazione Nota: Tutte le illustrazioni di questo manuale servono solo a scopo esplicativo. Qualsiasi discrepanza tra l'oggetto reale e l'illustrazione raffigurata deve essere rapportata all' o ggetto reale. -
Page 31: Istruzioni Per Il Montaggio
Istruzioni per il montaggio 1. Estrarre il corpo del ventilatore e i componenti dalla scatola. Collocare la base anteriore sulla base posteriore e unirle. (Consultare la Fig. 1) 2. Far passare il cavo di alimentazione attraverso la scanalatura, quindi inserire il corpo del ventilatore nella base. -
Page 32: Istruzioni Di Funzionamento
Istruzioni di funzionamento 4.1 Telecomando (Fig. 4) a. Funzionamento dei tasti 1. “ ” Pulsante di accensione/spegnimento Il tasto "On" serve per accendere il ventilatore. Il ventilatore si avvierà alla velocità minima. Per spegnere il ventilatore, premere il pulsante "Off". 2. -
Page 33: Pulsanti Sul Pannello Di Controllo Del Corpo Del Ventilatore (Fig. 6)
Istruzioni di funzionamento Avvertenze sulle batterie 1. Non smaltire le batterie bruciandole in quanto potrebbero verificarsi esplosioni o fuoriuscite di liquidi. 2. Non utilizzare congiuntamente batterie usate e nuove. 3. Non mescolare batterie alcaline, standard (carbonio-zinco) o ricaricabili (nichel-cadmio). c. Funzionamento del telecomando Puntare il telecomando verso il ricettore sul corpo del ventilatore e premere il pulsante desiderato. -
Page 34: Istruzioni Supplementari
Istruzioni supplementari 5.1 Istruzioni per la manutenzione Il ventilatore non richiede particolari attenzioni. Non tentare di riparare il ventilatore da soli. Rivolgersi a personale qualificato se occorre eseguire delle riparazioni. 1. Prima di eseguire pulizia e assemblaggio, il ventilatore deve essere scollegato dall' a limentazione. 2. - Page 35 Nota: Questo simbolo indica che questo prodotto non deve essere smaltito con altri ri uti domestici al termine della sua vita utile. Il dispositivo usato deve essere portato a un punto di raccolta u ciale per il riciclaggio di dispositivi elettrici ed elettronici. Per individuare questi punti di raccolta, contattare le proprie autorità...
- Page 36 www.beko.com...
- Page 37 Turmventilator Bedienungsanleitung EFW6000WS EN/FR/IT/DE/RO...
- Page 38 Lesen Sie zunächst diese Bedienungsanleitung durch! Sehr geehrte Kunden und Kundinnen! Vielen Dank, dass Sie sich für ein Produkt von Beko entschieden haben. Wir hoffen, dass Ihnen dieses Produkt optimalen Nutzen bringen wird. Dieses hochwertige Produkt wurde mit modernster Technologie hergestellt. Lesen Sie die gesamte Bedienungsanleitung und alle anderen Begleitdokumente sorgfältig durch, bevor Sie...
- Page 39 INHALTSVERZEICHNIS 1 Sicherheitshinweise 2 Teileübersicht 3 Installationsanleitungen 4 Gebrauchsanleitungen 4.1 Fernbedienung (Abb. 4)................8 4.2 Tasten am Gerät/Bedienfeld (Abb.
- Page 40 Sicherheitshinweise Warnung Lesen Sie die Hinweise für einen sicheren Gebrauch sowie alle Anleitungen sorgfältig durch. •Ein beschädigtes Netzkabel muss vom Hersteller, dessen Kundendienst oder einer ähnlich qualifizierten Fachkraft ersetzt werden, um Gefahrensituationen zu vermeiden. •Um Stromschläge zu vermeiden, dürfen weder das Produkt noch das Kabel oder der Stecker in Wasser oder andere Flüssigkeiten eingetaucht werden.
-
Page 41: Sicherheitshinweise
Sicherheitshinweise Dieses Symbol zeigt an, dass dieses Gerät am Ende seiner • Einsatzzeit nicht mit anderem Hausmü ll entsorgt werden darf. Altgeräte müssen an o zielle Sammelstellen zum Recycling elektrischer und elektronischer Geräte abgegeben werden. Nähere Angaben zu diesen Sammelstellen erhalten Sie von Ihrer Stadtverwaltung oder dem Händler, bei dem Sie das Gerät erworben haben. -
Page 42: Teileübersicht
Teileübersicht 1. Hauptgerät 2. Vorderer Sockel 3. Hinterer Sockel 4. Kunststoffmutter 5. Netzkabel Hinweis: Alle Abbildungen in dieser Bedienungsanleitung dienen nur der Veranschaulichung. Das tatsächliche Produkt kann von den Abbildungen abweichen und hat immer Priorität. 6 / 12 DE Turmventilator / Bedienungsanleitung... -
Page 43: Installationsanleitungen
Installationsanleitungen 1. Nehmen Sie das Gerät und die Ersatzteile aus der Verpackung. Setzen Sie den vorderen Sockel auf den hinteren Sockel und verbinden Sie beide Teile miteinander. (Siehe Abb. 1) 2. Führen Sie das Netzkabel durch die Rille und stecken Sie den Ventilator in den Sockel. (Siehe Abb. 3) 3. -
Page 44: Gebrauchsanleitungen
Gebrauchsanleitungen 4.1 Fernbedienung (Abb. 4) a. Tasten und Funktionen 1. „ “ Ein/Aus-Taste Verwenden Sie die „Ein“-Taste zum Einschalten des Ventilators. Das Gerät startet den Betrieb mit der Windeinstellung. Drücken Sie die „Aus“-Taste, um das Gerät auszuschalten. 2. „ “ Leistungstaste Drücken Sie nach dem Einschalten diese Taste wiederholt. -
Page 45: Tasten Am Gerät/Bedienfeld (Abb. 6)
Gebrauchsanleitungen Beachten Sie nachfolgende Warnung für Batterien 1. Batterien nicht ins Feuer werfen, sie könnten explodieren oder auslaufen. 2. Alte und neue Batterien nicht gemeinsam verwenden. 3. Unterschiedliche Batterietypen wie Alkalibatterien, herkömmliche Batterien (Kohle-Zink) oder wiederaufladbare Batterien (Nickel-Kadmium) nicht gemeinsam verwenden. c. -
Page 46: Andere Funktionen
Andere Funktionen 5.1 Wartung Der Ventilator muss nur geringfügig gewartet werden. Reparieren Sie den Ventilator nicht eigenständig. Sofern erforderlich, lassen Sie das Gerät nur von qualifizierten Wartungstechnikern reparieren. 1. Trennen Sie das Gerät vor der Reinigung und Installation vom Netzstrom. 2. -
Page 47: Entsorgung
Entsorgung Hinweis: Dieses Symbol zeigt an, dass dieses Gerät am Ende seiner Einsatzzeit nicht mit anderem Hausmü ll entsorgt werden darf. Altgeräte müssen an o zielle Sammelstellen zum Recycling elektrischer und elektronischer Geräte abgegeben werden. Nähere Angaben zu diesen Sammelstellen erhalten Sie von Ihrer Stadtverwaltung oder dem Händler, bei dem Sie das Gerät erworben haben. - Page 48 www.beko.com...
- Page 49 Ventilator turn Manual de utilizare EFW6000WS EN/FR/IT/DE/RO...
- Page 50 Stimate client, Vă mulţumim că aţi ales un produs Beko. Sperăm să obţineţi cele mai satisfăcătoare rezultate de la acest produs, ce a fost fabricat la standarde de calitate și cu tehnologie de ultimă generaţie. De aceea, înainte de a folosi produsul, vă rugăm să...
- Page 51 CUPRINS 1 Instrucţiuni referitoare la siguranţă 2 Figura 3 Instrucţiuni de asamblare 4 Instrucţiuni de operare 4.1 Telecomandă (Fig. 4) 4.2 Butoane pe corpul ventilatorului/indicatorul panoului (Fig. 6) Altele 5.1 Instrucţiuni de întreţinere 5.2 Curăţarea 5.3 Date tehnice Eliminare 3 / 12 RO Ventilator turn/Manual de utilizare...
- Page 52 Instrucţiuni referitoare la siguranţă Avertizare Citiţi cu atenţie regulile și instrucţiunile pentru utilizarea în condiţii de siguranţă. • În cazul în care cablul de alimentare este deteriorat, acesta trebuie să e înlocuit e de către producător, de un reprezentant al service-ului sau de o persoană cali cată pentru a evita orice pericol.
- Page 53 Instrucţiuni referitoare la siguranţă dezasamblată sau deschisă. -Ștergeţi cadrul ventilatorului și carcasa de protecţie a palelor rotorului cu o cârpă ușor umedă. Asiguraţi-vă că bateriile plate sunt eliminate în • conformitate cu legile și reglementările locale. Simbolul de pe baterie și ambalaj indică faptul că bateria livrată împreună cu produsul nu trebuie considerate deșeu menajer.
- Page 54 Figura 1. Corp 2. Bază faţă 3. Bază spate 4. Piuliţă de plastic 5. Cablu de alimentare Notă: Toate imaginile din acest manual au doar un scop explicativ. În caz de neconcordanţă între obiectul real și ilustraţie, obiectul real va avea întâietate. 6 / 12 RO Ventilator turn/Manual de utilizare...
- Page 55 Instrucţiuni de asamblare 1. Scoateţi corpul ventilatorului și piesele de schimb din cutie. Puneţi baza din faţă pe baza din spate și uniţi-le. (A se vedea Fig. 1) 2. Treceţi cablul de alimentare prin canal, apoi introduceţi corpul ventilatorului în bază. (A se vedea Fig.
- Page 56 Instrucţiuni de operare 4.1 Telecomandă (Fig. 4) a. Instrucţiuni taste 1. „ ” Tasta On/O (Pornit/Oprit) Tasta „On” (pornit) servește la pornirea ventilatorului. Ventilatorul va pornit la pasul briză. Apăsaţi tasta „Oprit” dacă ventilatorul trebuie să se oprească. 2. „ ”...
- Page 57 Instrucţiuni de operare Avertizare privind bateria, după cum urmează 1. Nu aruncați bateriile în foc, bateriile ar putea exploda sau scurge. 2. Nu amestecați bateriile vechi cu altele noi. 3. Nu amestecați baterii alcaline, standard (seria carbon) sau reîncărcabile (nichel-cadmiu). c.
- Page 58 Altele 5.1 Instrucţiuni de întreţinere Ventilatorul necesită o întreținere simplă. Nu încercați să îl reparați singur. În cazul în care necesită reparaţie, adresaţi-vă personalului cali cat. 1. Înainte de curăţare și asamblare, ventilatorul trebuie scos din priză. 2. Pentru a asigura o ventilaţie e cientă a aerului la motor, îndepărtaţi praful de pe ori ciile de ventilație din spatele motorului.
- Page 59 Eliminare Notă: Asiguraţi-vă că bateriile plate sunt eliminate în conformitate cu legile și reglementările locale. Simbolul de pe baterie și ambalaj indică faptul că bateria livrată împreună cu produsul nu trebuie considerate deșeu menajer. În anumite locuri, acest simbol poate utilizat în combinaţie cu un simbol chimic. În cazul în care bateriile conţin mai mult de 0,0005% mercur sau mai mult de 0,004% plumb, simbolul Hg pentru mercur și simbolul Pb pentru plumb sunt plasate sub simbolul chimic.