
Related Manuals for Riello AMW


Summary of Contents for Riello AMW
- Page 1 AMW - AMW Q- AMK N - AMC - AMD AN ISTRUZIONI PER L’UTENTE USER MANUAL www.riello.it...
- Page 2 AARIA Gentile Cliente, La ringraziamo per aver preferito un prodotto RIELLO, un apparecchio innovativo e di qualità che Le assicurerà benessere per lungo tempo. Con questo libretto desideriamo fornirle le informazioni che riteniamo necessarie per un corretto e più facile utilizzo.
-
Page 3: Table Of Contents
22. Soft 23. Health airflow 24. Spegnimento temporaneo 25. Spegnimento per lunghi periodi 26. Manutenzione 27. Pulizia 28. Interruttore ausiliario AMW - AMW Q 29. Anomalie In alcune parti del libretto sono utilizzati i simboli: ATTENZIONE= per azioni che richiedono particolare... -
Page 4: Avvertenze Generali
Servizio Tecnico di Assistenza RIELLO di zona. interventi riparazione manutenzione devono essere eseguiti dal Servizio Tecnico di Assistenza RIELLO, o da personale qualificato, secondo quanto previsto nella presente pubblicazione. Non modificare o manomettere l’apparecchio in quanto si possono creare situazioni di pericolo ed il costruttore dell’apparecchio... -
Page 5: Regole Fondamentali Di Sicurezza
AARIA 2. Regole fondamentali di sicurezza È vietato assolutamente toccare le parti in movimento, interporsi tra le stesse, o introdurre oggetti appuntiti attraverso le griglie. È vietato l’uso dell’apparecchio ai bambini e alle persone inabili non assistite. È vietato aprire gli sportelli di accesso ed effettuare qualsiasi intervento tecnico o di pulizia, prima di aver scollegato... -
Page 6: Descrizione
Inverter e rappresentano un importante riferimento per il condizionamento domestico di ambienti di piccole/medie dimensioni. AMW - AMW Q Unità interna per installazione a parete. Il prodotto è caratterizzato da: Mobile di copertura in materiale plastico autoestinguente Gruppo elettroventilante costituito da... - Page 7 AARIA AMK N Unità interna a cassette per installazione in controsoffitto. Il prodotto è caratterizzato da: Batteria di scambio costituita da tubi di rame e alette in alluminio turbolenziate Sistema filtrante con filtri acrilici rigenerabili Struttura in lamiera zincata rivestita con materiale isolante a cella chiusa.
- Page 8 AARIA Unità interna per installazione a pavimento. Il prodotto è caratterizzato da: Batteria di scambio costituita da tubi di rame e alette in alluminio turbolenziate Sistema filtrante con filtri acrilici rigenerabili Struttura in lamiera zincata rivestita con materiale isolante a cella chiusa. Gruppo elettroventilante costituito da ventola centrifuga e motore velocità...
-
Page 9: Telecomando
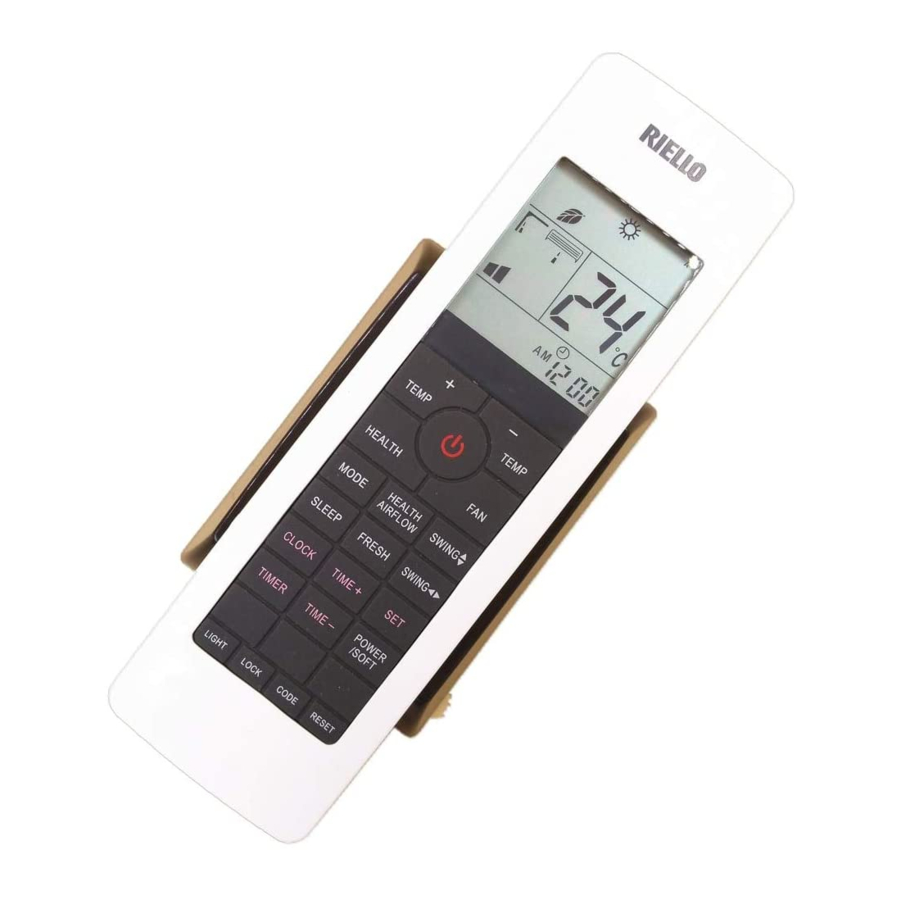
AARIA 4. Telecomando Display Simbolo timer Timer On attivato Simbolo della velocità di ventilazione Indica la velocità di ventilazione attuale Blocco display Blocco telecomando attivato Simbolo Swing Deflettori aria attivi Simbolo Sleep Funzione Notturna attivata Simbolo Health Funzione ionizzatore attivato Display delle modalità... - Page 10 AARIA Tasti Codice di trasmissione del segnale all’unità interna. Per poter comunicare con CODE l’unità interna il canale selezionato deve essere lo stesso settato sull’unità interna (canale A) Controlla l’accensione e lo spegnimento del led interno del display sull’unità interna e dell’indicazione acustica: - alla prima pressione il display si accende con indicazione sonora LIGHT - alla seconda pressione il display si spegne con indicazione sonora...
-
Page 11: Messa In Servizio
AARIA 5. Messa in servizio La prima messa in servizio dell’apparecchio deve essere effettuata dal Servizio Tecnico di Assistenza RIELLO, dopodichè l’apparecchio potrà funzionare automaticamente. Si potrà presentare la necessità di rimettere in funzione l’unità senza coinvolgere il Servizio Tecnico,ad esempio dopo un periodo di assenza prolungata. -
Page 12: Utilizzo Del Telecomando
AARIA 6. Utilizzo del telecomando Il telecomando è stato progettato per consentire un uso semplice anche senza particolari programmazioni. Per attivarlo è infatti sufficiente inserire le batterie, azzerare, impostare il canale di trasmissione su “A” tramite il tasto “CODE” e regolare l’ora corrente. -
Page 13: Regolazione Dell'ora Corrente
AARIA 8. Regolazione dell’ora corrente La regolazione dell’ora è necessaria al primo utilizzo del telecomando, in caso di sostituzione delle batterie o dopo l’utilizzo del tasto reset. Prima di avviare l’unità, selezionare la modalità di funzionamento desiderata. Premere il tasto clock. La scritta “AM”... -
Page 14: Funzione Notturna
AARIA 10. Funzione notturna La funzione notturna consente di selezionare un periodo di tempo durante il quale l’apparecchio, modificherà la temperatura di riferimento in ambiente: proveniente Aumentandola funzionamento raffreddamento deumidificazione. proveniente Riducendola funzionamento in riscaldamento. Durante la funzione notturna il ventilatore riduce di uno step la velocità... -
Page 15: Programmazione Timer Avvio Automatico
AARIA 12. Programmazione timer avvio automatico programmazione timer avvio automatico consente di programmare l’ora di avviamento dell’apparecchio. Prima dell’attivazione impostare correttamente l’ora corrente. Attivazione Dopo aver avviato l’apparecchio: Premere il tasto timer. Sul display compaiono il simbolo on intermittente e l’ora precedentemente impostata. -
Page 16: Programmazione Timer Arresto Automatico
AARIA 13. Programmazione timer arresto automatico programmazione timer arresto automatico consente di programmare l’ora di spegnimento dell’apparecchio. Attivazione Premere il tasto timer fino alla comparsa sul display del simbolo off intermittente e l’ora precedentemente impostata. Agire sui tasti time+ e time- per modificare l’ora. -
Page 17: Programmazione Timer Avvio E Arresto Automatico (Funzione In Abbinamento)
AARIA 14. Programmazione timer avvio e arresto automatico (funzione in abbinamento) Le funzioni del timer possono essere anche attivate in abbinamento. L’avviamento avviene nella funzione programmata o in auto. Sono disponibili due configurazioni. Timer on-off La funzione si attiva quando l’orario di timer on è... -
Page 18: Auto
AARIA 15. Auto L’apparecchio cambia automaticamente modalità funzionamento, raffreddamento riscaldamento, mantenere temperatura ambiente costante. I valori d’impostazione della temperatura sono predefiniti da programma. Attivazione Premere il tasto on-off. Agire sul tasto mode. Selezionare auto. Agire sul tasto fan per variare la velocità di ventilazione. -
Page 19: Riscaldamento
AARIA 16. Riscaldamento funzione riscaldamento consente l’avviamento e l’uso dell’apparecchio come produttore di aria calda. Per attivare questa funzione è necessaria una temperatura esterna compresa tra -15°C e 24°C. Attivazione Premere il tasto on-off. Agire sul tasto mode. Selezionare riscaldamento. Agire sui tasti temp+ e temp- per impostare la temperatura desiderata. -
Page 20: Raffreddamento
AARIA 17. Raffreddamento funzione raffreddamento consente l’avviamento l’uso dell’apparecchio come produttore di aria raffreddata e deumidificata. Per attivare questa funzione è necessaria una temperatura esterna compresa tra -10°C e +46°C. Attivazione Premere il tasto on-off. Agire sul tasto mode. Selezionare raffreddamento. Agire sui tasti temp+ e temp- per impostare la temperatura desiderata. -
Page 21: Deumidificazione
AARIA 18. Deumidificazione funzione deumidificazione consente l’avviamento e l’uso del climatizzatore, con lo scopo di ridurre l’umidità in ambiente. Per attivare questa funzione la temperatura ambiente deve essere superiore a 16°C. Attivazione Premere il tasto on-off. Agire sul tasto mode. Selezionare deumidificazione. -
Page 22: Ventilazione
AARIA 20. Ventilazione funzione ventilazione consente l’avviamento del solo ventilatore con lo scopo di ricircolare e filtrare l’aria ambiente. Attivazione Premere il tasto on-off. Agire sul tasto mode. Selezionare ventilazione. Agire sul tasto fan per variare la velocità di ventilazione. L’apparecchio funzionerà... -
Page 23: Power
AARIA 21. Power La funzione power consente di avere riscaldamento raffreddamento istantaneamente: raffreddamento selezionando In automaticamente la velocità di ventilazione massima. riscaldamento selezionando In automaticamente la velocità di ventilazione massima. Attivazione Premere il tasto power-soft. Disattivazione Premere il tasto power-soft. 22. -
Page 24: Health Airflow
AARIA 23. Health airflow La funzione health airflow orienta i deflettori motorizzati in modo da evitare il lancio dell’aria direttamente sulle persone. Attivazione Premere il tasto health airflow. Il simbolo appare sul display indicando la posizione del deflettore aria. Premere nuovamente il tasto health airflow per cambiare la posizione del deflettore aria. -
Page 25: Spegnimento Temporaneo
Lasciare in funzione l’apparecchio per 6 ore. Disattivare l’apparecchio con il telecomando premendo il tasto on-off. l’interruttore generale Posizionare dell’impianto su “spento” Il Servizio Tecnico di Assistenza RIELLO è a disposizione qualora la procedura sopra riportata non sia facilmente attuabile. -
Page 26: Manutenzione
Le uniche pulizie necessarie, da parte dell’utente, sono quelle dei filtri a rete, dei filtri depuratori e della griglia frontale. Filtri a rete AMW - AMW Q Disattivare l’apparecchio con il telecomando premendo il tasto on-off. Posizionare l’interruttore generale dell’impianto ... - Page 27 AARIA Filtri depuratori AMW - AMW Q Disattivare l’apparecchio con il telecomando premendo il tasto on-off. l’interruttore generale Posizionare dell’impianto su “spento” Sollevare il pannello frontale. Rimuovere i filtri a rete. Rimuovere i filtri depuratori. Togliere la polvere con un aspirapolvere.
- Page 28 AARIA Non usare acqua ad una temperatura superiore a 40 °C, detersivi in polvere o abrasivi, solventi e spazzole. È vietato aprire gli sportelli di accesso ed effettuare qualsiasi intervento tecnico o di pulizia, prima di aver scollegato l’apparecchio dalla rete di alimentazione elettrica posizionando l’interruttore...
-
Page 29: Interruttore Ausiliario Amw - Amw Q
È vietato l’uso dell’apparecchio senza il filtro a rete. Per riposizionare procedere in modo inverso. 28. Interruttore ausiliario AMW - AMW Q L’interruttore ausiliario consente l’attivazione e la disattivazione dell’apparecchio in caso di emergenza (avaria al telecomando, pile scariche). -
Page 30: Anomalie
L’interruttore generale dell’impianto sia posizionato su “acceso”. Le batterie del telecomando siano cariche. In caso di necessità fare intervenire il Servizio Tecnico di Assistenza RIELLO. L’apparecchio non raffredda o non riscalda a sufficienza Verificare che: Il filtro a rete sia pulito. - Page 31 Posizionare dell’apparecchio su “spento” l’interruttore principale Posizionare dell’apparecchio su “acceso” AMW - AMW Q Unità interna Descrizione Errore di comunicazione tra unità interna ed esterna Sonda ambiente difettosa Sonda scambiatore esterno difettosa Errore EEPROM Malfunzionamento motore ventilatore Unità esterna...
- Page 32 AARIA Dear Customer, Thank you for choosing an innovative and quality RIELLO product that shall provide an excellent performance for a long time. This booklet contains all the information which might be necessary for the correct and easy use of your new equipment.
- Page 33 23. Health airflow 24. Temporary turn-off 25. Stop for an extended period of time 26. Maintenance 27. Cleaning 28. Auxiliary switch AMW - AMW Q 29. Abnormal operations The following symbols are used in this publication: WARNING = actions requiring special care and appropriate training.
- Page 34 AARIA 1. General notices All RIELLO equipment shall be installed by During storms, position the system’s main skilled operators, authorised, who shall switch in the “off” position. issue a declaration of conformity for the This unit contains fluorinated greenhouse state-of-the-art installation, that is to say, gases covered by the Kyoto protocol.
- Page 35 AARIA 2. Fundamental safety rules It is strictly forbidden to touch any moving parts, interfere with them or introduce pointed objects through the grids. Do not allow children or unassisted disabled people to use the unit. Do not open the access covers and carry out technical or cleaning activities before disconnecting the unit from the power grid by positioning the system’s main...
- Page 36 The split The split units in the AARIA range are characterised by Inverter technology and represent an important reference point for home air conditioning of small and medium rooms. AMW - AMW Q Wall-mounted indoor unit. The product is characterised by: Self-extinguishing plastic cabinet group comprising Electroventilation...
- Page 37 AARIA AMK N Box indoor unit for countertop installation. The product is characterised by: Exchanger made of copper pipes and aluminium corrugated fins. Filtering system with regenerable acrylic filters Frame in galvanized steel coated with an insulating material with closed cells. Group consists of electric motor and centrifugal fan with adjustable speed.
- Page 38 AARIA Indoor unit for floor installation. The product is characterised by: Exchanger made of copper pipes and aluminium corrugated fins. Filtering system with regenerable acrylic filters Frame in galvanized steel coated with an insulating material with closed cells. Group consists of electric motor and centrifugal fan with adjustable speed.
- Page 39 AARIA 4. Remote control Display Timer symbol Timer On activated Fan speed symbol Shows the current fan speed Display lock Remote control block activated Swing symbol Air louvres active Sleep symbol Night Mode activated Health symbol Ioniser Mode activated Mode display Operation mode selected Signal trasmission symbol Using the remote control activates this.
- Page 40 AARIA Keys Transmission channel code with indoor unit. Communication between indoor CODE unit and wireless control happen only if the transmission channel set with the wireless control is the same of the one set on the indoor unit (channel A) Controls the turning on and off or the display’s internal led light on the indoor unit and of the beep: - Pressing once the display turns on and there is a beep...
- Page 41 AARIA 5. Commissioning The equipment’s first commissioning must be carried out by the RIELLO Technical Service staff; subsequently, it shall work automatically. It might become necessary to restart the unit without calling the Technical Service, for instance, after a prolonged absence.
- Page 42 AARIA 6. Use of the remote control The remote control is designed for easy usage, even without any specific programming. In order to activate it, simply insert the batteries, reset the device, set “A” channel with “CODE” button and set the clock. Battery insertion and replacement.
- Page 43 AARIA 8. Set the correct time. Upon first using the remote control unit after changing the batteries or after resetting it, it is necessary to reset the current time. Before starting the unit, select the desired operation mode. Press the clock button. The “AM”...
- Page 44 AARIA 10. Night mode In night mode, the user can select a period of time in which the unit shall change the room’s reference temperature: Increasing it if the unit is working in cooling and dehumidification mode. Decreasing it if the unit is working in heating mode.
- Page 45 AARIA 12. Setting the timer on automatic start Through the timer function on automatic start it is possible to set the time when the device should start. Ensure that the current time is correct before activating the unit. Activation After starting the unit: Press the timer button.
- Page 46 AARIA 13. Setting the timer on automatic stop Through the timer function on automatic stop it is possible to set the time when the device should stop. Activation Press the timer button until the off symbols starts blinking on the display, which aslo shows the pre-set time.
- Page 47 AARIA 14. Setting the automatic start and stop timer (combined mode) The timer’s functions can also be activated in combination. The device starts in the programmed function or in auto mode. There are two possible configurations. Timer on-off This function is activated when the timer on set time precedes the timer off set time.
- Page 48 AARIA 15. Auto unit changes operating mode automatically, switching between cooling and heating mode, to keep the room temperature constant. The temperature’s set values are pre-set by the programme. Activation Press the on-off button. Activate the mode button. Select auto Activate the fan button to change the fan’s speed.
- Page 49 AARIA 16. Heating The heating mode makes it possible to use the unit as a hot air generator. In order to activate this mode, the external temperature must fall between -15°C and 24°C. Activation Press the on-off button. Activate the mode button. Select heating operation.
- Page 50 AARIA 17. Cooling The cooling function allows the device to be used to produce cooled and dehumidified air. In order to activate this mode, the external temperature must fall between -10°C and +46°C. Activation Press the on-off button. Activate the mode button. Select cooling mode.
- Page 51 AARIA 18. Dehumidification The dehumidification function makes it possible to use the AC unit to reduce humidity in the room. In order to activate this mode, the room temperature must exceed 16°C. Activation Press the on-off button. Activate the mode button. Select dehumidification.
- Page 52 AARIA 19. Ventilation The ventilation mode makes it possible to operate the fan alone, in order to recycle and filter the air in the room. Activation Press the on-off button. Activate the mode button. Select ventilation. Activate the fan button to change the fan’s speed.
- Page 53 AARIA 21. Power The power mode makes it possible to have instant heating or cooling. In cooling mode, by automatically selecting maximum fan speed. In heating mode, by automatically selecting maximum fan speed. Activation Press the power-soft button. Deactivation Press the power-soft button. 22.
- Page 54 AARIA 23. Health airflow The health airflow mode orientates the powered louvres so as to avoid sending air directly on people. Activation Press the health airflow button. The relevant symbol appears on the display, showing the position of the air louvre. Press the health airflow again to change the position of the air louvre.
- Page 55 Leave the unit on for 6 hours. Turn off the unit from the remote control, pressing the on-off button. Position the system’s main switch in the “off” position. The RIELLO Technical Service is available in case of difficulties in carrying out the above instructions.
- Page 56 The only cleaning operation the user must care concerns the mesh filters, the air purifying filters and the front panel. Mesh filters AMW - AMW Q Turn off the unit from the remote control, pressing the on-off button. Position the system’s main switch in the “off”...
- Page 57 AARIA Air purifying filters AMW - AMW Q Turn off the unit from the remote control, pressing the on-off button. Position the system’s main switch in the “off” position. Raise the front panel. Remove the mesh filters. Remove the air purifying filters.
- Page 58 AARIA disconnecting the unit from the power grid by positioning the system’s main switch in the “off” position. Cleaning of AMK N mesh filters Release the latches to the screen. Open the screen. Unlatch the hinges Remove the screen. Take out the mesh filter pulling on the provided fins.
- Page 59 Do not use the unit without the mesh filter. In order to reposition, proceed in the reverse direction. 28. Auxiliary switch AMW - AMW Q The auxiliary switch makes it possible to activate or deactivate the unit in case of emergency (remote control breakdown, exhausted batteries).
- Page 60 The unit’s plug, if any, must be correctly plugged in. The mains switch must be “on”. The remote control’s batteries must be charged. If necessary, call RIELLO’s Technical Service. The air conditioner does not cool or warm effectively Check that: The mesh filter must be clean.
- Page 61 AARIA AMW - AMW Q Indoor unit Description Indoor - outdoor communication error Defective environmental probe Defective outdoor exchanger probe EEPROM error Fan engine malfunction Outdoor unit Description EEPROM error IPM protection activation Overcurrent protection of AC electricity for the outdoor model...
- Page 64 RIELLO S.p.A. - 37045 Legnago (VR) tel. +39 0442 630111 - fax +39 0442 22378 www.riello.it Poiché l’Azienda è costantemente impegnata nel continuo perfezionamento di tutta la sua produzione, le caratteristiche estetiche e dimensionali, i dati tecnici, gli equipag- giamenti e gli accessori, possono essere soggetti a variazione.
Need help?
Do you have a question about the AMW and is the answer not in the manual?
Questions and answers