Table of Contents
Advertisement
Quick Links
Advertisement
Table of Contents

Related Manuals for Cafe C7CDAAS3PD41


Summary of Contents for Cafe C7CDAAS3PD41
- Page 1 It is time appliances had a personality. Yours. Drip Coffee OWNER’S MANUAL...
-
Page 2: Table Of Contents
Table of Contents Model: C7CDAAS3PD41 / C7CDAAS2PS11 / C7CDAAS3PD31 / C7CDAAS3PD21 / C7CDAAS4PW21 / C7CDAAS2PS31 / C7CDAAS2PS21 / C7CDAAS4PW41 / C7CDAAS4PW31 / C7CDAAS2PS41 SAFETY INFORMATION..................4 COMPONENTS ..................... 5 GETTING STARTED ..................... 6 SETUP ........................7 Clock ......................7 Strength ....................8 Temperature .................. -
Page 3: Safety Information
IMPORTANT SAFETY INFORMATION READ ALL INSTRUCTIONS BEFORE USING THE APPLIANCE WARNING o reduce the risk of fire, explosion, electric shock, or injury when using your coffee maker, always follow these basic safety precautions. ■ READ ALL INSTRUCTIONS BEFORE USING ■ Use only a 120 V, 60 Hz standard electrical supply that is properly grounded in accordance with the National Electric Code and local codes and ordinances. -
Page 4: Components
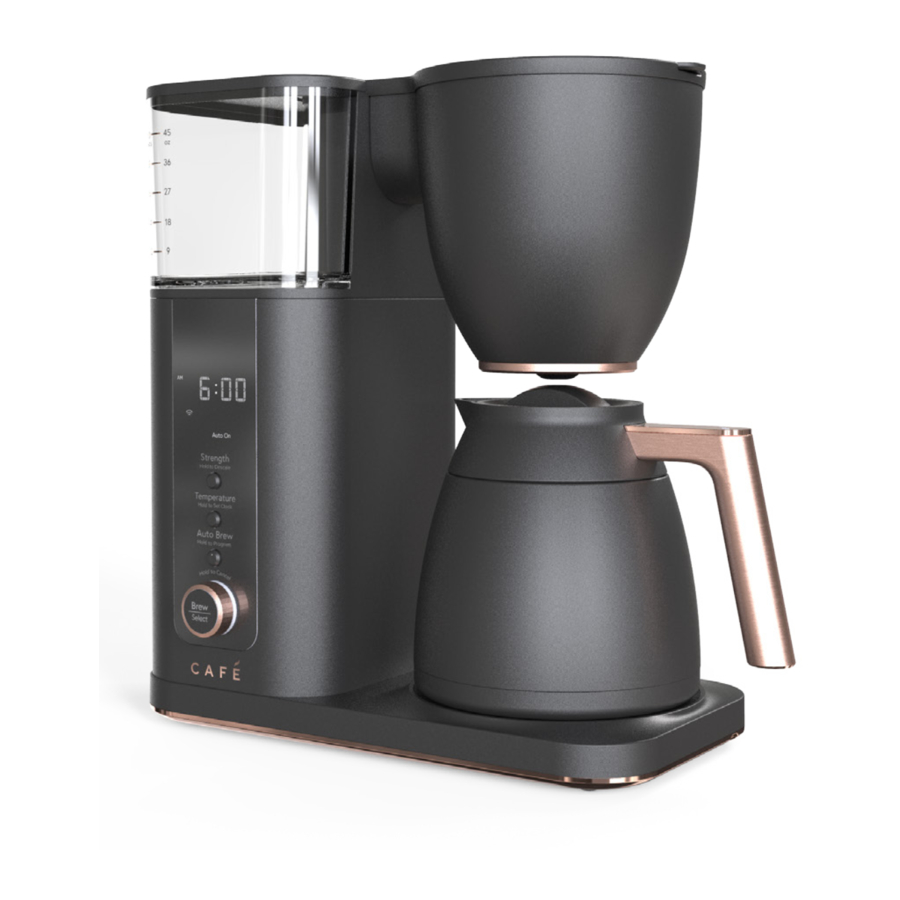
Components Tank Lid Brew Basket Insert Water Reservoir Drip Stop Lever Strength Button Showerhead Temperature Button Thermal Carafe Auto Brew Button Measuring Scoop Brew/Cancel/Select Dial Carbon Filter Mesh Basket Filter... -
Page 5: Getting Started
Getting Started INSTALLATION REQUIREMENTS ■ Product is designed to be installed indoors. Do not use your coffee maker outdoors. ■ Product must be installed upright on a flat, level surface that is able to support the total weight when full of water. - Page 6 Setup CLOCK ■ Push the Temperature button and hold for 3 seconds. Clock illuminates on the display and the white dot on the Temperature button will illuminate. ■ To set AM/PM: Rotate the Brew/ Select “Clock” knob and push to select. Illuminates Clock To set Hour: Rotate the Brew/Select knob and...
-
Page 7: Setup
Setup STRENGTH ■ Push the Strength button. The strength options and Strength button illuminate. The Strength options are Gold, Light, Medium, and Bold. GOLD: Brewing to the optimum strength Strengths using set parameters. This selection will brew Illuminate Gold Light Medium Bold coffee to the highest quality. -
Page 8: Temperature
Setup TEMPERATURE This coffee maker is regulated for temperatures between 185 and 205° F. It is recommended to brew between 195 to 205° F for best flavor extraction. For altitudes over 5000 feet, use 185° F to prevent °F water from boiling. NOTE: Temperature cannot be changed if Gold “Temp”... -
Page 9: Brewing
Brewing ■ Ensure the brew basket insert and drip stop lever in the bottom of the insert are clean and that the brew basket insert is in the brew basket. ■ Use either the mesh basket filter (included) or a No. 4 paper filter (not included) and place into the brew basket insert. -
Page 10: Auto Brew
Brewing AUTO BREW: ■ Auto Brew will let you start brewing automatically at a preset time. ■ Push the Auto Brew button for 3 seconds to program. Rotate Brew/ Select knob to select AM/PM and push to confirm. Then push the “Auto On”... -
Page 11: Pairing
Pairing Pairing Mode enables all of the functions of your coffee maker to be controlled over Wi-Fi after downloading the app. For example, you may want to customize your Auto Brew schedule - one for weekdays and one for weekends. Wi-Fi symbol To put your device into Pairing Mode, press and Illuminates... -
Page 12: Regulatory Information
Regulatory Information FCC/IC COMPLIANCE STATEMENT: This device complies with Part 15 of the FCC Rules. Operation is subject to the following two conditions: This device may not cause harmful interference, and This device must accept any interference received, including interference that may cause undesired operation. - Page 13 Notes...
-
Page 14: Limited Warranty
Refurbished Goods Limited Warranty Statement LIMITED WARRANTY TO ORIGINAL PURCHASER supplies, accessories, applications, installations, repairs, This refurbished product, as sold by Dealer to the external plumbing and leaks, external wiring, circuit original consumer purchaser, is warranted by OnPoint breakers, fuses or connectors not supplied and Warranty Solutions, LLC against manufacturing defects in authorized by OPW, or which damage this product or materials and workmanship for a limited warranty period... -
Page 15: Consumer Support
Consumer Support OnPoint Warranty/Small Appliances Website Have a question or need assistance with your appliance? Try the Small Appliances Website 24 hours a day, any day of the year! https://www.onpointwarranty.com/small- appliances-cx-portal. REGISTER YOUR APPLIANCE Register your new appliance on-line at your convenience! Timely product registration will allow for enhanced communication and prompt service under the terms of your warranty, should the need arise.
Need help?
Do you have a question about the C7CDAAS3PD41 and is the answer not in the manual?
Questions and answers