Table of Contents
Advertisement
THE PERFECT BALANCE OF FUNCTION AND STYLE
LAUNDRY - DISHWASHING - COOKING - COOLING
Installation and Operating Instructions
Built in Single Fan Oven
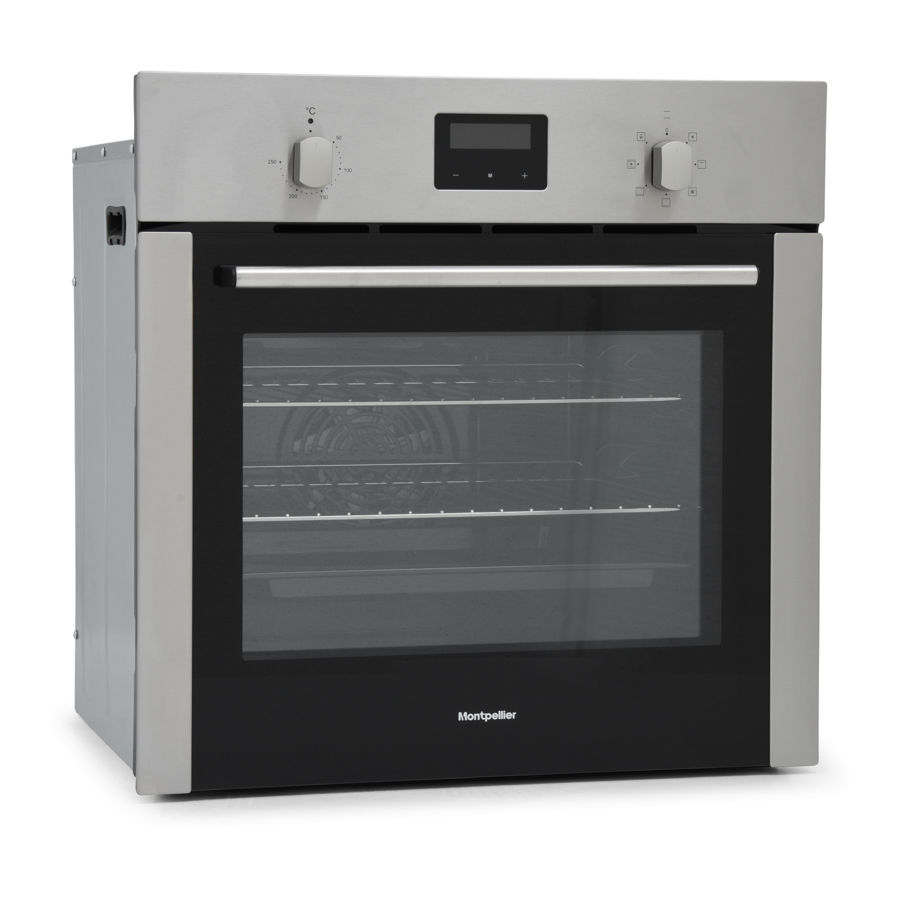
PSFO59FX - Stainless Steel
Please read these instructions carefully before attempting to install or use this appliance.
We recommend that you keep these instructions in a safe place for future reference.
Advertisement
Table of Contents

Related Manuals for montpellier PSFO59FX


Summary of Contents for montpellier PSFO59FX
- Page 1 Installation and Operating Instructions Built in Single Fan Oven PSFO59FX - Stainless Steel Please read these instructions carefully before attempting to install or use this appliance. We recommend that you keep these instructions in a safe place for future reference.
- Page 2 Welcome Thank you for choosing this Montpellier Built in Oven. Our Ovens has been designed to provide you with the best combination of style, reliability and performance to give you years of trouble-free use. You may be familiar with a similar product, but please take time to read these instructions carefully before installing or using your Built in Oven to ensure you get the most from your purchase.
-
Page 3: Table Of Contents
TABLE OF CONTENTS Safety instructions............4 How to save energy............5 Unpacking.................5 Description of the appliance..........6 Insta llation................8 Operation................10 Prior first use..............10 Electronic programmer............10 Oven..................15 Cleaning and maintenance..........17 Operation in case of emergency ........19 Baking in the oven..............20 Technical information............26... -
Page 4: Safety Instructions
SAFETY INSTRUCTIONS The appliance becomes very hot during operation.Take care not to touch the heating elements inside the oven. WARNING: Accessible parts may become hot during use.To avoid burns young children should be kept away. Mains lead of adjacent appliances may be damaged by hobs or stuck between the oven doors ,and produce short circuit ,therefore keep them at safe distance from the appliance. -
Page 5: How To Save Energy
HOW TO SAVE ENERGY Using energy in a responsible way not only saves money but also helps the environment. So let's save energy! And this is how you can do it: Make use of residual heat from the oven. If the cooking time is greater than 40 minutes, switch off the oven 10 minutes before the end time.Important when using the timer, set appropriately shorter cooking times according to the dish being prepared. -
Page 6: Description Of The Appliance
DESCRIPTION OF THE APPLIANCE 1 Temperature control knob 2 Oven function selection knob 3 Oven temperature signal light 4 Oven door handle 5 Electronic programmer... -
Page 7: Installation
INSTALLATION Installing the oven The kitchen should be dry and have effective ventilation according to the existing technical provisions Main lead behind the oven must be placed in such manner to avoid touching the back panel of the oven because of the heat it develops during operation Remove any packaging materials(foils, artificial foam, nails, etc. - Page 8 INSTALLATION Electrical connection Warning! All electrical work must be carried out by a suitably qualified and authorized electrician. No alterations or willful changes in the electricity supply should be carried out. Before attempting the connection,check whether the voltage indicated on the rating plate ●...
-
Page 9: Operation
Colour code L=exterior live wires, usually coloured black, brown. N=neutral The colour is usually blue. Beware of the correct N-connection! E=earthing wire,The colour is green/yellow. OPERATION Prior first use Remove packaging, clean the interior of the oven. ● Take out and wash the oven fittings with warm water and a little washing-up liquid. ●... - Page 10 Setting the time 1. At power on, displayed “12.00”, and flashes. 2. The current time can be set with button 1 and 3, 5 seconds after the time has been set, the new data will be saved. Timer The timer can be activated at any time and any function, The timer can be set from 1 minute to 23 hours and 59 minutes;...
- Page 11 5. Press any button, the signal function’ ’ and alarm signal will go off, or the alarm signal will be turned off automatically after 2 minutes. Caution! Besides timer alarm, any other alarms can be turned off by pressing any button .
- Page 12 If you set the cooking time to 0 or set the cooking time be the current time, ● the auto function will be off. ●After the auto function be off, the cooking time to 0, end of cooking time and current time remains the same.
- Page 13 3. Press button 1 and 3to adjust the cook time, within a range from 1 minute to 10 hours. 4. And press button 2, then the display will show flashing .Set the cooking time using buttons 1and 3, 5. The set time is introduced to the memory after 5 seconds., function signals always on.
-
Page 14: Oven
5.When it up to 10:00,the alarm signal is activated, the oven is switched off automatically.. Caution! Oven. Oven is controlled by the function knob and the temperature control knob. Caution! When selecting any heating function the oven will be switched on only after the temperature has been set by the temperature control knob. -
Page 15: Cleaning And Maintenance
Oven. Fan, bottom and top heaters on At this knob position the oven executes the cake function. Conventional oven with a fan. Caution! When the functions with fan have been selected but the temperature knob is set to zero only the fan will be on. With this function you can cool the dish or the oven chamber. Circular Heater Fan At this function ,allows the oven to be heating up in a forced way with the thermofan, which is in the central part of the oven chamber. - Page 16 Baking pans and accessories (oven grid,baking tray, etc) may be inserted into the oven in 5 guiding levels. Appropriate levels are indicated in the tables that follow. Always count levels from the bottom upwards! By ensuring proper cleaning and maintenance of your oven you can have a significant influence on the continuing fault-free operation of your appliance.
- Page 17 Replacement of the oven light Bulb Before any maintenance is started involving electrical parts, the appliance must be disconnected from the power supply.If the oven has been in use, let the oven cavity and the heating elements cool down before attempting any maintenance. Unscrew the protective cover.
-
Page 18: Operation In Case Of Emergency
Operation in case of emergency Removal of the internal glass panel Unscrew and unfasten the plastic latch that is in the corner at the top of the door. Next take out the glass from the second blocking mechanism and remove. After cleaning, insert and block the glass panel, and screw in the blocking mechanism. -
Page 19: Baking In The Oven
PROBLEM REASON ACTON 1.The appliance does not work Break in power supply Check the household fuse box;if there is a blown fuse replace it with a new one Choose wrong function Check if function knob.temperature knob is set to the correct position. 2.The programmer display is Set the current time(see use of the The appliance was disconnected... - Page 20 Cheese cake is undercooked Next time reduce the baking temperature and extend the baking time. Warnings regarding the baking tables The tables indicate the temperature range. Always select lower temperature first. You may always increase the temperature in case pastry needs more baking. Baking times are indicative only.
- Page 21 As stainless steel dishes reflect the heat, they are not recommended. If you cover your roast or wrap it in foil, it will preserve its juices and the oven will remain clean. The roast will be cooked quicker if it is left uncovered. Large roasts can be placed ...
- Page 22 Fish 175-180 2 210-220 50-80 Grilling Take extra precautions when grilling. Intensive heat from infrared element makes the oven and the accessories extremely hot. Use protective gloves and barbecue accessories! Perforated roast may produce spurting of hot grease(sausages).Use long grill tongs to ...
-
Page 23: Technical Information
Pork scrag 1500 160-180 100-180 Pork knuckle 1000 160-180 120-160 Roast beef 1500 190-200 40-80 beef fillet TECHNICAL INFORMATION Model PSFO59FX Voltage rating 220-240V 50Hz Total power 2000W Top element 850W Grill element 1100W Bottom element 1150W Circular element 1600W ... - Page 24 Your 2 year Manufacturer’s guarantee THIS DOES NOT AFFECT YOUR STATUTORY RIGHTS. Your new Montpellier appliance carries a free guarantee which protects you against the cost of repairs during the rst 24 months from date of purchase provided that: Any claim is accompanied by evidence of the model reference, model serial number and proof of purchase, such as a Sales Receipt, showing that the appliance was purchased within the 24 months prior to the date of claim.
- Page 25 Montpellier Domestic Appliances Ltd. Unit 1, Tewkesbury Retail Park, Northway Lane, Tewkesbury, Gloucestershire GL20 8JU www.montpellier-appliances.com The symbol on the product or on its packaging indicates that this product may not be treated as household waste. Instead it shall be handed over to the applicable collection point for the recycling of electrical and electronic equipment. By ensuring this product is disposed of correctly, you will help prevent potential negative consequences for the environment and human health, which could otherwise be caused by inappropriate waste handling of this product.
Need help?
Do you have a question about the PSFO59FX and is the answer not in the manual?
Questions and answers