
Related Manuals for Tecsun H-501x

Summary of Contents for Tecsun H-501x
- Page 1 TECSUN H-501x FM STEREO / LW / MW / SW-SSB PLL SYNTHESIZED RECEIVER ● AUDIO PLAYER OPERATION MANUAL TECSUN ELECTRONIC IND. LTD.
-
Page 3: Table Of Contents
CONTENTS CONTENTS GETTING STARTED H-501x at a glance ............................1 Powering your device ............................6 Charging the battery ............................6 Setting the clock ..............................7 Setting the FM frequency range ........................7 Setting the MW tuning step and AM (MW/LW/SW) frequency range ..............7 USING THE DEVICE Turning the device on/off .......................... - Page 4 Treble & bass ..............................20 Using headphones ............................20 Stereo audio input (line in) ..........................20 Stereo audio output (line out) ......................... 20 MISCELLANEOUS Troubleshooting ............................... 21 System reset ..............................22 Maintenance ..............................22 Lithium battery safety instructions ........................22 H-501x specifications ............................23...
-
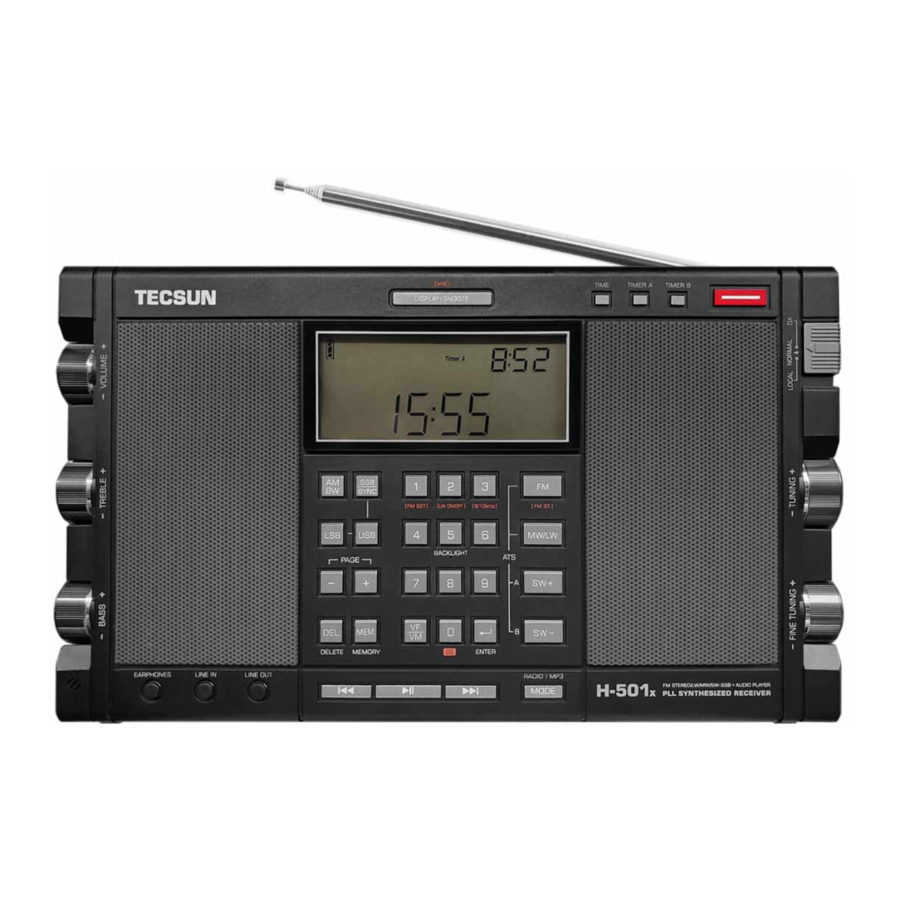
Page 5: H-501X At A Glance
H-501x at a Glance Front Right side Back Left side Bottom... - Page 6 H-501x at a Glance - Location of Controls TIME: Set time/display time DISPLAY: Display mode TIMER A: Alarm setting SNOOZE: Alarm snooze mode : Locks keys and tuning knobs TIMER B: Alarm setting POWER/SLEEP • Power switch • Sleep timer setting...
- Page 7 Adjust volume level Adjust treble Adjust bass Stereo headphone socket Stereo audio input Stereo audio output : Digital audio input (AM) sensitivity selection NORMAL FM ANTENNA: LOCAL Socket for external FM antenna TUNING: AM ANTENNA: • Tuning frequency Socket for external •...
- Page 8 Whip antenna (FM / SW) Support stand Battery selection switch MicroSD card slot RESET: Battery compartment System reset button compartment B compartment A Inside battery compartment...
- Page 9 H-501x at a Glance - Display Indication Repeat track ** dBμ: Signal strength measuring unit Audio player mode dB: Signal-to-noise ratio measuring unit S/N: Signal-to-noise ratio Alarm (Timer B) mb: Shortwave meter band Alarm (Timer A) PAGE: Memory page number...
-
Page 10: Powering Your Device
Powering Your Device This device can be powered by a 18650 3.7V rechargeable lithium (Li-ion) battery or by connecting a DC 5V/1A power adapter. 1) Battery powered: Push the battery compartment cover to the right as shown below. Install the battery following the indicated battery polarity and then place back the cover. -
Page 11: Setting The Clock
Setting the Clock (24-hour format): 1) Turn the device off. 2) Press and hold [ TIME ] until the clock time starts flashing. 3) Use the numeric keys to enter the current time (hours + minutes is four digits). Alternatively, rotate the [ TUNING ] knob to adjust the hour, then rotate the [ FINE TUNING ] knob to adjust the minutes, followed by a quick press of the [ TIME ] button to confirm the setting. -
Page 12: Using The Device
USING THE DEVICE Turning the device on/off: Quick press the red (POWER/SLEEP) button. Volume control: Rotate the [ VOLUME ] knob upwards or downwards to select your desired volume level. Note: Volume control on this device is disabled when feeding audio through the [ LINE OUT ] socket. (1) LISTENING TO RADIO VF (View Frequency) and VM (View Memory) VF: VF mode is used when searching for new radio signals. -
Page 13: Using The Radio's Antennas
Using the Radio’s Antennas FM / Shortwave (SW): When listening to FM or shortwave radio, extend the antenna and adjust its length and direction in order to get the optimum reception. Medium Wave (MW) / Long Wave (LW): This radio uses an internal ferrite bar antenna to receive medium wave and long wave broadcasts, the quality of which can be enhanced by changing the device's position and direction. -
Page 14: Tuning Into Stations
TUNING INTO STATIONS Turn on the device, then quick press the [ FM ], [ MW/LW ], [ SW + ] or [ SW - ] button to select your desired frequency band. You can tune into your favorite stations using any of the following tuning methods. Manual Tuning In VF mode, rotate the [ TUNING ] and [ FINE TUNING ] knobs to search for your desired stations. -
Page 15: Working With Station Memories
WORKING WITH STATION MEMORIES This device can store 3150 stations (presets), separated over 25 memory pages (P0 - P24). 1) Page 0, indicated as “P0” on the display, can store 750 stations: 100 stations each for FM, MW, LW, SSB and SYNC, and 250 stations for SW. -
Page 16: Storing Stations During Auto Scan
Operation for SW: 1) Use the [ PAGE - ] or [ PAGE + ] button to select an (empty) memory page. 2) Quick press [ SW+ ] or [ SW- ] to select the SW frequency band. 3) There are two ATS modes for SW: Mode A: Press and hold the [ SW+ ] button to initiate ATS within the selected meter band. -
Page 17: Listening To Stored Stations
LISTENING TO STORED STATIONS When recalling stored stations or initiating a memory page scan, Page 0 (P0) only shows the stations of the frequency band (FM/LW/MW/SW) or mode (SYNC/SSB) that was selected when entering the memory (VM). In Page 1-24 it is not necessary to preselect a frequency band or mode, the device will show stored stations from all bands within the selected memory page. -
Page 18: Deleting Stored Stations
DELETING STORED STATIONS Deleting a Single Station 1) Enter the memory (VM) mode and select the station that you wish to delete. 2) Press and hold the [ DEL. ] button until “dEL” and “PRESET” flash on the display. 3) Quick press the [ DEL. ] button to delete the unwanted station. PAGE PRESET Note: If the [ DEL. -
Page 19: Using The (Am) Antenna Gain [ Dx/Normal/Local ] Switch
Using the (AM) Antenna Gain [ DX/Normal/Local ] Switch The distance and transmission power of radio stations are not all the same; some received signals will therefore be strong whereas others are weak. To improve the listening experience, sensitivity can be adjusted with the [ DX/NORMAL/LOCAL ] switch. -
Page 20: Fm Stereo/Mono Selection
FM Stereo/Mono Selection While listening to FM, quick press [ FM ]. If the FM signal is in stereo the “ ” icon is shown on the display. Quick press [ FM ] again to return to mono listening. Note: When the FM signal is broadcasted in mono, or if the station is broadcasted in stereo but the signal is weak, “... -
Page 21: Album Preview
Repeat track: Press and hold [ ] until the display shows “ ”. Press and hold [ ] again to resume normal playback. Rewind: Press and hold [ Fast forward: Press and hold [ total tracks in album Album Preview During playback, quick press [ DISPLAY/SNOOZE ] to display the current album number and the total number of files within the album. -
Page 22: Computer Speaker Mode
(3) COMPUTER SPEAKER MODE You can use this device as a speaker for a computer by following the below steps: 1) Turn on the device and quick press [ MODE ] to enter the audio player mode. 2) Connect the digital audio input socket (micro-USB type-B) on the left side of this device to the computer using a suitable USB data cable. -
Page 23: Setting The Alarm By Radio Or Audio Player
Setting the Alarm by Radio or Audio Player Alarm by radio ● 1) Turn on the device, select the station frequency you want to use as the alarm. 2) Quick press [ MEM. ], the memory location will flash. 3) While still flashing, quick press [ TIMER A ] or [ TIMER B ], the alarm “ ”... -
Page 24: Setting The Sleep Timer
To feed audio to external amplifiers, amplified speakers or recording equipment. Use a stereo audio cable with a 3.5 mm (1/8 inch) plug to connect the [ LINE OUT ] socket of H-501x to the audio input socket of the external device. -
Page 25: Troubleshooting
Troubleshooting... -
Page 26: System Reset
System Reset This device works on advanced and stable firmware to enhance users' enjoyment. In the event that a sudden firmware glitch does occur (e.g. unresponsive or erratic behavior of buttons/knobs, LCD display issues) press the [ RESET ] button with a pointy object to return to normal operation;... -
Page 27: H-501X Specifications
H-501x Specifications Station Memory: 3150 in total Frequency Range: 50 ~ 522kHz, 9kHz tuning / 1kHz fine-tuning 100 ~ 519kHz, 9kHz tuning / 1kHz fine-tuning MW (AM): 522 ~ 1620kHz, 9kHz tuning / 1kHz fine-tuning 520 ~ 1710kHz, 10kHz tuning / 1kHz fine-tuning... - Page 28 IF Frequency: 1st IF: 55.845MHz, 2nd IF: 10.7MHz, 3rd IF (DSP): 45kHz 128kHz 33dB FM Stereo Crosstalk: ≥ 500mW x 2 (at 10% harmonic distortion) Output Power: Quiescent Current: MW / LW < 80mA < 95mA < 95mA < 36mA Audio Player Approx.
- Page 29 MEMORANDUM...
- Page 30 MEMORANDUM...
- Page 32 TECSUN ELECTRONIC IND. LTD. Address: Unit 11, 13/F, Block A, Hoi Luen Ind. Ctr., 55 Hoi Yuen Road, Kwun Tong, Kowloon, Hong Kong. E-mail: tecsun@on-nets.com Website: www.tecsun.com.cn www.tecsun-audio.com V041120...
Need help?
Do you have a question about the H-501x and is the answer not in the manual?
Questions and answers
Can you update the firmware on the Tecsun H-501x