Koplus Kolo Solo Assembly Instructions Manual
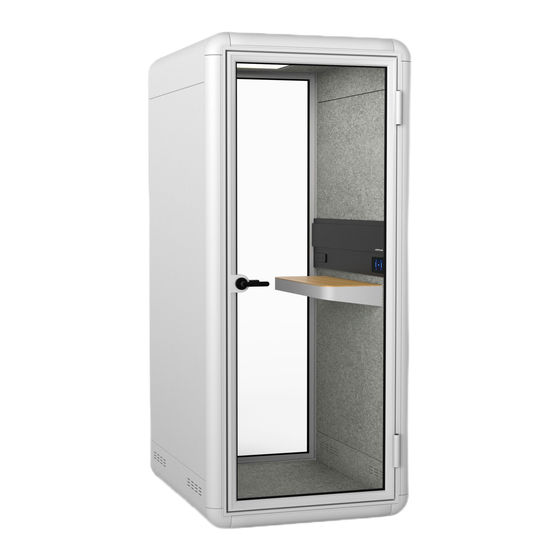
Acoustic collection left hand open - outlet on left - without stool - type a/b
Hide thumbs
Also See for Kolo Solo:
- Assembly instructions manual (28 pages) ,
- Assembly instructions manual (24 pages)

Related Manuals for Koplus Kolo Solo


Summary of Contents for Koplus Kolo Solo
- Page 1 KOLO SOLO Assembly Instructions. acoustic collection - kolo solo [left hand open - outlet on left - without stool - type A/B] koplus b.v. | koplus.eu info@koplusbrand.com version 120919...
- Page 3 Left Hand Open Door No Stool Outlet on Left Type A/B Plug...
- Page 4 Before we start, here are some things to be aware of: This is the assembly instruction for right hand opening door with no stool. A packaged Solo unit weights 315 kg and will require 2-3 persons to install. It takes an average of 30 - 45 min to install Solo.
-
Page 5: Required Tools
Ratchet Wrench - Metric Socket Phillips Screw Driver Allen Key Set **Must be purchased seperately** Aligning Rods Koplus B.V. | Kolo Solo | Left Hand Open Door | Outlet on Left | Without Stool | Type A/B Plug | Assembly Instruction Page 03... -
Page 6: Part List
Top Finishing Panel Nº6 Nº7-1 Nº7-2 Back Glass Frame Table Top + Frame Table Bottom Cover Koplus B.V. | Kolo Solo | Left Hand Open Door | Outlet on Left | Without Stool | Type A/B Plug | Assembly Instruction Page 04... - Page 7 Nº8 Glass Door Frame Koplus B.V. | Kolo Solo | Left Hand Open Door | Outlet on Left | Without Stool | Type A/B Plug | Assembly Instruction Page 05...
- Page 8 M8 x 50 M8 x 25 Spring Washer 1/4-20 UNC x 1-1/2 M4 x 12 Koplus B.V. | Kolo Solo | Left Hand Open Door | Outlet on Left | Without Stool | Type A/B Plug | Assembly Instruction Page 06...
- Page 9 Step 1. Nº3 Side Wall + Electric M8 x 35 Nº2-1 Bottom Koplus B.V. | Kolo Solo | Left Hand Open Door | Outlet on Left | Without Stool | Type A/B Plug | Assembly Instruction Page 07...
- Page 10 Step 2. Nº4 Side Wall M8 x 35 Koplus B.V. | Kolo Solo | Left Hand Open Door | Outlet on Left | Without Stool | Type A/B Plug | Assembly Instruction Page 08...
- Page 11 Carefully tip and lay the unit sideways. Use inner carton buffers or any platform to slightly prop up the unit. Koplus B.V. | Kolo Solo | Left Hand Open Door | Outlet on Left | Without Stool | Type A/B Plug | Assembly Instruction Page 09...
- Page 12 Step 4. M8 x 50 Page 10 Koplus B.V. | Kolo Solo | Left Hand Open Door | Outlet on Left | Without Stool | Type A/B Plug | Assembly Instruction...
- Page 13 Step 5. M8 x 35 Page 11 Koplus B.V. | Kolo Solo | Left Hand Open Door | Outlet on Left | Without Stool | Type A/B Plug | Assembly Instruction...
- Page 14 If not, check if all power cords are properlly connected before proceeding. Page 12 Koplus B.V. | Kolo Solo | Left Hand Open Door | Outlet on Left | Without Stool | Type A/B Plug | Assembly Instruction...
- Page 15 fix glass frame in place before securing with screws. Aligning Rod Nº6 Back Glass Frame Koplus B.V. | Kolo Solo | Left Hand Open Door | Outlet on Left | Without Stool | Type A/B Plug | Assembly Instruction Page 13...
- Page 16 After all 36 screws are fastened, go around the frame and tightly secure them. Spring Washer M8 x 25 Koplus B.V. | Kolo Solo | Left Hand Open Door | Outlet on Left | Without Stool | Type A/B Plug | Assembly Instruction Page 14...
- Page 17 Step 9. Nº5-2 Top Finishing Panel Koplus B.V. | Kolo Solo | Left Hand Open Door | Outlet on Left | Without Stool | Type A/B Plug | Assembly Instruction Page 15...
- Page 18 Nº7-1 Table Top + Frame 1/4-20 UNC x 1-1/2 Koplus B.V. | Kolo Solo | Left Hand Open Door | Outlet on Left | Without Stool | Type A/B Plug | Assembly Instruction Page 16...
- Page 19 Step 11. Nº7-2 Table Bottom Cover M4 x 12 Koplus B.V. | Kolo Solo | Left Hand Open Door | Outlet on Left | Without Stool | Type A/B Plug | Assembly Instruction Page 17...
- Page 20 Step 12. Nº2-3 Floor Tile Koplus B.V. | Kolo Solo | Left Hand Open Door | Outlet on Left | Without Stool | Type A/B Plug | Assembly Instruction Page 18...
- Page 21 Step 13. Nº2-2 Bottom Finishing Panel Koplus B.V. | Kolo Solo | Left Hand Open Door | Outlet on Left | Without Stool | Type A/B Plug | Assembly Instruction Page 19...
- Page 22 fix glass frame in place before securing with screws. Aligning Rod Nº8 Glass Door Frame Koplus B.V. | Kolo Solo | Left Hand Open Door | Outlet on Left| Without Stool | Type A/B Plug | Assembly Instruction Page 20...
- Page 23 After all 36 screws are fastened, go around the frame and tightly secure them. Spring Washer M8 x 25 Koplus B.V. | Kolo Solo | Left Hand Open Door | Outlet on Left | Without Stool | Type A/B Plug | Assembly Instruction Page 21...
- Page 24 Nº1-2 Tool Kit: Power Cord Koplus B.V. | Kolo Solo | Left Hand Open Door | Outlet on Left | Without Stool | Type A/B Plug | Assembly Instruction Page 22...
Need help?
Do you have a question about the Kolo Solo and is the answer not in the manual?
Questions and answers