ZSK T8 Software Settings
Hide thumbs
Also See for T8:
- Operating manual (170 pages) ,
- Quick reference manual (124 pages) ,
- User manual (18 pages)
Advertisement
Quick Links
Advertisement

Related Manuals for ZSK T8


Summary of Contents for ZSK T8
- Page 1 User Manual T8/T8-2 Control unit Software settings 02442V10 [D] - 2018...
- Page 2 Subject to change! Änderungen vorbehalten! © ZSK Stickmaschinen GmbH Printed in Germany [ GB ] 02442V10...
-
Page 3: Basic Information
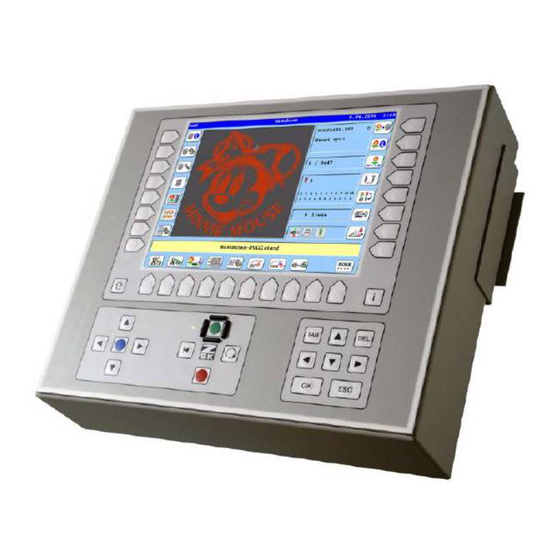
T8-Software adjustments Basic information Download Software Updates: https://www.zsk.de/t8-software.html All discribed functions of the control unit T8-/T8-2 will be started at the Base Screen (BS). The keys used in the function descriptions are shown in the above T8-/T8-2-figure. 02417V10 • 11.09.2018/DC •... -
Page 4: Software Settings
Software settings Software settings With the function Software settings of the T8 control unit, different operating modes and queries can be switched ON/OFF. In addition, modification and optimization options, as well as a network connection can be selected. Open software adjustments Switch on the function Software settings. - Page 5 Abridged user interface Abridged user interface In the abridged user interface of the T8 control unit, the functionality of the machine operation is reduced to the most necessary functions for the machine operation. Access authorization prevents the unauthorized use of the complete machine operation.
- Page 6 Abridged user interface Assignment of access rights • Press the button [L2] Complete opreration mode. The dialog Enter access authority is Ö displayed. At the first return to the complete operation an access authorization for authorized personnel should be created here. The access authorization prevents subsequent unauthorized access by the machine user to the complete operation mode and where changes of the machine settings are possible.
- Page 7 Abridged user interface • Press the button [L7] Change access authority. • Press the button [L3/R3] New access authority. • Enter a 4-digit PIN with the button [U1] - [U0] in the input field. • Press the button [L4/R4] Confirm access authority. •...
- Page 8 Abridged user interface Return to the complete user interface after granting an access authorization • Press the button [L2] Complete opreration mode. The dialog Enter access authority is Ö displayed. • Press the button [L3/R3] Zugangsberechtigung. • Enter the 4-digit PIN in the input field with the button [U1] - [U0].
- Page 9 Abridged user interface Change/delete access authorization • Press the button [L2] Complete opreration mode. The dialog Enter access authority is Ö displayed. • Press the button [L3/R3] Access authority. • Enter the 4-digit PIN with the button [U1] - [U0] in the input field. •...
- Page 10 Query pantograph configuration Query pantograph configuration The query function Inquiry pantograph configur allows you to determine whether the dialog Check pantograph configuration is to be displayed each time a design is loaded. If the function is deactivated, the dialog is not displayed. • Press the button [L2] Inquiry pantograph konfigur.
- Page 11 Internal monograming Internal monograming Activating the function Internal writing switches the operating mode Writing ON/OFF. • Press the button [R1] Internal writing. • Press the button [L8] Confirm. When the function Internal writing is Ö activated, the operating mode Writing is switched on and can be used via the design load or the Editor.
- Page 12 No inquiries at desin change No inquiries at desin change With the function No inquiries at design change, you determine whether the dialog Machine design should be displayed each time a design is changed. If the function is deactivated, the dialog is always displayed. •...
- Page 13 Modification options Modification options With the function [L3/R3] … you choose which modification options should be used during design loading/ changing. • Press the button [L3/R3] …. The dialog Modification options while de- Ö sign loading appears. • Select one of the following options: •...
- Page 14 Modification options • [L3/R3] Application depend. modificat. The design modification options are applied Ö depending on the application during design loading/changing. • Press the button [L8] Confirm in the dialog Software Settings when you have made all necessary settings. • 02417V10 • 11.09.2018/DC...
-
Page 15: Optimization Options
Optimization options Optimization options With the function [L4/R4] … you choose which optimization options should be used during design loading/ changing. • Press the button [L4/R4] …. The dialog Optimization options while de- Ö sign loading appears. • Select one of the following options: •... - Page 16 Optimization options Optimization options • [L3/R3] Design dependend optimization The design optimization options are applied Ö depending on the application during design loading/changing. • [L4/R4] Always optimze with user defined values The design is loaded with user values when Ö design loading/changing. Press the button [L8] Confirm in the dialog Software settings when you have made all necessary settings. •...
- Page 17 When loading designs from external medias (floppy disk, USB flash drive or via network), it may be possible that the design number of the loaded design has already been assigned to the memory of the T8. In this case, use the function [L5/R5] … to determine how the design number should be adjusted during design loading.
- Page 18 Assignment of the design number Always ask for design number • Press the button [L1/R1] Always aks for design number. The design number, design version or the de- Ö sign name must always be changed manually during the design loading via the following dialog: New Number: First it shows the original number of the design to be loaded with the note Number in use!.
- Page 19 The dialog Enter new design name is Ö displayed. • Change the design name here. • Confirm your entries with the key [OK] on the T8 control unit. The dialog Load pattern from device Ö appears again. • Confirm your changes in the dialog Load pattern from device with the button [L8] Confirm.
- Page 20 Options for network operation Options for network operation With the function [L6/R6] … you choose which network connection to use for design loading/changing. • Press the button [L6/R6] …. The dialog Network mode options appears. Ö • Select one of the following options: •...
- Page 21 Invisible buttons in the dialog Enter net connection name as llows: [Shift] + [◄] Start of text [Shift] + [►] End of text Press the key [OK] on the T8 control unit to accept the connection settings. • 02417V10 • 11.09.2018/DC •...
- Page 22 Options for network operation Delete network connection • Use the arrow keys [p], [q] to select the deleting network connection from the list. • Press the button [R7] Delete entry. The selected network connection is deleted. Ö Select network connection • Use the arrow keys [p], [q] to select the desired network connection from the list.
- Page 23 Options for network operation Confirm settings • Press the button [L8] Confirm in the dialog Software settings when you have made all the necessary settings. 02417V10 • 11.09.2018/DC •...
- Page 24 Notizen • 02417V10 • 11.09.2018/DC...
- Page 25 Notizen 02417V10 • 11.09.2018/DC •...
- Page 26 © 2018 ZSK Stickmaschinen GmbH Printed in Germany ZSK Stickmaschinen GmbH Magdeburger Str. 38-40 D-47800 Krefeld Germany www.zsk.de zsk@zsk.de...
Need help?
Do you have a question about the T8 and is the answer not in the manual?
Questions and answers