Table of Contents
Advertisement
Installation Instructions
Thank you for purchasing this quality Lucci product. To ensure correct function and safety, please read and follow all
instructions carefully before assembly, installation and use of this product. Please keep the instructions for future reference.
Warranty
• This product is covered by a 12-month warranty. The warranty is from date of purchase, not the date of installation.
• If this product is not assembled and installed by a licensed electrician, the warranty will be void.
• Please retain proof of purchase and evidence of installation by a licensed electrician for any warranty enquiries.
• Warranty will be void if there is any damage due to improper usage or modification to the product.
• Failure to comply with the instructions in this manual may increase the risk of damage or injury and will void warranty.
Installation Requirements
• The receiver must be installed by a licensed electrician.
• All wiring and installation of this product must adhere to latest local and national wiring rules.
eg. AS/NZS 3000 Electrical installations in Australia.
• NOTE: A double pole wall switch must be included in the wiring installation. The double pole switch allows
the receiver to disconnect from the mains 240VAC power during maintenance and cleaning of the ceiling fan.
• NOTE: Do not install the receiver with an existing fan wall controller. Remove any existing fan wall controller
and replace with a double pole wall switch, to power the receiver.
• Do not exceed rated power input specification.
• Select a suitable location for installation:
−
This product is suitable for indoor use only.
−
The receiver must be installed in the canopy of the ceiling fan.
• NOTE: This ceiling fan remote controller is only suitable for controlling the ceiling fan motor and the light kit
associated with the ceiling fan only. Any other use would be considered as misuse and warranty will be void.
• NOTE: The controller wiring circuit must NOT be shared with any electrical equipment that is sensitive to
voltage fluctuation, such as infrared sensor lights.
• DO NOT use the wiring of the controller, other than for the purpose of supplying power into the controller and
connections to the equipment that is under control. Any outside wiring connections which are not part of the
controller/controlled circuit, may affect the operation of the controller and will void warranty.
• This remote control is only suitable where the receiver can be inserted inside the canopy cover safely and securely.
• The maximum ceiling pitch angle should not be exceeded. It will damage the receiver and result in electric shock.
Please check with the retailer about the maximum pitch angle suitable for ceiling fan with remote control.
• Do not use a solid state dimmer with this ceiling fan receiver.
• Fan installation must be complete including assembly of blades before operating the remote control.
• Take care not to pull any electrical wires during unpacking as this may damage the connection.
• Lay out all the components on a smooth surface and make sure there are no components missing before assembling.
• If parts are missing, return the complete product to the place of purchase for inspection or replacement.
1 | P a g e
TOUCH REMOTE CONTROL FOR CEILING FAN
SKU# 210667
Rated Voltage 220V - 240V~ 50Hz
v 1 . 1 ( 0 9 / 2 0 2 0 )
Advertisement
Table of Contents

Related Manuals for LUCCI Air 210667


Summary of Contents for LUCCI Air 210667
- Page 1 Installation Instructions TOUCH REMOTE CONTROL FOR CEILING FAN SKU# 210667 Rated Voltage 220V - 240V~ 50Hz Thank you for purchasing this quality Lucci product. To ensure correct function and safety, please read and follow all instructions carefully before assembly, installation and use of this product. Please keep the instructions for future reference.
-
Page 2: Remote Control Buttons
Installation Instructions • Check whether the product has been damaged during transport. Do not operate/install any product which appears damaged in any way. Return the complete product to the place of purchase for inspection, repair or replacement. • Remove all packaging material from the product and be careful not to throw away accessories that may be hidden within the packaging material. - Page 3 Installation Instructions NOTE: Before the installation of the receiver, determine which type of ceiling fan you have. Type 1 - Earth wire is separate from the ceiling fan quick connector. The additional adaptor loom (Fig. 3) is NOT required for installation. Refer to page 3 &...
- Page 4 Installation Instructions Installation for Type 2 fans - Earth wire is incorporated with the ceiling fan quick connector (Fig. 5) 1. Switch OFF the mains power before installation. 2. Uninstall the canopy of the ceiling fan from the bracket. 3. Unplug the quick connector between the bracket (1) and the ceiling fan body (6). 4.
-
Page 5: Battery Installation
Installation Instructions INSTALLATION OF THE REMOTE CONTROL HOLDER (Fig.6) 1. Locate a suitable wall to fix the remote control holder with the 2 screws. (Fig.5a). 2. Slide the remote into the holder. (Fig. 5b) Fig. 6b Fig. 6a BATTERY INSTALLATION 1 pcs 3V CR2450 battery is required to operate the remote control. - Page 6 Installation Instructions PAIRING REMOTE & RECEIVER NOTE: The remote and receiver will need to be paired after the installation of the ceiling fan. NOTE: When two or more ceiling fans are installed in one location, please refer to the instruction on the next page. PAIRING REMOTE &...
-
Page 7: Reset To Default
Installation Instructions PAIRING REMOTE & RECEIVER – WHEN 2 OR MORE CEILING FANS ARE INSTALLED IN ONE LOCATION When two or more fans are located near each other, you may want to have the remote/receiver for each fan set to a different code, so that the operation of one fan does not affect the operation of the other fan/s. NOTE: Ensure that you have installed a single pole disconnection switch in the fixed wiring for each fan. -
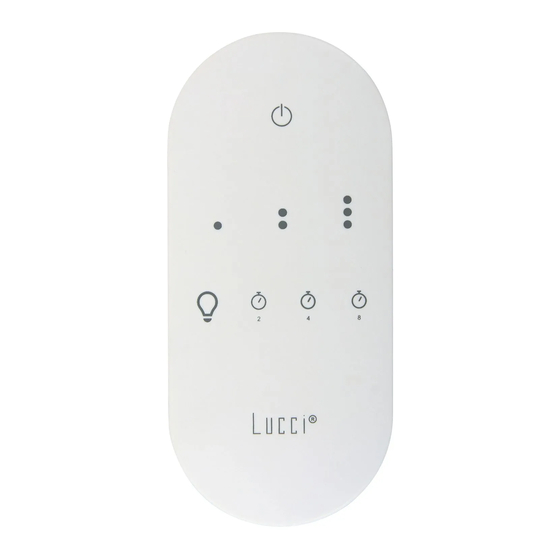
Page 8: Led Indicator
Installation Instructions REMOTE CONTROL BUTTONS: Before you start using the remote, take the time to read through this section and get familiar with the button and function of each button LED indicator Turn on the fan at Turn off the fan medium speed Turn on the fan at Turn on the fan at... -
Page 9: Safety Precautions For The Battery
• Ensure that the product does not come in contact with corrosive chemicals/solvents or abrasive cleaners etc Specifications SKU # 210667 Rated Voltage 220 - 240V~ 50Hz Motor: Max.0.75A, Use with the AC motor of ceiling fan only Rated Load Light: Max.100W, 100VA LED, Non-dimmable...