Advertisement
Table of Contents
- 1 Quick Start
- 2 Flight Operation
- 3 First Person View (FPV)
- 4 On-Screen Display (OSD)
- 5 Flight Modes
- 6 Battery Charging
- 7 Switch Functions
- 8 Joystick Functions
- 9 Button Functions
- 10 Button Operation
- 11 Frequency Selection
- 12 Remote Control
- 13 Advanced Settings
- 14 After-Sale Service
- Download this manual
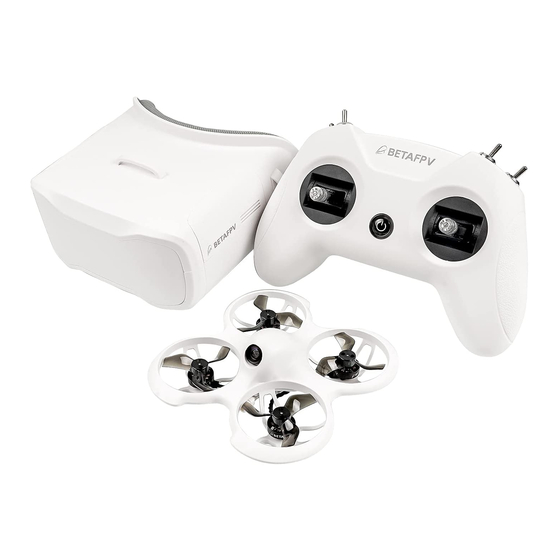
Product List
1 x Cetus Brushed Whoop Quadcopter
1 x LiteRadio 2 SE Transmitter (Frsky Protocol)
1 x BEATFPV VR02 FPV Goggles
Box Contents:
2 x BT2.0 300 mAh 1S Lipo Battery
1 x BT2.0 Battery
Charger and Voltage Tester
1 x USB Charging Cable (Type-C)
1 x Type-C to FC Adapter
1 x Prop Removal Tool
4 x 31mm 4-Blade Prop (Replacement)
1 x Portable Storage Bag
Preflight Checks
1. Verify that all components are included, without damage and the airframe is with no
deformation.
2. Verify that propellers and motors are installed correctly and stably.
3. Ensure that propellers do not scratch against frame ducts and motors spin smoothly.
4. Verify batteries (of quadcopter, remote control radio transmitter, and FPV goggles)
are fully charged.
5. Be sure pilot is familiar with all flight controls.
Transmitter").
6. Always keep a safe distance in all directions around the quadcopter (1 meter or
more) when having a test-flight. Operate the quadcopter carefully in open space.
Cetus FPV Kit
(Refer
"Remote Control Radio
Advertisement
Table of Contents

Related Manuals for BETAFPV Cetus FPV Kit


Summary of Contents for BETAFPV Cetus FPV Kit
- Page 1 Cetus FPV Kit Product List 1 x Cetus Brushed Whoop Quadcopter 1 x LiteRadio 2 SE Transmitter (Frsky Protocol) 1 x BEATFPV VR02 FPV Goggles Box Contents: 2 x BT2.0 300 mAh 1S Lipo Battery 1 x BT2.0 Battery Charger and Voltage Tester...
-
Page 2: Quick Start
Quick Start Guide Quick Start Before flying, verify that the remote control radio transmitter is successfully connected with the quadcopter, all basic controls are functional, and the quadcopter can be taken off normally. l Step 1: On the remote control radio transmitter, set the throttle joystick and four switches on the top to the lowest position. - Page 3 l Step 3: Move switch SA up to arm the quadcopter. The throttle joystick must be at the lowest position or the quadcopter will not arm. The motors will spin slowly. Move switch SA down to disarm the quadcopter and the motors will stop spinning. The completion of these steps verifies that the quadcopter and the remote control radio transmitter can work normally, and the following flight operations can be continued.
-
Page 4: Flight Operation
Flight Operation l Step 4: Re-arm quadcopter (step 3). Motors will spin at a low speed. Throttle (left) Joystick: l Up/down controls rate of ascent/ descent. l Left/Right controls counterclockwise/ clockwise rotation. Direction (right) Joystick: l Up/down controls forward/ backward. l Left/right controls left/ right. - Page 5 Before flying with goggles, it is recommended to practice and become familiar with the controls and sensitivity of the joysticks by following the above-mentioned operation steps. Caution: 1. Find a suitable open place for the first flight. 2. Push the joysticks slowly, especially the throttle joystick. 3.
-
Page 6: First Person View (Fpv)
l Step 6: Disconnect and remove the battery from the quadcopter. A long press of the power button on the remote control radio transmitter will turn it off after three beeps. First Person View (FPV) First-person view (FPV) is the real-time transmission of the camera image to FPV goggles. l Take out the goggles, install the headband;... -
Page 7: On-Screen Display (Osd)
On-Screen Display (OSD) After the frequency search, flight information and FPV images will be shown on the display. This information is called On-screen Display (OSD), as shown below:... -
Page 8: Flight Modes
About OSD information: l The flight status of the quadcopter is displayed in the center. DISARM indicates locked status. LOW VOL indicates that the battery voltage of the quadcopter is low. RX LOSS indicates that the quadcopter has been disconnected with the remote control radio transmitter;... -
Page 9: Battery Charging
The flight mode is displayed in the lower right corner of the flight screen, corresponding to the flight mode of quadcopter. Pilot can choose different flight modes according to different flight environments and their flight control skills. chg 1. Normal Mode: When the quadcopter ascends, center the two joysticks at the same time, and the quadcopter will maintain at a fixed point in a horizontal attitude. - Page 10 l When the charger’s LED turns solid green, charging is complete. Two batteries can be charged at the same time. Charging a fully discharged battery takes approximately 20 minutes. When the battery is inserted into the TEST port and the charger is not plugged in via cable, the current battery level will be displayed.
- Page 11 Note: The electric display charger in this kit cannot be charged with a double-head Type-C data cable. Remote Control Radio Transmitter The remote control radio transmitter included in this kit is the LiteRadio 2 SE model (Frsky Protocol). Instructions of its buttons are shown below.
-
Page 12: Switch Functions
Switch Functions Four switches are provided on the front of the remote control radio transmitter: switch SA, switch SB, switch SC, and switch SD, as shown below. Pilot can change different modes and parameters of the quadcopter with these switches. Please caution that only after the remote control radio transmitter and the quadcopter are connected successfully, the switches can work. -
Page 13: Joystick Functions
Switch SA: Arm/Disarm Quadcopter l Quadcopter will be disarmed if switch SA is down. l Quadcopter will be armed if switch SA is up. Switch SB: Flight Mode of Quadcopter l The flight mode is “Normal Mode” if switch SB is down (N MODE). l The flight mode is “Sport Mode”... - Page 14 Direction (right) Joystick - forward/backward tilt (pitch) and left/right tilt (roll).
-
Page 15: Button Functions
Button Functions There are three buttons on the remote control radio transmitter. l Power button: Turns the remote control radio transmitter on/off with a long press. l BIND button: Enter binding mode with a short press (active after the remote control radio transmitter is powered on). -
Page 16: Button Operation
Note: The remote control radio transmitter in this kit cannot be charged with a double-head Type-C data cable. FPV Goggles The FPV goggles used in the kit, named model VR02. The FPV goggles use the built-in antenna to receive video. Button Operation... - Page 17 chg1:修改对应英文名称 l Power switch Turn the power switch left and right to turn the goggles on or off. When facing the switch, the left position is off; the opposite of the position is on. l Search button (S) Quick frequency search: Press and hold the frequency search button for 1 second to start the frequency search.
- Page 18 Press and hold for 1 second to start the frequency scan, and the frequency scan result will be displayed after 3 seconds. The different colors in the screen indicate the current status of each frequency as follows:...
-
Page 19: Frequency Selection
l Band Key and Channel Key In the frequency scan interface, the Band Key can be cycled down to select different bands, and Channel Key can be cycled to the right to select different channels. Pilot can select the goggles frequency by pressing the Band Key and Channel Key. For example, select a band and channel with green status since these frequencies are not occupied and signal interference is relatively weak. - Page 20 The FPV goggles can receive 48 frequency points in the 5.8GHz spectrum, distributed across 6 bands (A, B, E, F, R, and L) of 8 channels each(Channel, (CH-1, ……, CH-8), as shown below: The stock quadcopter included in this kit only uses 8 frequency points of band B, which is the second row in the table below: CH 1 CH 2...
- Page 21 l The power light will be blue when charging and lights out when fully charged . Note: The FPV goggles in this kit cannot be charged with a double-head Type-C data cable. Quadcopter OSD Menu Operation The OSD menu is a set of operation interfaces designed to modify the configuration of the quadcopter.
- Page 22 After accessing the OSD menu, pilot will see the following menu interface on the FPV screen.
- Page 23 The OSD menu cursor can be controlled by the right joystick to operate the OSD interface: l Up: move the cursor up l Down: move the cursor down l Right: confirm/modify selection Turn Quadcopter RGB LED ON/OFF The quadcopter status LED light is normally solid blue when flying.
- Page 24 Customizing OSD Flight Information The information displayed in the OSD flight interface can be customized. This information includes : receiver protocol, flight mode, battery voltage and speed threshold. l In the MAIN menu, select LAYOUT and enter the LAYOUT menu, as shown below; l Select the target information item, OFF means no display, ON means display;...
- Page 25 LED Light/Beep Status Codes Quadcopter LED Light There are two RGB status LEDs on the bottom of the quadcopter .
- Page 26 Status Status State description Solution color —— power Replace quadcopter is abnormal or battery and power on again Flashing slowly Quadcopter battery is low Replace battery Blue Solid quadcopter connected with the remote control radio transmitter Blue Flashing fast Quadcopter is horizontal Place the calibrating quadcopter on a...
-
Page 27: Remote Control
horizontal surface and wait for a while Purple Solid Quadcopter accessed the OSD menu Green Flashing fast Quadcopter is in binding mode White Flashing fast Arming failed, because Disarm, and place the throttle joystick was the throttle joystick not at the lowest position lowest when arming position... - Page 28 Indicator LED color Status State description Solution Solid Throttle joystick is not at the Move throttle joystick lowest position when starting to the lowest position Flashing fast Remote control radio Wait for binding transmitter binding mode Blue Flashing slowly Battery voltage is too low Charge remote control...
-
Page 29: Advanced Settings
Indicator LED color Status State description Blue Solid Charging —— Not charging or charging is complete Advanced Settings Additional advanced settings are available in case of special operations. Re-Bind for Quadcopter If quadcopter and remote control radio transmitter cannot be connected successfully, the pilot may need to re-bind. - Page 30 l Lightly press the BIND button on the back of the remote control radio transmitter with a screwdriver. The power indicator will flash red; l If re-bind is successful, quadcopter status light will change to blue. Note: The re-binding of the remote control radio transmitter and the quadcopter may not be successful after pressing the BIND button of the remote control radio transmitter once.
- Page 31 l In the MAIN menu, select CONFIG, then CALI; l Push the direction joystick to the right to enter level calibration mode. Quadcopter’s LED flashes blue; l When the OK prompt appears and the LED returns to solid blue, the calibration is complete.
- Page 32 The remote control radio transmitter will emit a beep for about 3 seconds and LED will stop flashing. Calibration has been completed successfully. Turn OFF/ON the Optical Flow Positioning Function In Normal Mode, the optical flow positioning function of Cetus quadcopter is turned on by default, which provides an auxiliary function for horizontal flight.
- Page 33 l Select TOF and change it to OFF (turn off positioningfuntion)/ON (turn on positioningfuntion), and then select BACK to exit the CONFIG sub-menu; l Select SAVE in the MAIN menu to exit the OSD setting interface. Supplement Warning & Security l Move the throttle joystick as gently as possible to avoid the quadcopter ascending and descending too suddenly.
-
Page 34: After-Sale Service
l Keep the battery away from water. If the flight controller touches water, a short circuit may occur and the flight controller may burn out. l Do not fly in inclement weather with thunderstorms or lightning. l Do not fly in areas that are not permitted by local law. Precautions for Battery Use and Charging l Do not immerse the battery in water. - Page 35 For after-sale service, please reach out via e-mail: Support@betafpv.com This clause only applies to the products manufactured by BETAFPV and sold by BETAFPV authorized dealers. The specific interpretation rights of this clause belong to BETAFPV. How to Replace Propellers Propellers can be deformed or fall off when quadcopter collides with an object.
- Page 36 identify. Otherwise, the quadcopter may drift or become difficult to control. The following are common unsatisfactory environments: l Dark environment; l Above the water surface; l Above smooth tiles or single-color smooth ground. If the quadcopter needs to fly in an unsatisfactory environment, the optical flow positioning function can be turned off and the quadcopter will lose the auxiliary function of horizontal flight.
- Page 37 How to Use FPV Simulator The safest and quickest method to get started is to use an FPV simulator. The Lite Radio 2 SE remote control radio transmitter supports most FPV simulators on the market with a comprehensive configuration. To connect your radio: l Turn on the remote control radio transmitter and wait the blue light to show;...
- Page 38 How to Stop After A Collision Push down switch SA on the remote control radio transmitter immediately once the quadcopter collides with an object.All motors will immediately stop. Caution: Push down switch SA immediately when the quadcopter is hit or the propellers scratch against the frame duct.
Need help?
Do you have a question about the Cetus FPV Kit and is the answer not in the manual?
Questions and answers