Advertisement
INSTRUCTION MANUAL
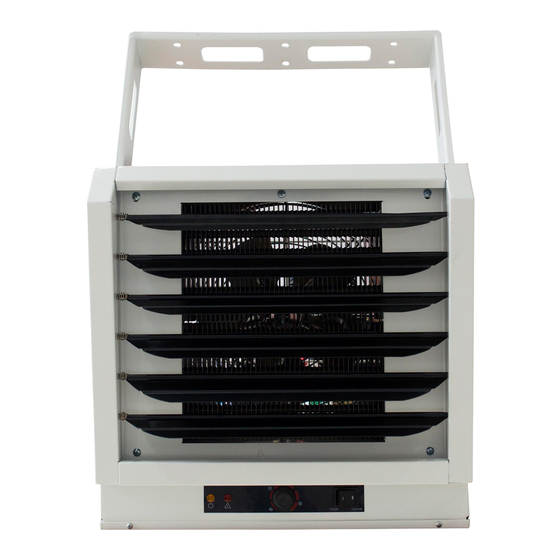
HEAVY-DUTY FAN-FORCED CEILING-MOUNT HEATER
MODEL: HA24-75MB
Figure 1
PET OWNERS WARNING:
Health warning for some small pets,
including birds, as they are extremely sensitive to the fumes produced during
the first-time use of many appliances. These fumes are not harmful to humans
but we recommend that you do not use your heater around birds and small
pets during its initial use until the manufacturing corrosion (anti-corrosion)
coatings burn off.
Technical Support: 1-866-206-0888
Service email: info@mecanair.net
Advertisement

Subscribe to Our Youtube Channel
Related Manuals for ProFusion HA24-75MB


Summary of Contents for ProFusion HA24-75MB
- Page 1 INSTRUCTION MANUAL HEAVY-DUTY FAN-FORCED CEILING-MOUNT HEATER MODEL: HA24-75MB Figure 1 PET OWNERS WARNING: Health warning for some small pets, including birds, as they are extremely sensitive to the fumes produced during the first-time use of many appliances. These fumes are not harmful to humans...
-
Page 2: Table Of Contents
TABLE OF CONTENTS Important Instructions…………………………………3 Description and Specifications………………………4 General Safety Information…………......5 Locating the heater……………………………………..6 Installation………………………………………………..7-11 Connecting the power………………………………….11-14 Operating Instructions…………………………………15-16 Maintenance Instructions………………………………16... -
Page 3: Important Instructions
IMPORTANT INSTRUCTIONS When using electrical appliances, basic precautions should always be followed to reduce the risk of fire, electric shock, and injury to persons, including the following: 1. Read all instructions before installing or using this heater. 2. This heater is hot when in use. To avoid burns, do not let bare skin touch hot surfaces. -
Page 4: Description And Specifications
DESCRIPTION The heavy-duty electric heater is designed for garages, workshops and similar locations. It features two heat settings, for a maximum heat production of 25,589 BTU per hour. It includes horizontal and vertical air flow and a built-in thermostat with overheating safety thermal cut-out. -
Page 5: General Safety Information
GENERAL SAFETY INFORMATION : This heater requires a hardwire installation (no plug). The installation of this product must be carried out by a certified electrician and in accordance with all local and national electrical codes. NOTE: This appliance is compatible with a 240V line voltage single pole wall thermostat (not included). -
Page 6: Locating The Heater
LOCATING THE HEATER Install heater out of traffic areas, maintaining clearances stated in figure 3. The direction of air flow should not be restricted by columns or machinery and the air flow should wipe exposed walls rather than blowing directly on them. When more than one heater is used in an area, the heaters should be installed in a way that the air discharge of each heater supports the air flow of the others, to provide best circulation of warm air as indicated in figure 4. -
Page 7: Installation
INSTALLATION Hardware needed You will also need the following hardware, which can be purchased from your local hardware store or electrical supply store: Electric wire in the adequate gauge and length for your application Proper size fuse or breaker for your heater’s amperage ... - Page 8 HANGING THE HEATER Lift the heater up and into the mounting bracket. 2) Align the bracket screws with the keyhole slots in the mounting bracket. 3) If the heater is to be tilted, it must be positioned in the keyhole slots - see figure 6. 4) Tighten the bracket screws with a wrench to secure the unit once suspended at horizontal or vertical level.
- Page 9 MULTIPLE VERTICAL ANGLES Figure 8 MOUNTING THE HEATER IN THE WALL’S WOOD STUDS ONLY Refer to Figures 9A to 1. Slide the support plate into the tripod; align both square holes and tighten with screws. (Figure 9A) 2. Install the tripod on the wall with two screws. (Figure 9B) 3.
- Page 10 Wall Hanging Installation (wood stud only) Attach with screw (M4*12*1) Support plate WALL 2. Install the bracket on the wall with two screws (ST10*30*2) Tripod 1. Slide the support plate into the tripod Figure 9A Figure 9B 4. Attach the heater 3.
-
Page 11: Connecting The Power
5. The heater can be fixed at 3 different angles. Use two screws (M6*16*2) to secure the unit in each angle. WALL screw screw screw TOP VIEW 45° 45° Figure 9E NOTE: The louvers are designed so they cannot be completely closed. Do not attempt to defeat this feature;... - Page 12 NOTE: If you use an external temperature control (external thermostat), please follow the instructions below: Note 1: Turn off the power to the supply line for the heater before you select the build-in / external thermostat. Note 2: Please find the control switch on the back of the heater as shown in Figure 11 and shift the switch to “II”...
- Page 13 Strip away the cover of lead wire for 50mm .Twist the wire through the end From the external control box. Figure 12C Figure 12D 5. Bend each wire into a circle Place the twisted wires through the hole Figure 12E Figure 12F 7.
- Page 14 Connection of power cables 1. Remove the screw from the front of the unit to connect the power to the heater. 2. Attach the cable connectors to the unit (See Figure 13) and slide the 8-gauge wire through the cable connector. 3.
-
Page 15: Operating Instructions
OPERATING INSTRUCTIONS Note: After setting an external thermostat to control the heater, the power selection switch on the unit will be the only working function on the heater itself. TO PROTECT THE HEATING ELEMENT This unit has a fan delay function to provide warm air when it is first turned on. When the heater is turned off, the fan will continue working for a short while to cool the heating element;... -
Page 16: Maintenance Instructions
THERMAL CUT-OUT The heater will automatically turn off should it overheat. When this happens, the red indicator will turn on. After the unit has cooled back down to a normal level, the heater will turn ON again and the red indicator will turn off, but the reason of the overheating must be determined and corrective action must be taken before further operation.
Need help?
Do you have a question about the HA24-75MB and is the answer not in the manual?
Questions and answers