Table of Contents
Advertisement
Quick Links
Advertisement
Table of Contents
Troubleshooting

Summary of Contents for GILBARCO VEEDER-ROOT FlexPay Encrypting PIN Pad
- Page 1 FlexPay Encrypting PIN Pad (EPP) ™ Start-up and Service Manual MDE-4784D...
- Page 2 Computer Programs and Documentation All Gilbarco Inc. and/or Veeder Root Company computer programs (including software on diskettes and within memory chips) and documentation are copyrighted by, and shall remain the property of, Gilbarco Inc. and/or Veeder Root Company. Such computer programs and documents may also contain trade secret information. The duplication, disclosure, modification, or unauthorized use of computer programs or documentation is strictly prohibited, unless otherwise licensed by Gilbarco Inc.
-
Page 3: Table Of Contents
Table of Contents Table of Contents 1 – Introduction Purpose ................1 Intended User . - Page 4 Table of Contents Replacing the FlexPay EPP ............57 Encore 500 Series and Eclipse Dispensers .
-
Page 5: Introduction
Purpose Introduction 1 – Introduction Purpose This manual provides start-up, service, and troubleshooting instructions for FlexPay ™ Encrypting PIN Pads (EPPs) that are installed on the Encore Series, Eclipse , and The ® ® Advantage Series dispensers. ® Intended User This manual is intended for Authorized Service Contractors (ASCs) who are trained to service the FlexPay EPP. -
Page 6: Product Configurations
Introduction Overview Figure 1-1 shows the FlexPay EPP system configuration. Figure 1-1: FlexPay EPP - System Configuration Dual Head Card Reader Door Node Advanced GSM Flexpay EPP with SmartPad™ Emulation Auxiliary CRIND Control Node ® Function Keypad Mono Display and Soft keys Component Functionality FlexPay EPP with SmartPad... -
Page 7: Product Specifications
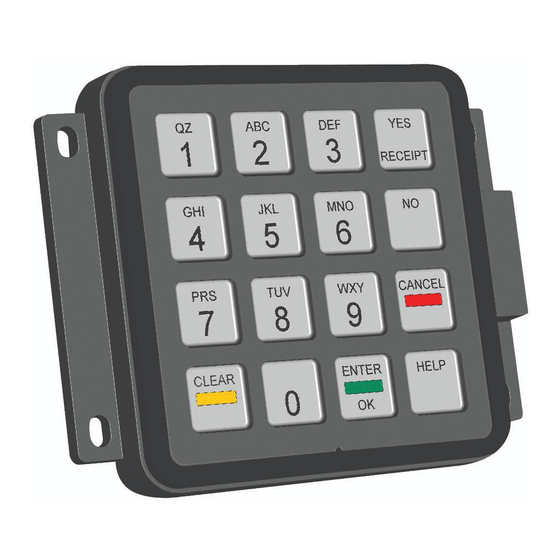
Required Tools Introduction Product Specifications Figure 1-2: FlexPay EPP • PCI Compliant PIN Pad - PIN encrypted directly in PIN Pad. Capable of remote key loading - TDES encryption standard • PIN Pad equipped with standard buttons and color indicators: YES/Receipt, No, Cancel, Clear, Enter/OK, and Americans with Disabilities Act (ADA) •... -
Page 8: Related Documents
• Encore and Eclipse • Encore and Eclipse Installers • Footprint & Elevation Library MDE-4799 FlexPay Encrypting PIN Pad (EPP) Mapping Cables FlexPay EPP & SCR MDE-4807 FlexPay Encrypting PIN Pad (EPP) Remote Key • Encore and Eclipse Loading (RKL) and Debit Activation Instructions •... - Page 9 Abbreviations and Acronyms Introduction Term Description Integrated Circuit Major Oil Company Printed Circuit Assembly Payment Card Industry Point Of Sale SDES Single-Data Encryption Standard TDES Triple-Data Encryption Standard TRIND Transmitter/Receiver IN Dispenser ® MDE-4784D FlexPay™ Encrypting PIN Pad Start-up and Service Manual · December 2011 Page 5...
- Page 10 Introduction Abbreviations and Acronyms This page is intentionally left blank. Page 6 MDE-4784D FlexPay™ Encrypting PIN Pad Start-up and Service Manual · December 2011...
-
Page 11: Important Safety Information
Important Safety Information 2 – Important Safety Information Notes: 1) Save this Important Safety Information section Read the Manual in a readily accessible location. Read, understand and follow this manual and any other labels 2) Although DEF is non-flammable, Diesel is or related materials supplied with this equipment. - Page 12 Important Safety Information No Open Fire In an Emergency Inform Emergency Personnel Compile the following information and inform emergency Open flames from matches, lighters, welding torches or personnel: other sources can ignite fuels and their vapors. • Location of accident (for example, address, front/back of No Sparks - No Smoking building, and so on) •...
- Page 13 Important Safety Information Hazards and Actions WARNING Spilled fuels, accidents involving pumps/dispensers, or uncontrolled fuel flow create a serious hazard. Fire or explosion may result, causing serious injury or death. Follow established emergency procedures. DEF is non-flammable. However it can create a slip hazard. Clean up spills promptly. The following actions are recommended regarding these hazards: Collision of a Vehicle with Unit Fire at Island...
- Page 14 Important Safety Information This page is intentionally left blank. Page 10 MDE-4784D FlexPay™ Encrypting PIN Pad Start-up and Service Manual · December 2011...
-
Page 15: Start-Up And Service
Start-up Procedure for the FlexPay EPP Start-up and Service 3 – Start-up and Service This chapter provides start-up, service, and troubleshooting instructions for the FlexPay EPP. These procedures must be performed by a Gilbarco ASC who is trained to service the FlexPay EPP. -
Page 16: Temperature Range
Start-up and Service Temperature Range Purge memory (in case of The Advantage Series or Encore 300 dispensers, install the coldstart jumpers and perform a coldstart). IMPORTANT INFORMATION The FlexPay EPP may not enable proper debit functions if the purge memory or coldstart procedure is not performed. -
Page 17: Sensors
Sensors Start-up and Service Sensors The FlexPay EPP has secure hardware, preventing tampering with the electronics and disclosure of the secret keys and PIN codes that are being stored. The FlexPay EPP has sensors that can detect the following: • Disassembly of the keyboard •... -
Page 18: Reading The Status Leds
Start-up and Service Reading the Status LEDs IMPORTANT INFORMATION To perform Remote Key Loading of TDES keys, refer to MDE-4807 FlexPay Encrypting PIN Pad (EPP) Remote Key Loading (RKL) and Debit Activation Instructions. For information on connecting a laptop to the FlexPay EPP, refer to “Connecting a Laptop to the FlexPay EPP”... -
Page 19: Crind Diagnostics
CRIND Diagnostics Start-up and Service CRIND Diagnostics Encore 500 Series and Eclipse Dispensers Entering Diagnostic Mode Using the CRIND Diagnostic Card To enter the Diagnostic Mode, proceed as follows: Swipe the CRIND Diagnostic Card (see Figure 3-1). Figure 3-1: Entering the Diagnostic Mode CRIND Diagnostic Card The CRIND Diagnostic Startup Menu appears. - Page 20 Start-up and Service CRIND Diagnostics Performing the Keypad Test To perform the Keypad Test, proceed as follows: On the CRIND Diagnostic Startup Menu, press 1. The CRIND Diagnostic Main Menu appears. Figure 3-3: CRIND Diagnostic Main Menu On the CRIND Diagnostic Main Menu, press 2. The Device Config Menu appears. Figure 3-4: Device Config Menu Device Config 1.
- Page 21 CRIND Diagnostics Start-up and Service On the Device Config Menu, press 8. The Keypad Menu appears. The Keypad Menu displays a unique code in real-time for each key that is pressed. Notes:1) When you enter the Keypad Test in Diagnostic Mode, a message is displayed at the bottom of the screen that indicates the Debit status (on Encore 500 Series and Eclipse dispensers only).
-
Page 22: The Advantage Series And Encore 300 Dispensers
Start-up and Service CRIND Diagnostics Exiting Diagnostic Mode To exit the Diagnostic Mode after performing the Keypad Test, proceed as follows: Return to the Diagnostic Startup Menu. Press 2 to exit the Diagnostic Mode. The Advantage Series and Encore 300 Dispensers Entering Diagnostic Mode Using the CRIND Diagnostic Card To enter the Diagnostic Mode using the CRIND Diagnostic Card, proceed as follows: Insert and remove the Diagnostic Card. -
Page 23: System Health Report
System Health Report Start-up and Service IMPORTANT INFORMATION Function keys on the FlexPay EPP and the Auxiliary Keypad may display different rows/columns from what is expected. This is normal. The FlexPay EPP or the Auxiliary Keypad must not be replaced, if this is observed. Exiting Diagnostic Mode Using Diagnostic Card Insert and remove the Diagnostic Card. -
Page 24: Method 2
Start-up and Service System Health Report Method 2 To print the System Health Report, proceed as follows: Note: This method will disable both sides of the dispenser. Swipe the CRIND Diagnostic Card (see Figure 3-7). Figure 3-7: Entering the Diagnostic Mode CRIND Diagnostic Card The CRIND Diagnostic Startup Menu appears. - Page 25 System Health Report Start-up and Service On the CRIND Diagnostic Startup Menu, press 1. The CRIND Diagnostic Main Menu appears. Figure 3-9: CRIND Diagnostic Main Menu On the CRIND Diagnostic Main Menu, press 5. The System Health Report is printed. The System Health Report consists of four sections (for example, see Figure 3-10 page 22...
- Page 26 Start-up and Service System Health Report Figure 3-10: System Health Report Example The type of Keypad in use Page 22 MDE-4784D FlexPay™ Encrypting PIN Pad Start-up and Service Manual · December 2011...
- Page 27 System Health Report Start-up and Service Figure 3-11: System Health Report Example Continued The State of the SmartPad MDE-4784D FlexPay™ Encrypting PIN Pad Start-up and Service Manual · December 2011 Page 23...
- Page 28 Start-up and Service System Health Report Figure 3-12: System Health Report Example Continued Page 24 MDE-4784D FlexPay™ Encrypting PIN Pad Start-up and Service Manual · December 2011...
-
Page 29: Connecting A Laptop To The Flexpay Epp
Connecting a Laptop to the FlexPay EPP Start-up and Service Figure 3-13: System Health Report Example Continued Connecting a Laptop to the FlexPay EPP To map keys using the FlexPay EPP Mapping Tool and to perform service routines using the FlexPay EPP Service Tool, connect a laptop to the FlexPay EPP. -
Page 30: Using The M08743A001 Flexpay Epp Programming Cable
Start-up and Service Connecting a Laptop to the FlexPay EPP Using the FlexPay EPP Programming Cable (M08743A001) This cable consists of two connectors: a 9-pin D-Sub connector which connects to the port on the laptop and a 6-position connector which connects to the pigtail connector at the rear of the FlexPay EPP. -
Page 31: Programming Cable
Connecting a Laptop to the FlexPay EPP Start-up and Service Using the Standalone FlexPay EPP Programming Cable (M08743A002) This cable consists of three connectors: a USB cable which connects to a USB port on the laptop, a 9-pin D-Sub connector which connects to the port on the laptop, and a 6-position connector which connects to the rear of the FlexPay EPP. -
Page 32: Using The Flexpay Epp Mapping Tool
Start-up and Service Using the FlexPay EPP Mapping Tool Using the FlexPay EPP Mapping Tool The Mapping Tool allows you to map keys (and their associated functions) present in the current keypad to those present on the FlexPay EPP. Common Terms Term Description The basic unit of a keypad which has a unique position (row and column) and... -
Page 33: Downloading The Single Click Update Tool
Using the FlexPay EPP Mapping Tool Start-up and Service Downloading the Single Click Update Tool To download the Single Click Update tool, proceed as follows: Log on to the Gilbarco Extranet and click Technician Resources > Laptop Tool > Single Click Update. - Page 34 Start-up and Service Using the FlexPay EPP Mapping Tool Click Unzip. • If the unzip operation is successful, the Winzip Self-Extractor window appears (see Figure 3-18). The files are unzipped successfully. Figure 3-18: Unzip Successful Message Window Click OK. The Winzip Self-Extractor - KeyMapLoader_10.2.8.exe window appears (see Figure 3-19).
- Page 35 Using the FlexPay EPP Mapping Tool Start-up and Service • If the unzip operation fails, a message appears that states that the output file cannot be created (see Figure 3-21). Figure 3-21: Error Message Click OK. Navigate to the KeyMapLoader directory from Windows Explorer (see Figure 3-22).
- Page 36 Start-up and Service Using the FlexPay EPP Mapping Tool Right-click the KeyMapLoader folder and click Search (see Figure 3-23). Figure 3-23: Searching the KeyMapLoader Folder Enter *.* in the “All or part of the file name:” field and click Search (see Figure 3-24).
- Page 37 Using the FlexPay EPP Mapping Tool Start-up and Service Select any file and then press CTRL and A simultaneously. All the files in the window will be highlighted (see Figure 3-25). Figure 3-25: Search Results Window MDE-4784D FlexPay™ Encrypting PIN Pad Start-up and Service Manual · December 2011 Page 33...
- Page 38 Start-up and Service Using the FlexPay EPP Mapping Tool Select any file, right-click and click Properties (see Figure 3-26). Note: If you have accidentally deselected all files, then repeat step page Figure 3-26: Selecting the Properties Option Page 34 MDE-4784D FlexPay™ Encrypting PIN Pad Start-up and Service Manual · December 2011...
- Page 39 Using the FlexPay EPP Mapping Tool Start-up and Service Deselect the “Read-only” option (if the option is selected). Click OK (see Figure 3-27). Figure 3-27: Properties Window The Confirm Attributes Changes window appears. Select Apply changes to the selected items, subfolders and files and click OK (see Figure 3-28).
-
Page 40: Installing The Flexpay Epp Mapping Tool
Start-up and Service Using the FlexPay EPP Mapping Tool Installing the FlexPay EPP Mapping Tool To install the FlexPay EPP Mapping Tool, proceed as follows: Double-click the KeyMapLoader.exe icon on your laptop. An Open File-Security Warning window appears (see Figure 3-29). -
Page 41: Configuring The Flexpay Epp Mapping Tool
Using the FlexPay EPP Mapping Tool Start-up and Service Configuring the FlexPay EPP Mapping Tool To configure the FlexPay EPP Mapping Tool, proceed as follows: Select the required template from the options available (see Figure 3-34 page 40). Click Config. The Config window appears. Open and edit the items under “Edit File Filters”, which can be selected in the combos when opening or modifying an existing map. -
Page 42: Creating A New Key Map
Start-up and Service Using the FlexPay EPP Mapping Tool The functionality for each of the options under “System Configurations” is described below. Select the required settings. • Key code base: This field is preset and cannot be modified. • Options for Fill out unmapped keys: - Automatically with a specific key code Note: This is the default filling option and the default key code for this option is 0x0C, the value of which can be changed. - Page 43 Using the FlexPay EPP Mapping Tool Start-up and Service To create a new key map, proceed as follows: Connect the FlexPay EPP on the dispenser to the laptop that contains the FlexPay EPP Mapping Tool application using the programming connector. Power on the FlexPay EPP.
- Page 44 Start-up and Service Using the FlexPay EPP Mapping Tool If there is no key map file available, manually select the required template for the FlexPay EPP connected and edit the key captions, if required (see Figure 3-34). Figure 3-34: Keypad Template Options Keypad Template Options Click one of the unlabeled keys under “Old Keypad”.
- Page 45 Using the FlexPay EPP Mapping Tool Start-up and Service Enter the required caption in the “Key Caption” field. For example, “PAY CASH HERE”. Figure 3-36: Key Caption Key Caption Field Note: At any time, if the text of a key caption is erased, the corresponding mapping relation will be deleted automatically.
- Page 46 Start-up and Service Using the FlexPay EPP Mapping Tool Enter the same caption as in step page Figure 3-38: Key Code Key Code Field Note: For a double-space button, two different codes are displayed in the “Key Code” field when you hit the two keys in the double-space button. The keypad is displayed as shown in Figure 3-39.
- Page 47 Using the FlexPay EPP Mapping Tool Start-up and Service Repeat steps page 40) to page 42) to create the required keys. The keypad is displayed as shown in Figure 3-40. Figure 3-40: Updated Keypad Note: The ADA key displays the following features: •...
- Page 48 Start-up and Service Using the FlexPay EPP Mapping Tool Figure 3-41: ADA Function Default Value for ADA Reference the Auxiliary keypad on the unit with the FlexPay EPP and select the key to be mapped with “PAY CASH HERE” under “New Pad - EPP”. Figure 3-42: Selecting the Key to be Mapped Unlabeled Key Page 44...
- Page 49 Using the FlexPay EPP Mapping Tool Start-up and Service Select the required name for the key from the list of options under the “Mapping to” field. Else, enter the name of the key in the “Key Caption” field, if the name is different from that of the key it will be mapped with.
- Page 50 Start-up and Service Using the FlexPay EPP Mapping Tool Select the list of options in the “Mapping to” field to view the old keys that are available. Figure 3-44: List of Old Mapping Keys Select the required old key to which the new key must be mapped. Note: If there is no old key that can be mapped, enter the required key code in the “Key code”...
- Page 51 Using the FlexPay EPP Mapping Tool Start-up and Service Enter the required information in the following fields in “EPP Operation”: • Type • _Brand • @ Location • [ POS... ] • _T Prod. ID • -Serial number Note: The key map file name component fields display the following features: •...
- Page 52 Start-up and Service Using the FlexPay EPP Mapping Tool Click OK. The Save As window is displayed. The map is sent to the FlexPay EPP automatically. Note: The Key Codes can be saved or sent to FlexPay EPP, if there are no changes made to the Key Captions.
- Page 53 Using the FlexPay EPP Mapping Tool Start-up and Service Click OK. Note: The tool will report an error if the FlexPay EPP is offline, power has been turned off, or if the FlexPay EPP has been connected using the wrong COM. Figure 3-48: Sending the Key Map Successfully Figure 3-49: Sending the Key Map Unsuccessfully MDE-4784D FlexPay™...
-
Page 54: Setting Up The Clone Function In A Key Map
Start-up and Service Using the FlexPay EPP Mapping Tool Setting Up the Clone Function in a Key Map To clone the key map for a FlexPay EPP, proceed as follows: Connect the laptop that contains the FlexPay EPP Mapping Tool application to a FlexPay EPP on the dispenser using the programming connector. -
Page 55: Sending The Key Map File To The Flexpay Epp
Using the FlexPay EPP Mapping Tool Start-up and Service Sending the Key Map File to the FlexPay EPP To send the required key map to a FlexPay EPP, proceed as follows: Connect the laptop that contains the FlexPay EPP Mapping Tool application to a FlexPay EPP on the dispenser using the programming connector. -
Page 56: Verifying Flexpay Epp Cable Connections
Start-up and Service Verifying FlexPay EPP Cable Connections Click Yes. • If the key map file has been successfully sent to the FlexPay EPP a .txt file for the key map appears, which displays “0 SYNTAX errors”. See Figure 3-48 page •... -
Page 57: The Advantage Series Units And Encore 300 Dispensers
Verifying CRIND Software Version Start-up and Service The Advantage Series Units and Encore 300 Dispensers On The Advantage Series and Encore 300 units, ensure that one end of the FlexPay EPP cable is connected to the rear of the FlexPay EPP and the other end to P282 (SmartPad port on the appropriate CRIND Logic Board for each side of the unit. - Page 58 Start-up and Service Verifying CRIND Software Version Preventing Electrostatic Discharge IC Extractor Wrist Strap Printed Circuit Assemblies (PCAs) and Integrated Circuits (ICs) are sensitive to electrostatic discharge caused by static electricity. Electrostatic discharge can damage electronic parts. When removing PCAs or handling sensitive parts: •...
-
Page 59: Advanced Gsm
Advanced GSM Start-up and Service Advanced GSM The Advanced GSM replaces a Standard GSM. It is configured to work with the CRIND FlexPay EPP with Gilbarco CRIND (Generic and MOC), without any controller (POS) changes, in TDES mode. The POS/Forecourt software communicates with the Advanced GSM through standard PC “COM Port”... - Page 60 Start-up and Service Advanced GSM To verify the proper operation of the Advanced GSM and to isolate and correct problems in processing Debit Card transactions use the troubleshooting procedure (Figure 3-54). Figure 3-54: Advanced GSM Troubleshooting Procedure STEP 1 STEP 2 Check Installation Check GSM for Diagnostic Code No Diagnostic...
-
Page 61: Replacing The Flexpay Epp
Replacing the FlexPay EPP Start-up and Service Replacing the FlexPay EPP CAUTION Ensure that you install a new Card Reader Gasket, if you remove and reinstall the Card Reader when replacing the FlexPay EPP. Else, water may leak around the old gasket. - Page 62 Start-up and Service Replacing the FlexPay EPP Remove the FlexPay EPP. Mount the new FlexPay EPP on the unit using the screws removed in step page Reconnect the cables removed in step page Restore power to the unit. Enter the Diagnostic Mode using the Diagnostic Card. Refer to “Entering Diagnostic Mode Using the CRIND Diagnostic Card”...
-
Page 63: The Advantage Series And Encore 300 Dispensers
Replacing the FlexPay EPP Start-up and Service The Advantage Series and Encore 300 Dispensers To replace the FlexPay EPP in The Advantage Series and Encore 300 dispensers, proceed as follows: Inform the Manager that the power will be removed and remove all power supplied to the unit at the breaker located in the building. -
Page 64: New Features In Flexpay Epp 2.1 (M10662B001)
Start-up and Service New Features in FlexPay EPP 2.1 (M10662B001) In the Diagnostic Mode, run a Keypad Test to check all keys. For instructions, refer to “Performing the Keypad Test” page Exit the Diagnostic Mode. For instructions, refer to “Exiting Diagnostic Mode Using Diagnostic Card”... -
Page 65: Changes In The Bezel/Pod For Flexpay Epp 2.1
New Features in FlexPay EPP 2.1 (M10662B001) Start-up and Service Changes in the Bezel/POD for FlexPay EPP 2.1 The bezels/PODs for FlexPay EPP 2.1 are different from the bezels/PODs for FlexPay EPP 1.3. The bezels/PODs for FlexPay EPP 2.1 are manufactured with a few changes to accommodate the FlexPay EPP 2.1 and Activation switches. -
Page 66: Troubleshooting Communication Issues
Start-up and Service Troubleshooting Communication Issues IMPORTANT INFORMATION • The FlexPay EPP 2.1 will not fit into the bezel/POD intended for FlexPay EPP 1.3. If you have the FlexPay EPP 1.3 and want to upgrade to FlexPay EPP 2.1, then you must upgrade your bezel/POD. - Page 67 Troubleshooting Communication Issues Start-up and Service Both the FlexPay EPP and Auxiliary keypad appear dead (you do not hear a beep when keys are pressed) To troubleshoot this problem, proceed as follows: Check the rear of the FlexPay EPP to ensure the Red and Green LEDs are flashing. Unplug the Auxiliary keypad from the rear of the FlexPay EPP and verify if the FlexPay EPP keys start to beep.
- Page 68 Start-up and Service Troubleshooting Communication Issues A beep is heard when the keys on the FlexPay EPP are pressed. However, debit does not work To troubleshoot this problem, proceed as follows: Run a System Health Report and ensure that the FlexPay EPP type is programmed as “SmartPad”.
-
Page 69: The Advantage Series And Encore 300 Dispensers
Troubleshooting Communication Issues Start-up and Service The Advantage Series and Encore 300 Dispensers The key does not work as labeled on the FlexPay EPP or on the Auxiliary keypad To troubleshoot this problem, proceed as follows: Check the key mapping. In most cases, it would have been mapped incorrectly and has to be remapped. - Page 70 Start-up and Service Troubleshooting Communication Issues The correct software version is installed, the dispenser boots up and displays “SmartPad not working” To troubleshoot this problem, proceed as follows: Verify the LEDs on the rear of the FlexPay EPP are flashing. Verify the cables between the FlexPay EPP and SmartPad port on the CRIND Logic Boards are connected properly.
-
Page 71: Troubleshooting Flowcharts
Troubleshooting Flowcharts Start-up and Service Troubleshooting Flowcharts Figure 3-60: Troubleshooting Flowchart - 1 BEGIN Debit does not work Step 1 If Debit is not working at all dispensers, then Does verify GSM, dispenser have network, POS Aux. keypad Operations with Debit option? Swipe Debit Card... - Page 72 Start-up and Service Troubleshooting Flowcharts Figure 3-61: Troubleshooting Flowchart - 2 If an Encore Swipe 500 series Diagnostics “Debit Not dispenser Working” - Step 2 Card Review System Health Press the Report Did you receive Clear key on a beep FlexPay EPP If dispenser is Encore 300 or...
- Page 73 Troubleshooting Flowcharts Start-up and Service Figure 3-62: Troubleshooting Flowchart - 3 “Debit not working” - step 3 Can you see Power Down the LED on the Dispenser FlexPay EPP? Remove TRIND board Solid “Red” Is Red LED and bracket (if applicable) on solid? and power-up dispenser Connect...
- Page 74 Start-up and Service Troubleshooting Flowcharts Figure 3-63: Troubleshooting Flowchart - 4 BEGIN Solid “Red” LED on FlexPay EPP (In dispenser) 99% of the time when there is a solid red LED, you will see a tamper when using the RKL Tool. Ensure that you are using the latest Connect FlexPay EPP RKL tool.
- Page 75 Troubleshooting Flowcharts Start-up and Service Figure 3-64: Troubleshooting Flowchart - 5 BEGIN 1 or more keys on the PIN Pad will not beep when pressed Ensure that the issue is not a broken beeper Is there an Aux. keypad? Unplug Aux. keypad and try Warmstart pressing keys...
- Page 76 Start-up and Service Troubleshooting Flowcharts Figure 3-65: Troubleshooting Flowchart - 6 The Advantage BEGIN series/Encore 300 Message dispenser only “SmartPad Not Working” is displayed Keys on the FlexPay EPP do not beep when pressed Ensure that the issue is not a broken beeper Check cable between FlexPay EPP and CRIND.
- Page 77 Troubleshooting Flowcharts Start-up and Service Figure 3-66: Troubleshooting Flowchart - 7 The Advantage BEGIN Series/Encore 300 Zero key on FlexPay dispenser only PIN Pad will not work Is the zero key the only non working key? Test all keys. Then pull and replace FlexPay EPP or Aux.
- Page 78 Start-up and Service Troubleshooting Flowcharts Figure 3-67: Troubleshooting Flowchart - 8 BEGIN Mappable keys on FlexPay EPP and Aux. Mappable keys. For keypad do not function example, Yes, No, properly Cancel, Help, Pay Outside Debit, Pay Outside Credit, and so on When pressing mappable keys you get Mappable keys do...
- Page 79 Troubleshooting Flowcharts Start-up and Service Figure 3-68: Troubleshooting Flowchart - 9 Existing FlexPay BEGIN FlexPay EPP 2.1 loses Activation (Shows on RKL Tool) Tighten all 4 Are all 4 screws tight? screens and check again Is FlexPay EPP mounted on bracket/dispenser correctly? Yes or No...
- Page 80 Start-up and Service Troubleshooting Flowcharts Figure 3-69: Troubleshooting Flowchart -10 Newly installed BEGIN FlexPay EPP FlexPay EPP 2.1 shows Not Activated on RKL Tighten all 4 Are all 4 screens and screws tight? check again Is FlexPay EPP mounted on bracket/dispenser correctly? Yes or No...
-
Page 81: Wiring
The Advantage Series - Side A and Side B Wiring 4 – Wiring This chapter provides the FlexPay EPP Wiring diagrams for different Gilbarco dispensers. The Advantage Series - Side A and Side B MDE-4784D FlexPay™ Encrypting PIN Pad Start-up and Service Manual · December 2011 Page 77... -
Page 82: Encore S Series - Side A And Side B
Wiring Encore S Series - Side A and Side B Encore S Series - Side A and Side B M08430B001 M08430B001 Page 78 MDE-4784D FlexPay™ Encrypting PIN Pad Start-up and Service Manual · December 2011... -
Page 83: Eclipse Side-1 And Side-2
Eclipse Side-1 and Side-2 Wiring Eclipse Side-1 and Side-2 MDE-4784D FlexPay™ Encrypting PIN Pad Start-up and Service Manual · December 2011 Page 79... -
Page 84: Encore 300
Wiring Encore 300 Encore 300 Page 80 MDE-4784D FlexPay™ Encrypting PIN Pad Start-up and Service Manual · December 2011... -
Page 85: Encore 500 - Side A And Side B
Encore 500 - Side A and Side B Wiring Encore 500 - Side A and Side B MDE-4784D FlexPay™ Encrypting PIN Pad Start-up and Service Manual · December 2011 Page 81... -
Page 86: Flexpay Epp Heater Option
Wiring FlexPay EPP Heater Option FlexPay EPP Heater Option Phillips is a registered trademark of Phillips Screw Co. ® © 2011 Gilbarco Inc. 7300 West Friendly Avenue · Post Office Box 22087 Greensboro, North Carolina 27420 Phone (336) 547-5000 · http://www.gilbarco.com ·...
Need help?
Do you have a question about the FlexPay Encrypting PIN Pad and is the answer not in the manual?
Questions and answers