
Summary of Contents for Alphacool Heatmaster
- Page 1 ALPHACOOL HEATMASTER Measure, Control, Monitor, Alarm, Protect, ...PC independent. User guide V 1.0...
-
Page 2: Table Of Contents
Appendix 1 Application of control-loops Appendix 2 Alarm conditions Appendix 3 Controlling pumps with Heatmaster Part 2 Heatmaster software functions – Basics and menu Appendix A Sensor calibration Appendix B PID-functions of the control-loops variables Correct operation and guarantee Statement of conformity... -
Page 3: System Requirements And Features
Features Independent from PC-software. After the setup of Heatmaster, all settings are saved in Heatmaster. After system installation, no need for further connection per USB-cable. There is no burden for the operating system to interact with USB-device with this feature. -
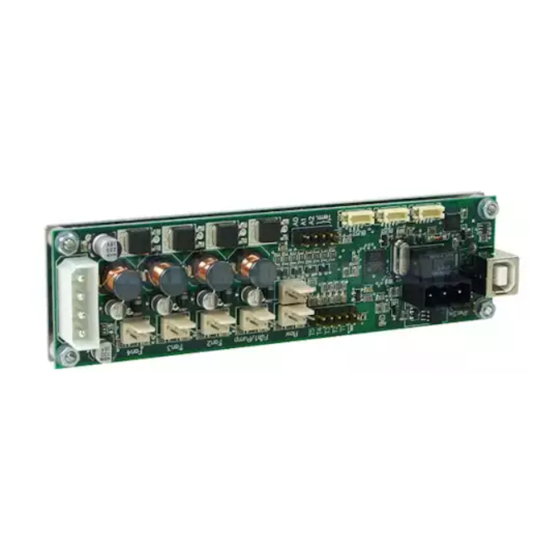
Page 4: Hardware Fitting And Installation
C Install the Heatmaster software and follow the instructions The Heatmaster reacts as a power distributor at the first start of the hardware. All fans and pumps connected will be controlled with 100% PWM , without the need of the installation of software or... -
Page 5: Connection Definitions
Level 3. The normal on/off function thereby hasn't changed. 2 Relays Connect here a device of your choice or a further relay. The Heatmaster relay delivers max. 24 Volt / 30 Watt of switching voltage. - Page 6 Connect the enclosed 3-pin cable (Socket/Socket) with the fan connection of CPU fan on the main board. In case of air cooling CPU, connect the CPU fan to the Heatmaster now. With this the Heatmaster can be connected to all the alarm and monitoring functions (alarm level 2) of the main board ( see handbook of your main board, BIOS setups).
- Page 7 12 USB Connection Connect the Heatmaster with a free USB-port of your PC. The correct function can only be secured at a direct PC port. Check long USB cables (5m and more, HUBs and repeater) later, if the basic function is checked on a PC-USB-port.
-
Page 8: Software Installation Drivers And Heatmaster Software
2 Driver installation The Heatmaster hardware will be found and Windows will ask for a suitable driver. Confirm or give manually the current location of the driver through giving the file path. Turn off the virus-scan or firewall programs before the installation if necessary. - Page 9 The driver is signed digitally, but does not take part of further certification of Microsoft. Ignore the warning message accordingly and click “continue installation any way” The driver installation takes place for USB and thereafter for the serial-port If the driver does not show the indicated functions, uninstall the driver and restart the PC. Start the driver installation again.
- Page 10 Select the relevant port. With that, the general installation of the Heatmaster is completed. If you don’t have a port to select, check the driver installation and the correct connection of the Hardware. The onboard-LED of the Heatmaster hardware should be illuminated permanently green by the first starting up.
-
Page 11: Quick Start Up
Quick introduction Now, you will experience everything about the complete first operation, including important settings of the control-loops, without reading the complete instruction manual. With an example setup you can create your first control-loops. Before you start, please read the Appendix 1 and 2 for a pure air cooling. - Page 12 Here the selected aspects through the buttons (11) are displayed. Place the desired device icons here from the library (5) to build up a control-loop. After that the Heatmaster software asks the possible selection of devices in a pop-up requester (e.g. thermo sensor 1-5). You also can move device icons in to the other four control-loop panels.
- Page 13 I. Start screen The display screen shown above corresponds, if all four fans (three fans and one pump) and all thermo sensors are connected during the first run. The internal temperature sensor is in the monitor content by default and is displayed as a graph on the monitor. The fan (and one connected pump) run with the full operating-voltage of 12V.
- Page 14 II. Add Devices (Monitor Content) Fan 1 (respectively the pump) is added to the monitor content per drag and drop, through the dragging of the device icon from the control-loop panel (12) of the monitor (2). The icon can also be dropped on the monitor.
- Page 15 You can specify the values manually, if the loop is not active. Furthermore the speed and the Achieved RPM are shown. It is about the feedback of the fan/pump, which is evaluated by the Heatmaster (input). Entered values in PWM are specifications of the Heatmaster to the device (output) The highest level of the performance in an active loop is specified with the property Maximum PWM (%), so that a fan/pump never achieves more than 80% of its performance and runs noisily.
- Page 16 You can get the required information from the manufacturer’s data and enter here. Follow these steps for every Control loop you wish to use. The basic setting of the Heatmaster is finished with that. Leave the USB cable connected for couple of days to adapt the setups if needed.
-
Page 17: Appendix 1 Application Of Control-Loops
(Names for loops can be assigned freely). Control-loops should not be consisted only of a fan and a minimum sensor, but also of an alarm buzzer, so that the Heatmaster can accomplish its extensive protective functions. Don’t expect regulation, deactivate the control-loop and enter the rotation values manually (see fast access, Control-loops (13)). -
Page 18: Appendix 2 Alarm Conditions
The red Heatmaster-LED blinks at the stage 1, from stage 2 this is permanently on. In an alarm stage, the port will be informed in every second about the alarm stage, and once after the alarm stops as well (stage 0). -
Page 19: Appendix 3 Controlling Pumps With Heatmaster
Alphacool AP 900 or the Laing D5. The pump reacts then as a 12V fan without Tacho-signal* for the Heatmaster. Please consider the respective properties for the fans-pumps device (Properties “comes with Tachosignal” or “Pump connected”) - Page 20 HEATMASTER INSTRUCTION MANUAL PART 2 EXTENDED SETUP...
-
Page 21: Heatmaster Software Functions - Basics And Menu
Heatmaster software basic and menu functions DRAG&DROP Basically select all basic functions and devices from the library (5) through drag and drop with the mouse over (4) and (12) one of the five possible control-loops (13) and deposit back the functions/devices in the library, which are not necessary. - Page 22 Activate Recording - If you activate this function, the software creates a history-log-file in the File, where the Heatmaster.exe is. This is a csv/txt file, in which values like temperature, RPM etc. are entered according to the selected intervals (see below). If you stop and resume recording, new data will be added without deleting old data.
- Page 23 The library is the first and the central control station of all devices (sensors, fans, pumps etc.) and functions (alarm…) of the Heatmaster software. From here you can dodrag and drop deviceicons in to the Monitor (2), Monitor content (4), device windows (12) 1 to 5 and all these among (2), (4) and...
- Page 24 Status – On / off Name – Default name or give individual names Connection – Marking the real hardware connection on Heatmaster 8 Flow meter device icon The flow meter can be allocated in one of five loops. The flow meter is used to calculate and control the liquid transportation in liquid-cooling systems in liters or gallons.
- Page 25 PC will be shut down, if the Heatmaster is connected with the power-switch of the PC. (see the topic Connection Definitions 1, Power switch) Hysterisis- Temperature - Indicates or specifies the hysterisis temperature.
- Page 26 Unregulated running value PWM (%) - Shows the set up running value for the initial stage, where the Heatmaster hardware does not assume the control yet. This value is regularly set up at 100. Starting threshold PWM (%) - This is the lowest possible value, at which the fan barely starts.
- Page 27 This value can be adjusted manually if needed. Pump connected - This property shows the Heatmaster, that there is no fan in use and gives other PWM values, which should be corrected. If you deactivate this property, the icon will also change from Pump/Fan to Fan.
- Page 28 Heatmaster, which include devices selected by you respectively. Without devices in a control-loop the Heatmaster cannot undertake controlling function. You select devices per drag and drop from the library (5) and drop over the control-loop-panel. After doing this the software asks in a pop-up requester for selecting free device-number (e.g.
-
Page 29: Appendix A Sensor Calibration
Appendix A Sensor calibration Nominal Resistance at 25˚C All temperature sensors used by Heatmaster are NTC temperature sensors (NTC resistors – Negative Temperature Coefficient). The sensors are simply made of one resistor, which alters under the influence of measuring physical values (in this case the temperature). The value is given in Ohm and can be adapted to specific manufacturer’s instructions. - Page 30 = Ln(R t1 / R t2 ) / (1/T 1 – 1/T 2 ) where R t1 = Resistance at temperature 1 R t2 = Resistance at temperature 2 T 1 = Temperature 1 in °K T 2 = Temperature 2 in °K The Beta-value of a NTC-thermal resistor is calculated here with two temperature value only and used only in a pre-described range.
-
Page 31: Appendix B Pid-Functions Of The Control-Loops Variables
Appendix B PID- PID functions of the control-loop variables Changing these properties is generally not needed and you only need basic knowledge to do this. You have the possibility, if you want to experiment with this or develop setups. Create an external experimental-loop for example with an extension cable to test safely. - Page 32 The differential value has a special meaning, if the proportional and the integral controlling of the regulator are deactivated. In this case the fan speed will be accelerated or decelerated in levels according to the differential value and the amplification factor set up. Amplification factor The amplification factor multiplies the temperature deviation from the nominal value.
-
Page 33: Correct Operation And Guarantee
3. The warranty claim is only valid with the combination of original invoice, sales slip or with a confirmation of warranty from Alphacool. 4. It is discretionary of Alphacool to repair or to replace the product or the parts, which are defect. Replaced product or the part is a property of Alphacool. -
Page 34: Statement Of Conformity
© Copyright 2009 Alphacool GmbH All rights including translation reserved. Analog or digital reproductions of any kind, except a copy of the consumer, without the written consent of Alphacool. The guide reflects the technical status at the time of printing. Changes reserved.
Need help?
Do you have a question about the Heatmaster and is the answer not in the manual?
Questions and answers