Table of Contents
Advertisement
Advertisement
Table of Contents

Related Manuals for Zimmer Cryo Mini

Summary of Contents for Zimmer Cryo Mini
- Page 1 Instructions for Use CryoMini GB/EU...
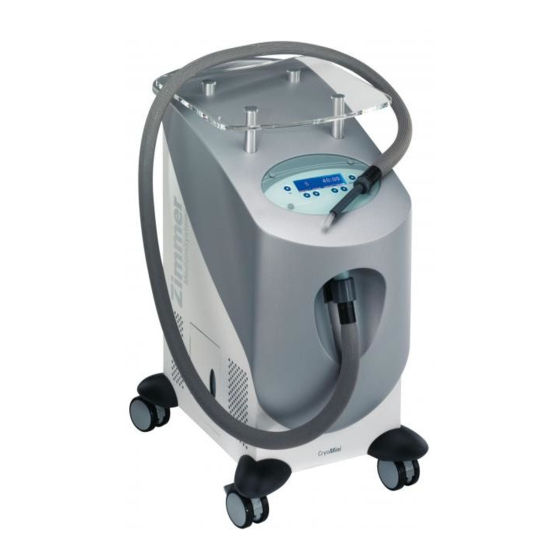
- Page 2 Illustrations Front of Device Fig. 1 Equipment and 1 Castor Controls 2 Castor guards 3 Control panel 4 Tray 5 Treatment tube connection Fig. 2 6 Treatment tube 7 Treatment tube connector socket...
- Page 3 Illustrations Rear / Left side of Device Fig. 3 Fig. 4 Equipment 8 Air filter 9 Identification plate Controls 10 Mains switch 11 Power inlet 12 Condensation water container...
- Page 4 Illustrations Screens / Displays Fig. 4 Cooling recommended 30:00 -10°C Start/ Stop Display 13 Increasing treatment time controls 14 Reducing treatment time 15 Increasing fan speed 16 Reducing fan speed 17 OK button 18 Start/Stop key 19 Fan speed icon 20 Fan speed display 21 Symbolic display of treatment time 22 Treatment time...
- Page 5 Explanation of Symbols In the instructions for use this symbol indicates “Danger”. Caution! In the instructions for use this symbol indicates „Caution“ with regard to possible damage of the device.. Applied part type B Do not push sideways. Maximum permissible load on the glass plate 35kg. Max 35 kg / 77.16 lb Follow Instructions for Use.
-
Page 6: Table Of Contents
Content Illustrations Front of Device Rear / Left side of Device Screens / Displays Explanation of Symbols Page Indications / Contraindications 1.1 Indications / Contraindications in the Physical Therapy 1.2 Indications / Contraindications in the Aesthetics Side Effects Application information Warnings CryoMini - in brief Device Set Up... - Page 7 Content Device Combination Safety and Maintenance 14.1 Safety 14.2 Maintenance Functional Test Safety Check / Metrological Control Error Messages / Troubleshooting / Disposal Manufacturer´s EMC declaration Valid for the CryoMini devices. This instructions for use is an integral part of the device. It must be stored with the device and kept accessible at all times for anyone authorized to operate this device.
-
Page 8: Indications / Contraindications
Indications / Contraindications 1.1 Indications / Contraindications in the Physical Therapy Indications CryoMini is intended for the following areas of application: • Reduction of pain and stiffness and as a supplemental treatment for acute and chronic painful diseases of the musculoskeletal system - Arthritis - Bursitis - Tendinitis... -
Page 9: Indications / Contraindications In The Aesthetics
Indications / Contraindications 1.2 Indications / Contraindications in the Aesthetics Indications CryoMini is intended for the following areas of application: Pain and inflammation reduction by cooling using cold air during and after the application of dermatological and cosmetic treatments • laser therapy •... -
Page 10: Side Effects
Side Effects Side effects Cold-related skin damage, such as skin irritations up to slight frostbite and chilblains may occur, especially in sensitive patients. Page 3... - Page 11 Inspect the device before use. In case of damage, the device must not be used. Caution ! Only accessories from Zimmer Medizin Systeme GmbH are to be used. Page 4...
- Page 12 Operation Instructions The device may cause malfunctions, or may interfere with the operation of equipment in its vicinity through electromagnetic effects. It may be necessary to take appropriate remedial action, such as a new orientation, a new arrangement of the device, or an electromagnetic shielding.
-
Page 13: Warnings
Warnings Users of the CryoMini system must be instructed in the proper use of the system and have the appropriate skills. The device is intended to be used exclusively by medical professionals. The patient should be carefully monitored throughout the treatment. Treatment instructions regarding the place of treatment, duration and intensity of treatment require medical knowledge and may only be given by licensed physicians, therapists and ancillary medical staff. -
Page 14: Cryomini - In Brief
CryoMini - in brief What is CryoMini? A compact cold air device for the treatment of musculoskeletal diseases. What does CryoMini Cold air is blown with an adjustable flow rate to the treated body area. perform? What are the The clearly structured LCD display and the ergonomic keyboard feature stated-the- advantages of art technology. -
Page 15: Device Set Up
Device Set Up Therapy hose The therapy hose is connected and locket into the connecting piece of CryoMini. connect Install glass plate Put a silicone washer on each of the 4 spacing bolts mounted in the hood. Then place the glass plate on the spacing bolts. Attach the glass plate by screwing clamp bearings in each of the 4 spacing bolts. - Page 16 Device Set Up Assemble castor The castor guards are plugged onto the castor holders. guards Connect power cord Connect the power cord to the designated port (11) of the device and connect it to the mains. Note: The device may only be connected to sockets with protective earth. Caution ! After transport or assembly work in a horizontal position, CryoMini must stand upright for at least 30 minutes before switching on.
-
Page 17: Operation Instructions
Operation Instructions 7.1 Device Description Pre-cooling Once CryoMini is turned on, the device starts to pre-cool to the minimum reachable temperature. During this phase, the compressor and the capacitor fan work together. At the same time, the device performs a self-test. During the self-test or pre-cooling, no entries can be made on the display. -
Page 18: Performing The Treatment
Operation Instructions 7.2 Performing the Treatment Turn the device on Switch on the device using the toggle switch (10), the display will light up. Operational readiness Once the device is turned on, the pre-cooling / self-test begins. CryoMini is ready Start of treatment when the start-up screen shows. -
Page 19: Settings
Settings Self-Test After switching on, CryoMini performs a self-test. During the test, the current status of the pre-cooling can be read. Menu During the self-test / initialisation, it is possible to switch to the menu to configure basic settings. To enter the menu, press "Menu" on the display during the self-test. Info Automatic Service Program S01 Automatic Service Program S02... - Page 20 Settings Device Configuration Basic settings (such as language) can be set or changed in the device configuration using arrow keys. Vaporiser temperature display: Select "CHANGE" to change the current setting. If "ON" is selected, the vaporiser temperature will be shown on the display. The temperature displayed is NOT the air temperature.
- Page 21 Settings Note on the display: Press "CHANGE" to change the current status. When "ON" is selected, a warning will appear on the display as soon as the set vaporiser temperature is reached. Press "SAVE" to save the new settings. Warning text in display State: ON Start/ Stop CHANGE...
- Page 22 Settings Service This area is password-protected and is only accessible for persons trained by Zimmer MedizinSysteme. Exit the menu via the "OK" button. Please enter passwort: [....] Start/ Stop Back to treatment Exits the configuration menu and starts the therapy screen.
-
Page 23: Technical Information
Technical Information Power supply 100 - 120 V 230V – 240 V / 50 Hz / 60 Hz Mains fuse 16A – circuit-breaker in power on/off switch Power 260 W (stand-by) / 1,5 kW (max) Consumption 1A (stand by) / 6A (max) Protection class Application class Type B... -
Page 24: Cleaning Disinfection
Cleaning Disinfection -Before starting any maintenance and cleaning measures the device must always be turn off at the main switch and unplugged. - Make sure that when cleaning and disinfecting the labels of the device (such as warnings, labels of control devices, identification plate) are not damaged. - Make sure, when cleaning and disinfecting, that no liquids penetrate the device. -
Page 25: Ce-Mark
CE-mark The product bears the CE marking in accordance with the EC directive on Medical Products 93/42/EEC. Page 18... -
Page 26: Scope Of Delivery And Accessories
Scope of Delivery Accessories Scope of delivery Art no.* 1 Treatment tube light 4 Castors ∅ 75 mm - with brake 4 Castor guards 1 Tray 1 Defrosted water container 1 Mains cable 1 Instructions for use *see accessories Accessories Art. -
Page 27: Device Combination
Device Combinations No combination devices are provided by the manufacturer for CryoMini. Anyone who contrary to these specifications combines devices and thus operates a medical system does so at its own risk. Page 20... -
Page 28: Safety And Maintenance
14.1 Safety CryoMini is manufactured according to the safety regulations DIN EN 60601-1. As manufacturer, Zimmer MedizinSysteme can only be considered responsible for the safety and reliability: • the device is operated using a proper power outlet with earth contact and the electrical installation complies with DIN VDE 0100 Part 710, •... -
Page 29: Maintenance
Safety and Maintenance 14.2 Maintenance Cleaning the air filter In order to clean the treatment air and necessary cooling air from dust particles, a filter element is located on the rear of the device. Under normal use it is sufficient to clean the filter regularly by vacuuming the entire surface of the outer area using a commercial household vacuum cleaner, at the latest, when the software displays a corresponding request notification after 200 operating hours. -
Page 30: Functional Test
Functional Test Function test After switching on, CryoMini automatically performs a self-test and checks the functionality of technical components. A functional test of the cooling function can be performed by the user if required as described below: Turn the device on. Wait until the device is ready for operation. -
Page 31: Safety Check Metrological Control
Safety Check Metrological Control For the device CryoMini neither a Safety check (STK) nor a Metrological Control (MTK) is required in Germany. In Germany, among others, the Medical Devices Operator Ordinance (MPBetreibV) and the BG regulation to electrical systems and equipment (BGV A3) apply in their current version. -
Page 32: Error Messages Troubleshooting Disposal
If the fault occurs frequently and successively, please inform the customer service. You can reach customer service via the head office in Neu-Ulm. For other functional faults, please contact the service department. Head Office Zimmer MedizinSysteme GmbH Junkersstraße 9 D-89231 Neu-Ulm Phone +49 731 9761-0... - Page 33 Disposal The device may only be returned in original packaging to the factory. It must be disposed of by Zimmer MedizinSysteme GmbH. In foreign (European) countries please refer to national regulations for disposal. Contact your distributor if required. Page 26...
-
Page 34: Manufacturer´s Emc Declaration
Manufacturer´s EMC declaration Medical electrical devices, such as CryoMini, are subject to special precautions with regard to electromagnetic compatibility (EMC), and must be installed and commissioned in accordance with the EMC advice given in the instructions for use or accompanying documents. Portable and mobile HF communication systems (e.g. - Page 35 Manufacturer´s EMC declaration Guidelines and manufacturer’s declaration – electromagnetic immunity The CryoMini device is intended for use in the electromagnetic environment specified below. The customer or the user of the CryoMini device should assure that it is used in such an environment. Electromagnetic immunity IEC 60601-Test level Compliance level...
- Page 36 Manufacturer´s EMC declaration The main features of CryoMini are: interference-free delivery of shock waves and interference-free control of all functions. Uninterrupted operation is not required with the use as intended. Guidelines and manufacturer’s declaration – electromagnetic immunity The CryoMini device is intended for use in the electromagnetic environment specified below. The customer or the user of the CryoMini device should assure that it is used in such an environment.
- Page 37 Manufacturer´s EMC declaration Theoretically, it is not possible to exactly predict the field strengths of fixed transmitters, such as base stations for radiotelephones and mobile land radios, amateur radio stations, AM and FM radio and TV broadcasting. To determine the electromagnetic environment in relation to the fixed transmitters, an electromagnetic site survey should be considered.
- Page 38 CryoMini Instructions for Use Zimmer MedizinSysteme GmbH Junkersstrasse 9 D-89231 Neu-Ulm Tel. +49 731. 97 61-291 Fax +49 731. 97 61-299 export@zimmer.de www.zimmer.de...
Need help?
Do you have a question about the Cryo Mini and is the answer not in the manual?
Questions and answers