
Related Manuals for Briggs & Stratton 13500


Summary of Contents for Briggs & Stratton 13500
- Page 1 8000 Watt Portable Generator Operator’s Manual BRIGGS & STRATTON POWER PRODUCTS GROUP, LLC JEFFERSON, WISCONSIN, U.S.A. Printed in U.S.A. Manual No. 195693GS Revision E (05/29/2007)
- Page 2 Thank you for purchasing this quality-built Briggs & Stratton generator. We are pleased that you’ve placed your confidence in the Briggs & Stratton brand. When operated and maintained according to the instructions in this manual, your Briggs & Stratton generator will provide many years of dependable service. This manual contains safety information to make you aware of the hazards and risks associated with generator products and how to avoid them.
-
Page 3: Table Of Contents
Table of Contents Operator Safety ....... . . 4 Equipment Description......... 4 Safety Rules. -
Page 4: Operator Safety
Operator Safety Equipment Description Read this manual carefully and become familiar with your generator. Know its applications, its limitations and any hazards involved. The generator is an engine–driven, revolving field, alternating current (AC) generator. It was designed to supply electrical power for operating compatible electrical lighting, appliances, tools and motor loads. - Page 5 WARNING The engine exhaust from this product contains chemicals known to the State of California to cause cancer, birth defects, or other reproductive harm. WARNING Generator produces hazardous voltage. Failure to isolate generator from power utility can result in death or injury to electric utility workers due to backfeed of electrical energy.
- Page 6 WARNING Contact with muffler area can result in serious burns. Exhaust heat/gases can ignite combustibles, structures or damage fuel tank causing a fire. • DO NOT touch hot parts and AVOID hot exhaust gases. • Allow equipment to cool before touching. •...
-
Page 7: Assembly
Assembly Your generator requires some assembly and is ready for use after it has been properly serviced with the recommended fuel and oil. If you have any problems with the assembly of your generator, please call the generator helpline at (800) 743-4115. If calling for assistance, please have the model, revision, and serial number from the data tag available. -
Page 8: Add Engine Oil
Add Engine Oil 1. Place generator on a flat, level surface. 2. Clean area around oil fill and remove yellow oil fill cap. NOTE: See Oil in Engine Maintenance to review oil recommendations. Verify provided oil bottle is correct viscosity for current ambient temperature. 3. -
Page 9: Attach Negative Battery Cable
Attach Negative Battery Cable Your unit is equipped with electric start capability but can be started manually. If you choose not to use the electric start feature, you do not need to connect the negative battery cable. The sealed battery on the generator pre–installed except for the negative (black) battery cable. -
Page 10: Generator Location
Generator Location Clearances and Air Movement WARNING Exhaust heat/gases can ignite combustibles, structures or damage fuel tank causing a fire. • Keep at least 5 ft. (1.5 m) clearance on all sides of generator including overhead. Place generator outdoors in an area that will not accumulate deadly exhaust gas. -
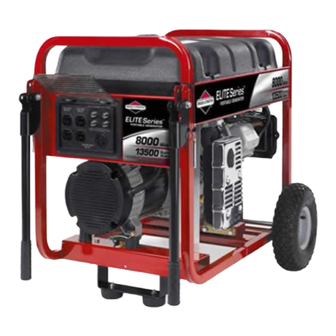
Page 11: Features And Controls
Features and Controls Read this Operator’s Manual and safety rules before operating your generator. Compare the illustrations with your generator, to familiarize yourself with the locations of various controls and adjustments. Save this manual for future reference. A - 120 Volt AC, 20 Amp, Duplex Receptacles — May be used to supply electrical power for the operation of 120 Volt AC, 20 Amp, single phase, 60 Hz electrical, lighting, appliance, tool, and motor loads. -
Page 12: Cord Sets And Receptacles
Cord Sets and Receptacles Use only high quality, well-insulated, grounded extension cords with the generator’s 120 Volt duplex receptacle. Inspect extension cords before each use. Check the ratings of all extension cords before you use them. Extension cord sets used should be rated for 125 Volt AC loads at 20 Amps or greater for most electrical devices. -
Page 13: Battery Float Charger
Battery Float Charger Use battery float charger jack to keep the starting battery charged and ready for use. Battery charging should be done in a dry location, such as inside a garage. 1. Plug charger into unit’s “Battery Float Charger” jack, which is located next to the start switch. -
Page 14: Operation
Operation Starting the Engine IMPORTANT: Always unplug the battery float charger before starting the generator. Disconnect all electrical loads from the generator. Use the following start instructions: 1. Make sure unit is on a level surface. IMPORTANT: Failure to start and operate the unit on a level surface will cause the unit not to start or shut down during operation. -
Page 15: Connecting Electrical Loads
Connecting Electrical Loads 1. Let engine stabilize and warm up for a few minutes after starting. 2. Plug in and turn on the desired 120 and/or 240 Volt AC, single phase, 60 Hz electrical loads. NOTE: • DO NOT connect 240 Volt loads to the 120 Volt duplex receptacles. - Page 16 Creating a Temporary Shelter 1. In an emergency, use the original shipping carton. 2. Cut off top carton flaps and one long side of carton to expose muffler side of unit. If required, tape up other sides of carton to fit over generator as shown. Wind NOTE: If required, remove wheel kit to fit carton over generator as shown.
-
Page 17: Don't Overload Generator
Don’t Overload Generator Capacity You must make sure your generator can supply enough rated (running) and surge (starting) watts for the items you will power at the same time. Follow these simple steps: 1. Select the items you will power at the same time. 2. -
Page 18: Maintenance
Maintenance Maintenance Schedule Follow the hourly or calendar intervals, whichever occurs first. More frequent service is required when operating in adverse conditions noted below. Maintenance Schedule - Fill in Dates as You Complete Regular Service Maintenance Task Before Every 25 Hours Each Use or Yearly Clean debris... -
Page 19: Battery Maintenance
NOTICE Improper treatment of generator can damage it and shorten its life. • DO NOT expose generator to excessive moisture, dust, dirt, or corrosive vapors. • DO NOT insert any objects through cooling slots. • Use a soft bristle brush to loosen caked on dirt or oil. •... - Page 20 Changing Engine Oil Change the oil after the first 5 hours of operation. Change oil every 50 hours thereafter. If you are using your generator under extremely dirty or dusty conditions, or in extremely hot weather, change the oil more often. CAUTION Avoid prolonged or repeated skin contact with used motor oil.
- Page 21 4. Replace spark plug if electrodes are pitted, burned or porcelain is cracked. Use the recommended replacement spark plug. See Specifications. 5. Install spark plug and tighten firmly. Service Spark Arrester The engine exhaust muffler has a spark arrester screen. Inspect and clean the screen every 100 hours of operation or once each year, whichever comes first.
-
Page 22: Storage
Storage The generator should be started at least once every seven days and allowed to run at least 30 minutes. If this cannot be done and you must store the unit for more than 30 days, use the following guidelines to prepare it for storage. Generator Storage •... -
Page 23: Troubleshooting
Troubleshooting Problem Cause 1. One of the circuit breakers is open. 2. Fault in generator. Engine is running, but no AC 3. Poor connection or defective cord set. output is available. 4. Connected device is bad. 1. Short circuit in a connected load. 2. -
Page 24: Warranties
Warranties Emissions Control System Warranty Briggs & Stratton Corporation (B&S), the California Air Resources Board (CARB) and the United States Environmental Protection Agency (U.S. EPA) Emissions Control System Warranty Statement (Owner’s Defect Warranty Rights and Obligations) California, United States and Canada Emissions Control Defects Warranty Statement The California Air Resources Board (CARB), U.S. -
Page 25: Emission Information
2. Length of Coverage B&S warrants to the initial owner and each subsequent purchaser that the Warranted Parts shall be free from defects in materials and workmanship which caused the failure of the Warranted Parts for a period of two years from the date the engine is delivered to a retail purchaser. -
Page 26: Generator Owner Warranty
Effective February 1, 2006 replaces all undated Warranties and all Warranties dated before February 1, 2006 Briggs & Stratton Power Products Group, LLC will repair or replace, free of charge, any part(s) of the portable generator that is defective in material or workmanship or both. -
Page 28: Specifications
(air cleaner, exhaust, charging, cooling, carburetor, fuel pump, etc.), application limitations, ambient operating conditions (temperature, humidity, altitude), and engine-to-engine variability. Due to manufacturing and capacity limitations, Briggs & Stratton may substitute an engine of higher rated power for this Series engine. Portable Generator (800) 743-4115 BRIGGSandSTRATTON.COM...
Need help?
Do you have a question about the 13500 and is the answer not in the manual?
Questions and answers