Celestron POWERSEEKER 60AZ Instruction Manual
Hide thumbs
Also See for POWERSEEKER 60AZ:
- User manual ,
- Quick setup manual (2 pages) ,
- Instruction manual (26 pages)
Table of Contents
Advertisement
Quick Links
Advertisement
Table of Contents

Related Manuals for Celestron POWERSEEKER 60AZ


Summary of Contents for Celestron POWERSEEKER 60AZ
- Page 1 60AZ I N ST R U CT I O N M A N U A L #21057-DS...
- Page 2 INTRODUCTION Congratulations on your purchase of a PowerSeeker 60AZ Telescope with Smartphone Take time to read through this manual before embarking on your journey through the Adapter. The PowerSeeker Series is made of the highest quality materials to ensure Universe. It may take a few observing sessions to become familiar with your telescope, stability and durability.
-
Page 3: Attaching The Telescope Tube To The Mount
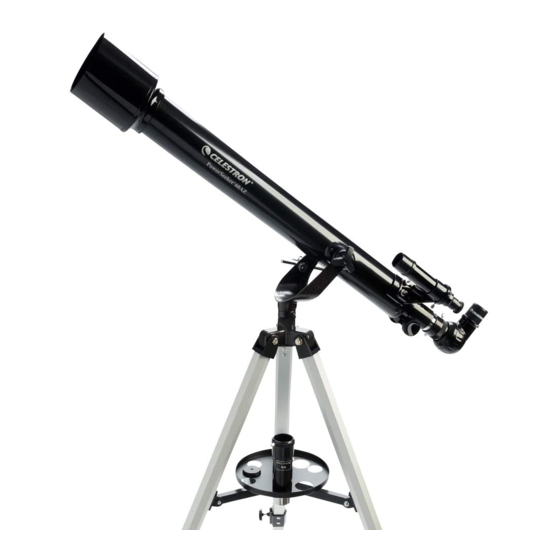
ATTACHING THE TELESCOPE TUBE TO THE MOUNT Objective Lens Telescope Optical Tube Finderscope Eyepiece Diagonal Focus Knob Altitude Slow Motion Rod Assembly Accessory Tray Tripod Alt-Az Mount Altitude Locking Knob Azimuth Lock Smartphone Adapter Figure 1-1 PowerSeeker 60AZ Refractor... -
Page 4: Setting Up The Tripod
This section covers the assembly instructions for your PowerSeeker telescope. Your Your PowerSeeker 60AZ telescope comes in one box. The pieces in the box are the telescope should be set up indoors the first time so that it is easy to identify the... -
Page 5: Moving The Telescope Manually
ATTACHING THE TELESCOPE TUBE TO THE MOUNT The telescope optical tube attaches to the altazimuth mount with the altitude slow motion rod assembly and the respective knobs. Before starting, remove the objective lens cap. To mount the telescope tube to the mount: Figure 2-7 Figure 2-8 1. -
Page 6: Installing And Using The Barlow Lens
INSTALLING THE DIAGONAL AND EYEPIECE (REFRACTOR) The diagonal is a prism that diverts light at a right angle to the light path of the refractor. This allows you to observe in a position that is more comfortable than if you had to look straight through. -
Page 7: Installing The Finderscope
INSTALLING THE FINDERSCOPE To install the finderscope: Figure 2-17 1. Locate the finderscope (it will be mounted inside the finderscope bracket) – see Figures 1-1 and 1-2. 2. Remove the knurled nuts on the threaded posts on the optical tube – see Figure 2-17. -
Page 8: Specifications
Tube Color 7 lb (3.18kg) Total Telescope Kit Weight Software Starry Night Basic Software For complete specifications and product information, visit: www.celestron.com Product design and specifications are subject to change without © 2020 Celestron • All rights reserved prior notification. celestron.com/pages/technical-support 2835 Columbia Street •...
Need help?
Do you have a question about the POWERSEEKER 60AZ and is the answer not in the manual?
Questions and answers