
Related Manuals for emmeti CRONO-TH


Summary of Contents for emmeti CRONO-TH
- Page 1 CRONO - TH MIRAI SMI MANUALE INSTALLAZIONE ED USO INSTALLATION AND USE MANUAL...
- Page 2 ® All rights reserved. No part of this publication may be repro- ® Tutti i diritti sono riservati. Nessuna parte della pubblicazione può duced or distributed without written permission from Emmeti. essere riprodotta o diffusa senza il permesso scritto da Emmeti. Warning! Attenzione!
- Page 3 1 Crono-TH ............4 2 Liste parametri nel CRONO-TH .......7 2.1 Menù Set 2.2 Menù Prg 3. Comandi tastiera con la schermata principale. Pressione BREVE ......13 4. Comandi tastiera con la schermata principale. Pressione PROLUNGATA ..... 14 5 Comandi tastiera all'interno dei MENÙ ....15...
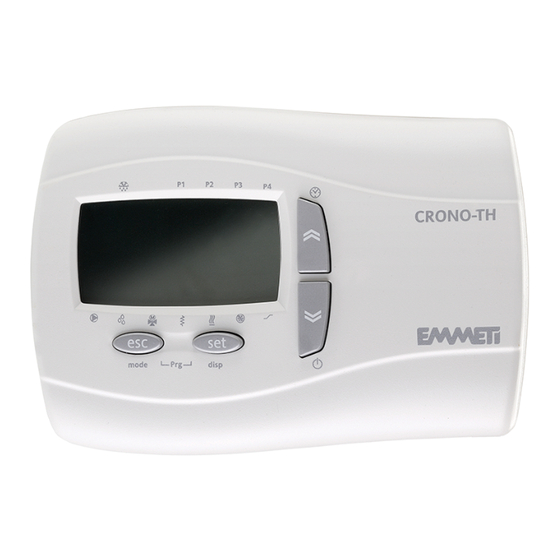
- Page 4 1. CRONO-TH CRONO-TH è il terminale utente (accessorio opzio- nale della pompa di calore MIRAI-SMI), che ha la funzione di controllo della temperatura e umidità ambiente del locale principale dell’abitazione. L’utente, tramite il CRONO-TH, oltre ad impostare i set point di umidità e temperatura ambiente, può...
- Page 5 Visualizzazione nella schermata principale Accensione fissa Accensione intermittente - Temperaura Ambiente. - Scritta Off, se il controllo è disabilitato (Remote On/Off chiuso). Umidità Ambiente o Orologio Stato di warning attivo (allarme) La pompa di calore sta producendo acqua Modalità riscaldamento (impostata) calda sanitaria (ACS) Modalità...
- Page 6 1. PREMESSA Accensione fissa Accensione intermittente Impostazione orologio Pompa 1 (PdC) Pompa 2 (impianto) Deumidificatore in funzione Produzione di acqua calda sanitaria (ACS) Riscaldatore elettrico in funzione come integrazione ACS Generatore supplementare in funzione Non attiva Produzione di acqua al set point2 (per fancoil) Sbrinamento Fascia oraria attiva nel profilo 1 Fascia oraria attiva nel profilo 2...
- Page 7 2. Liste parametri nel CRONO-TH L’intero elenco dei parametri è suddiviso su due differenti menù: “Menù Set “ e “Menù Prg” 2.1. Menù Set Lista parametri menù Set: Range Par Icona Label Descrizione U.M. Default Set point ambiente in modalità raffrescamento °C...
- Page 8 Come accedere e modificare i parametri del menù Set: mode disp mode disp Premere il tasto esc per tornare indietro di un livello. mode disp mode disp disp mode Premere il tasto set per far lampeggiare Sulla schermata principale premere il valore del parametro.
- Page 9 2.2 Menù Prg Il menù Prg è suddiviso in ulteriori menù interni: Menù label Descrizione PrOF Profili 1 e 2 fasce orarie On/Off CONF Fascia oraria Comfort/Attenuazione Assegnazione profilo fasce orarie dAYS On/Off ai vari giorni della settimana Lista parametri menù Prg: Menù...
- Page 10 Lista parametri menù Prg: Menù Range Par Label Descrizione U.M. Default label Timer di On/Off PdC profilo 1, fine secondo periodo di On: Orario in cui si passa, per la seconda volta, dalle condizio- 23:59 17:00 ni di On alle condizioni di Off, nel profilo 1 Timer di On/Off PdC profilo 2, inizio periodo di On: PrOF Orario in cui si passa dalle condizioni di Off alle...
- Page 11 Lista parametri menù Prg: Menù Range Par Label Descrizione U.M. Default label Inizio periodo condizioni di Comfort: Ora del giorno in cui si passa dalle condizioni di 00:00 08:00 Attenuazione alle condizioni di Comfort CONF Fine periodo condizioni di Comfort: Ora del giorno in cui si passa dalle condizioni di 23:59 21:00...
- Page 12 Come accedere e modificare i parametri del menù Prg: mode disp disp mode disp mode Premere il tasto esc per tornare indietro di un livello. disp mode mode disp disp mode mode disp Sulla schermata principale Premere il tasto set per accedere Premere il tasto set per far Premere i tasti su o giù...
- Page 13 3. Comandi tastiera con la schermata principale Pressione BREVE Cambio Comfort/ Attenuazione Per impostare l'orologio Per uscire dai menu Set e Prg Per entrare nel menù Set Per entrare nel menù Prg...
- Page 14 4. Comandi tastiera con la schermata principale Pressione PROLUNGATA Abilita le fasce orarie di On/Off On/Off pompa Cambio funzionamento di calore Raffrescamento/ Riscaldamento (se parametro Mode=1) Per selezionare la visualizzazione dell’ora o dell’umidità...
- Page 15 5. Comandi tastiera all'interno dei MENÙ Per scorrere i parametri Per scorrere i parametri Per uscire dal menù Per entrare nei menù e confermare le modifiche...
- Page 16 disp mode disp mode Impostazione dell’orologio con indicazioni sul display disp mode disp mode mode disp mode disp Premere i tasti su o giù per modificare il giorno. Premere Sulla schermata principale premere assieme mode disp mode disp il tasto set per confermare la modifica e uscire dall’impo- i tasti su e giù...
- Page 17 Installazione del terminale utente "CRONO-TH" esposto alla luce solare diretta. • Assicurarsi di seguire le normative relative alle • Installare il CRONO-TH nello stesso locale in cui si apparecchiature elettriche per effettuare l'instal- trova l'impianto radiante. lazione e collegamento a bassa potenza tra la PdC •...
- Page 18 (vedi fig.1). Dopo aver rimosso il frontale ad alta umidità e/o sporcizia; esso, infatti, è adatto praticare sulla parete in cui va fissato il CRONO-TH, per l’uso in ambienti con grado di inquinamento atmosferico, ordinario o normale. Fare in modo di 2 fori del diametro di 4 mm con le distanze previste (vedi fig.2).
- Page 19 Connessioni elettriche Prima di effettuare ogni collegamento elettrico e/o Il sensore di umidità va collegato al CRONO-TH come manutenzione ordinarie e straordinaria , assicurarsi indicato nella figure seguenti ed inserito all’interno di aver tolto l'alimentazione alla PdC ed al CRONO- del frontale nell’apposita scanalatura.
- Page 20 137.0 mm Nota: Una volta installato il CRONO-TH verificare l'impostazioni dei seguenti parametri: - Par 103 "LAn"= on, per abilitare l'utilizzo del CRONO-TH (necessario) - PAr 101 "Mode" = 0, per impostare il cambio modo (Riscaldamento/Raffrescamento) mediante il CRONO-TH (non necessario)
- Page 21 DATI TECNICI CRONO-TH: • Protezione frontale: IP40; • Contenitore: materiale plastico ABS bianco; • Dimensioni (ingombri max): 137x96.5x31.3mm (Lxhxb); • Montaggio: a parete; • Temperatura ambiente di funzionamento: -5 ... 60°C; • Temperatura ambiente di immagazzinamento: -20 ... 85°C; • Umidita ambiente di funzionamento e di immagazzinamento: 10 ... 90%RH;...
- Page 22 CONDIZIONI D'USO Uso consentito Ai fini della sicurezza lo strumento dovra essere installa- • secondo la connessione come dispositivo su cavo to e usato secondo Ie istruzioni fornite ed in particolare, flessibile esterno separabile, collegamento di tipo Y. in condizioni normaIi, non dovranno essere accessibili •...
- Page 23 1 Crono-TH ..........24 2 Parameter lists in CRONO-TH ......27 2.1 Set Menu 2.2 Prg Menu 3. Keyboard controls with main display. SHORT pressing ........33 4. Keyboard controls with main display. PROLONGED pressing ......34 5 Keyboard controls inside the MENUS ....35...
- Page 24 In addition to setting the room temperature and humidity by means of the CRONO-TH, the user can also define the periods of attenuation of the environmental comfort. Furthermore, the user can activate the main states, operating modes and displays available on SMART-MT.
- Page 25 Display in main screen Permanent start-up Intermittent start-up - Room Temperature. - Writing Off, if control is disabled (closed Remote On/Off). ROOM Humidity or Clock Warning status active (alarm) The heat pump is producing domestic hot Heating mode (set) water (DHW) Cooling mode (set) Heat pump OFF The pump Off with On/Off timer...
- Page 26 Permanent stat-up Intermittent start-up Clock setting Pump 1 (HP) Pump 2 (system) Dehumidifier running Domestic hot water production (DHW) Electric heater running as DHW integration Auxiliary generator running Not active Water production at set point 2 (for fan coil) Defrosting Time band active in profile 1 Time band active in profile 2 Time band active in profile 3...
- Page 27 2. Parameter lists in CRONO-TH The full list of parameters is divided into two different menus: “Set Menu” and “Prg Menu” 2.1 Set Menu Set Menu parameters list: Range Par Icona Label Description U.M. Default Room set point in cooling mode (Comfort temperature) °C...
- Page 28 How to access and modify the Set menu parameters: disp mode mode disp Press the key to go back one level. mode disp mode disp mode disp Press the set key on the main Press the key to have the value up or down Press the keys to modify the value, if it is...
- Page 29 2.2 Prg Menu The Prg menu is divided in further inside menus: Label menu Description PrOF Profiles 1 and 2 time bands On/Off CONF Comfort/Attenuation time band Assignment of On/Off time bands dAYS profile to the various days of the week Lista parametri menù...
- Page 30 Prg Menu parameters list: Range Label menu Par Label Description U.M. Default HP On/Off timer profile 1, end second On period: Time at which profile 1 switches from On to Off for the 23:59 17:00 second time HP On/Off timer profile 2, start On period: PrOF 00:00 08:00...
- Page 31 Lista parametri menù Prg: Menù Range Par Label Descrizione U.M. Default label Comfort conditions period start: Time of day when system switches from 00:00 08:00 Attenuation to Comfort conditions CONF Comfort conditions period end: Time of day when system switches from Comfort to 23:59 21:00 Attenuation conditions...
- Page 32 How to access and modify the Prg menu parameters: mode disp disp mode disp mode Press the to go back one level. disp mode mode disp disp mode mode disp Press the set key to access Sulla schermata principale Press the set key to Press the up or down keys to the list of parameters of the menu premere assieme i tasti set e esc...
- Page 33 3. Keyboard controls with main display SHORT pressing Change Comfort/ Attenuation To set the clock To exit Set and Prg menus To enter the Set menu To enter the Prg menu...
- Page 34 4. Keyboard controls with main display PROLONGED pressing Enable time bands of On/Off Heat pump Change mode On/Off Cooling/Heating (if parameter Mode=1) To select displaying of time or humidity...
- Page 35 5. Keyboard controls inside the MENUS To scroll the parameters To scroll the parameters To exit the menu To enter the menus and to confirm the modifications...
- Page 36 mode disp mode disp Setting clock with indications on display mode disp mode disp mode disp mode disp Press the up or down keys to modify the day. Press the set disp mode disp On the main display, simultaneously press mode key to confirm the modification and to exit clock setting.
- Page 37 Installation of "CRONO-TH" user terminal • Install CRONO-TH in the same room as the radiant • Be sure to comply with standards concerning system. electric equipment to perform installation and • Do not install in a room where industrial chemical...
- Page 38 6. Wall installation CRONO-TH is designed to be hung on a wall. Open nections, close the front of the keyboard by simply pressing it with your finger (see fig.3). Do not install the front of CRONO-TH separating it from the bot-...
- Page 39 (using a screwdriver or similar tool) as shown in fig. 1. Wiring must pass through the central hole at the base of the CRONO-TH (fixed to the wall) and be connected to the PCB TERMINAL BLOCK. If installed on a metal panel, it must be earthed.
- Page 40 Electrical connections Dimensions (clearance) 137.0 mm 137.0 mm Note: Once installed the CHRONO-TH verify the settings for the following parameters: - Par 103 "LAn" = on, to enable use of the CHRONO-TH (required) - PAr 101 "Mode" = 0, to set the mode switching (heating / cooling) using the CHRONO-TH (not required)
- Page 41 CRONO-TH TECHNICAL DATA • Front protection: IP40; • Container: White ABS plastic; • Dimensions (max clearance): 137x96.5x31.3mm (Lxhxd); • Assembly: on wall; • Operating room temperature: -5 ... 60°C;. • Storage room temperature: -20 ... 85°C; • Operating and storage room humidity: 10 ... 90%RH;...
- Page 42 CONDITIONS FOR USE Allowed use For safety purposes, the device must be installed and • device with pollution degree 2 used according to the instructions provided and in parti- • material group l a cular, in standard conditions, dangerous live parts must •...
- Page 44 For a correct disposal, the different materials must be divided and collected according to the regulations in force. EMMETI Spa Via B. Osoppo, 166 - 33074 Fontanafredda frazione Vigonovo (PN) Italy Tel. 0434-567911 - Fax 0434-567901 9900220600001 Internet: http://www.emmeti.com - E-mail: info@emmeti.com...
Need help?
Do you have a question about the CRONO-TH and is the answer not in the manual?
Questions and answers