Table of Contents
Advertisement
Quick Links
Advertisement
Table of Contents

Related Manuals for Household Essentials StowAway 18100 Series

Summary of Contents for Household Essentials StowAway 18100 Series
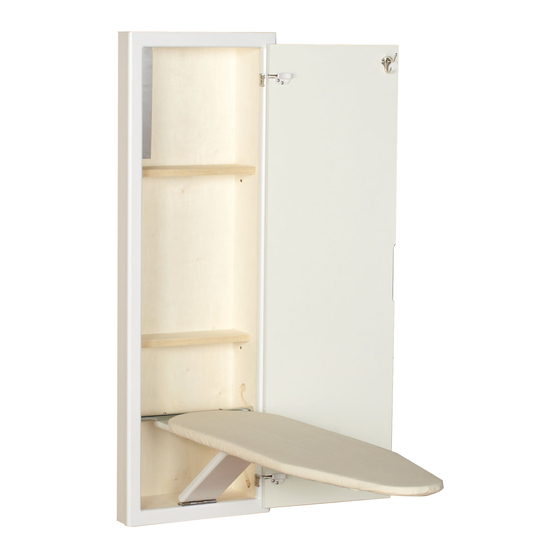
- Page 1 18100 series (White) 18200 series (Unfinished Oak)
- Page 2 Please read this entire instruction booklet before installing your StowAway® Ironing Board. For questions during installation or after, please contact us at Household Essentials at 1.800.922.5524/314.428.5657. Hardware is wrapped up in the cover inside the cabinet, but if you are missing anything, please call and we will expedite replacement parts.
- Page 3 OPTIONAL ACCESSORIES (sold separately) 180 Light Kit - Kit includes an adjustable spotlight LED bulb, 3-prong electric outlet, and timer with automatic shut-off (15 & 30 minute settings). Installs into the upper right corner of the cabinet. (A CERTIFIED ELECTRICIAN should run the wiring for the light kit.) Replacement Cover with Pad - Cotton covers with attached fiber pads are designed specifically for the StowAway®...
- Page 4 1. CUTOUT THE DRYWALL On a wall with 16” on center studs, in an area clear of all electrical and mechanical services: A. Find wall studs with a stud finder and mark their location. B. Using a level, sketch the cutout dimensions onto the wall If your cutout is level, between the studs, drawing a LEVEL rectangle your cabinet and ironing...
- Page 5 3. PREP THE CABINET FOR THE DOOR The door can open to the LEFT (LEFT HINGE) or to the RIGHT (RIGHT HINGE): A. Lay the cabinet (Part A) on its side: left side down for left hinge / right side down for right hinge. B.
- Page 6 5. MOUNTING THE CABINET TO THE WALL A. Lift the cabinet and set its base into the cutout, then tilt the cabinet into place (see figure 1). B. Attach the cabinet to the wall studs with Phillips drywall screws (Part E). Screw from inside the cabinet into the wall studs, placing screws approx.
- Page 7 USE & CARE OF YOUR STOWAWAY® HEIGHT ADJUST: Lift the board near the back end, guide it through the curved cutouts in the cabinet, and glide it into place. Reverse to lower. The board must be in the lower position to close. CLEANING: Wipe cabinet with a damp cloth or mild cleanser as needed.
- Page 8 6/2017...
Need help?
Do you have a question about the StowAway 18100 Series and is the answer not in the manual?
Questions and answers