Table of Contents
Advertisement
Advertisement
Table of Contents

Related Manuals for Peloton TREAD


Summary of Contents for Peloton TREAD
- Page 1 U S E R M A N U A L...
-
Page 2: Table Of Contents
TA B L E O F C O N T E N T S S A F E T Y I N F O R M AT I O N Logging in L A B E L S Selecting a class M E M B E R S U P P O R T Class types N O T I C E S... -
Page 3: S A F E T Y I N Form Ati On
Always store the safety key away from Unauthorized changes or modifications to Do not wear loose or dangling clothing the Tread and out of the reach of children. this equipment could damage the Tread, Consult a physician before beginning a new while using the Tread. -
Page 4: L A B E L S
L A B E L S M E M B E R S U P P O R T Familiarize yourself with all warnings on the Tread before use. Peloton’s #1 concern is member If any label is damaged or lost, contact member support for a replacement immediately. -
Page 5: Noti C E S
Hereby, Peloton Interactive, Inc. U S /C AN A DA must not cause harmful interference, equipment and receiver. declares that the Peloton Tread Peloton Interactive, Inc. and (2) this device must not accept any Connect the equipment to an outlet on a... -
Page 6: S P E C I F I C At I O N S
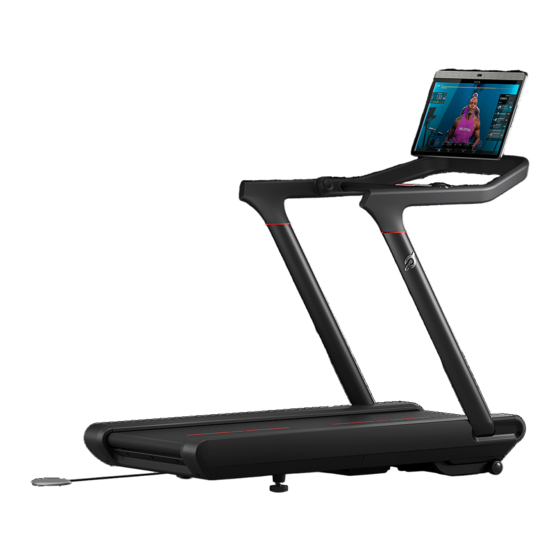
S P E C I F I C AT I O N S T O U C H S C R E E N T R AY S T O P B U T T O N S P E E D K N O B S A F E T Y K E Y P O W E R S W I T C H I N C L I N E W H E E L S... - Page 7 S P E C I F I C AT I O N S C O N T I N U E D D I M E N S I O N S On-screen speed and incline shortcuts Total : 68” L x 33” W x 62” H (173 cm L x 84 cm W x 157 cm H) Volume up/down buttons Screen : 23.8”...
- Page 8 S P E C I F I C AT I O N S C O N T I N U E D P E R F O R M A N C E P O W E R C O N S U M P T I O N Speed : 0-12.5 mph/0-20 kph Networked Standby Mode : Incline : 0-12.5% grade...
-
Page 9: Location Requirements
When installing the Tread, make sure that the electrical installation complies with all local Install the Tread on a hard, flat, stable surface. Avoid high pile carpets. If you put a mat codes and ordinances. Consult an electrician if you are not sure whether your outlet can under the Tread, choose a hard, thick mat that won’t curl up or interfere with the... -
Page 10: Leveling
Store the Tread in a dry, indoor area. Remove the Safety Key and store it in a separate location when the Tread is not in use. To reattach the Safety Key, fit the magnet into the notch under the center button. Wrap the cord around the cleat twice and place the clip on the magnet. -
Page 11: U S I N G T H E T R E A D
S A F E T Y K E Y Do not start the Tread before stepping onto the running surface. Step onto the Tread from the rear, using handrails for balance. Avoid putting your Familiarize yourself with emergency stop procedures before using the Tread. -
Page 12: Ge T Ti N G Sta Rt E D
A D D I N G A P R O F I L E To let another person use your Tread, tap the icon next to your username at the lower left of the screen and select Add/Remove Profiles. The new user can log in with an existing Peloton account or tap Create an Account to set up a new one. -
Page 13: M A I N T E N A N C E A N D C A R E
S A F E T Y I N F O R M AT I O N M A I N T E N A N C E S C H E D U L E The safety and integrity of the Tread can only be maintained when it is regularly examined Before every class: for damage and repaired. -
Page 14: T R O U B L E S H O O T I N G
Power down and unplug the Tread. Solution: First, make sure the Tread is awake. If the screen is dark, the Tread is asleep and Use a 3mm Allen wrench to remove one screw from each rear end cap and three will not work. - Page 15 A temporary issue with the touchscreen software Keep in mind that the Tread will only display heart rate data when a class is in progress. If an error occurs, follow the instructions on the screen. If there are no instructions, use Problem: The Tread won’t turn on.
- Page 16 Tread. The Peloton Tread weighs 290 lb/132 kg and requires more than one person to assemble and/or move. Do not attempt to move the Tread with fewer than two people. Improper assembly of the Peloton Tread can lead to serious injury. Damage or equipment failure resulting from the improper or negligent assembly will not be covered under Peloton’s warranties.
-
Page 17: A S S E M B Ly
A S S E M B LY C O N T I N U E D Add handrail screws. Torque screws to Attach upright bolt covers Attach tray Plug in power/data cable 35 lb-ft/47 N•m Snap on upright caps Install safety key Plug in and power on Torque upright screws to Add handrail bolt covers... -
Page 18: L I M I T E D H O M E U S E Wa R R A N T Y
Limited the date of original delivery. If a defect arises in the Peloton Tread or a the U.S. or Canada, and units missing Warranty period and only so long as the warranted component within the applicable serial numbers. - Page 19 H O W D O I O B TA I N of equipment or parts. Peloton does not use of the Peloton Tread with parts or THIS LIMITED WARRANTY IS THE WA R R A N T Y S E R V I C E ?
- Page 20 Peloton Tread. Part E below. M O R E C O V E R A G E ? Any other use of the Peloton Tread shall void Extended warranty coverage is available for this Limited Warranty. This Limited Warranty “Customer”, “You”...
- Page 21 Limited Warranty (which You may opt out of T R E A D C O M P O N E N T S : Peloton at any time by contacting us at In this Limited Warranty, capitalized words in “Peloton Tread”...
- Page 22 Canada or used outside of the Applicable performance), theft, vandalism, fire, flood, If a defect arises in the Peloton Tread or a Provinces, and units missing serial numbers. wind, lightning, freezing or other natural Any attempt to move or repair fitness...
- Page 23 Labour may not be included if the Peloton (ii) provide Peloton with the serial number by calling 1.866.679.9129, by emailing Tread is moved outside of Our service area of the Peloton Tread and the dated support@onepeloton.ca, or by writing WITHOUT LIMITATION, ANY WARRANTY within the Applicable Provinces.
- Page 24 Peloton’s Privacy Team at privacy@onepeloton.ca F. P R I VA C Y N O T I C E (i) You have any questions about Peloton’s In connection with this Limited Warranty, collection of Your personal information or We will collect and use the following...
- Page 25 T R 0 2 | 0 0 0 3 1 - 1 . 0 © Peloton 2020, Peloton Interactive, Inc. All rights reserved. onepeloton.com...
Need help?
Do you have a question about the TREAD and is the answer not in the manual?
Questions and answers