
Related Manuals for Puhui T-870A


Summary of Contents for Puhui T-870A
- Page 1 BGA IRDA-WELDER User Manual Model:T-870A Puhui technology (taian). CO., LTD. www.Tech168.cn...
-
Page 2: Table Of Contents
IRDA-WELDER T870 User Manual CATALOGUE 1. F e a t u r e s … … … … … … … … … … … … … … … … … … … … … … … . 2 2. Te c h n i c P a r a m e t e r … … … … … … … … … … … … … … … … … … . . 2 3. -
Page 3: Features
IRDA-WELDER T870 User Manual Features 1. Adopt infrared weld technology which independent exploration. 2. Use infrared heat, easy to cut through, which overcomes disadvantage(bum out elements) of traditional welding machines. 3. Easily operate. Just need one day training. Can operate it shillfully. 4. -
Page 4: Instrument Inventory
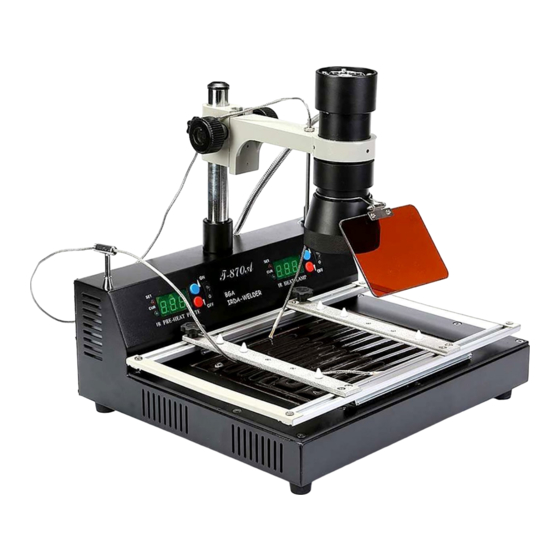
IRDA-WELDER T870 User Manual Instrument inventory Welding table main body Infra-red lamp body Temperature sensor Board support of the circuit Power line user's manual(Compact disc) The main part function explaining 1、 Welding table main body: Focus the holder End cover Guide rod infrared lamp... -
Page 5: ⑵ F R O N T P A N E L
IRDA-WELDER T870 User Manual 2、 Front panel PCB temp-sensor Infra-red lamp adjustment Preheating chassis Infra-red lamp temperature temperature display monitor display monitor Temperature level regulation Preheating chassis switch buttons Infra-red lamp switch 3、Back panel Power switch Infrared lamp connection Fuse PCB temp-sensor Power input Lamp temp-sensor... -
Page 6: ⑷Focusing Support And Lamp Body
IRDA-WELDER T870 User Manual 4、Focusing support and lamp body: Lamp body segment Guide rod Focusing knob Focusing holder Lamp temp-sensor 烙铁 rack 5、Board support of the circuit: Preheat dish Fastening nut Socket of the sensor Board support of the circuit Chassis (workingbench ) Http://www.tech168.cn... -
Page 7: Installation Step
IRDA-WELDER T870 User Manual Installation step 1、 Lamp body and main body assembly: ①Loosen the pinch nut of focusing support. ②Pick up focusing support, make the guide rod aim at the corresponding nut on the base, then rotate the guid rod. ③Fasten the focusing support by rotating pinch nut of it. -
Page 8: Operation Method
IRDA-WELDER T870 User Manual Operation method Infrared lamp body PCB temp-sensor 烙铁 rack Circuit board Chassis (workingbench ) Circuit board support Http://www.tech168.cn... -
Page 9: ⑴Starting And Starting Front Inspects
IRDA-WELDER T870 User Manual North bridge repair scene Position of infra-red lamp temperature sensor Removal of CPU block Http://www.tech168.cn... - Page 10 IRDA-WELDER T870 User Manual Removal of GAP slot Removal of expansion slot Http://www.tech168.cn...
-
Page 11: ⑵Sealing Off/Repair Operation
IRDA-WELDER T870 User Manual 1、Examination and starting: ①、Inspect the infrared lamp body, the temperature sensor and the power line and see if they are in good connection. ②、Turn on the power switch.Self-checking uses (the previous setting value semons trated on the keyboard display monitor after you turn on the machine) . ③、The front panel has two switches: one controls the preheating dish, the other the infrared lamp separately.Press the “▲”or“▼”buttons on the“IR PRE-HEAT PIATE”on the front panel to choose a temperature between 60 and 200℃... -
Page 12: Maintenance And Overhaul
IRDA-WELDER T870 User Manual ④ Soldering process Clean up the welding plate with the brush. Put the tin ball and spread soldering flux (not too thick, only a thin layer of it) on the soldering plate. Put the chip in the accurate place after the solvent volatilizes out of soldering flux, heat the tin ball until it melts, once the tin ball melts, the chip will be soldered in the right place automatically. - Page 13 However, we will not replace the complete machine; this is not covered by our warranty. PUHUI is responsible to give proper guidance of the use and installation of the machine; if you don’t follow these, it will void the warranty.
Need help?
Do you have a question about the T-870A and is the answer not in the manual?
Questions and answers