
Related Manuals for Arthrex Angel


Summary of Contents for Arthrex Angel
- Page 1 Angel Concentrated Platelet Rich ® Plasma (cPRP) System - Operator’s Manual Software Version 1.21 DFU-0262-3 Revision 0 06/2020...
- Page 2 This page intentionally left blank...
-
Page 3: Table Of Contents
Operational Checks ........................1-6 Setting the Date and Time ......................1-6 Chapter 2: Installing the Angel cPRP Processing Set The Angel Processing Set or Disposable Set ..................2-1 Description ..........................2-1 Warnings and Precautions ......................2-3 Setup and Blood/Bone Marrow Aspirate Preparation ................2-3 Turning on the Angel System .................... - Page 4 Troubleshooting the Save Process ......................5-6 Troubleshooting the Software Update Process ..................5-6 Other Operational & Troubleshooting Tips .................... 5-7 Chapter 6: Routine Care New Software ............................6-1 New Software Screen ..........................6-4 Visual Inspection ............................ 6-5 Angel ® cPRP System Operator’s Manual...
- Page 5 Performance Characteristics ..................... 7-1 Physical Characteristics ......................7-1 Environmental Limitations ......................7-1 Chapter 8: Other Commercial Matters Limitation of Liability ........................8-1 Technical documentation ......................8-1 Technical safety standards ....................... 8-1 Identification of manufacturer ....................8-3 Angel ® cPRP System Operator’s Manual...
- Page 6 Overview List of Figures Chapter 1: Overview Figure 1-1 Front-view of the Angel System ................... 1-2 Figure 1-2 Rear-view of Angel System ....................1-2 Figure 1-3 Start Screen .......................... 1-3 Figure 1-4 Load Screen ......................... 1-6 Figure 1-5 Date and Time Settings ......................1-6...
- Page 7 Figure 6-11 Fuse Replacement: Slide Out Holders ................6-10 This is not a warranty document. For all warranty information, including disclaimers, exclusions, terms, conditions and related provisions refer to the “Arthrex U.S. Product Warranty” section of the Arthrex, Inc. website, found at www.arthrex.com whose...
- Page 8 Overview This page intentionally left blank Angel ® cPRP System Operator’s Manual...
-
Page 9: Before You Get Started
This manual is intended for users of the Angel System. The procedures recommended in this Operator’s Manual have been developed and tested to provide safe, reliable and efficient operation of the Angel System. It is important that the operator thoroughly understand the information in this Operator’s Manual before attempting to use the Angel System. - Page 10 Do not use alternate power plugs or adapters that disconnect the safety ground. 9. The operator should never touch the USB port on the Angel System, while at the same time making contact with the patient, as potential for electrical shock may result.
- Page 11 27. The platelet rich plasma is not intended for transfusion. 28. The Angel System is not intended to be used by the patient. As such a mains power switch is not available to the user. In case of an emergency, power from the unit can be removed by unplugging the unit from the electrical socket.
-
Page 12: Precautions
The PEC is used for the Angel System Electrical Safety Testing. The PEC is not to be used by the operator to connect additional medical devices to the system during installation, or use of the system. - Page 13 20. If the case data are relevant for patient’s treatment, it will always be necessary to use other Hospital standard measuring instruments. 21. The user of the Angel System is responsible for the monitoring of the system performance, when using custom protocols.
- Page 14 Overview Angel ® cPRP System Operator’s Manual...
-
Page 15: Symbols
Overview Symbols The following symbols appear on the device labeling. All of the symbols used on the labeling along with the title, description and standard designation number may be found on our website at www.arthrex.com/symbolsglossary. Catalog number MODEL Model number... -
Page 16: Service Information
Return of Used Product If for any reason this product must be returned to Arthrex, Inc., a Returned Materials Authorization (RMA) number is required from Arthrex, Inc. prior to shipping it. If the product has been in contact with blood or body fluids, it must be thoroughly cleaned and disinfected before packing. - Page 17 Overview This page intentionally left blank Angel ® cPRP System Operator’s Manual...
-
Page 19: Chapter 1: Overview
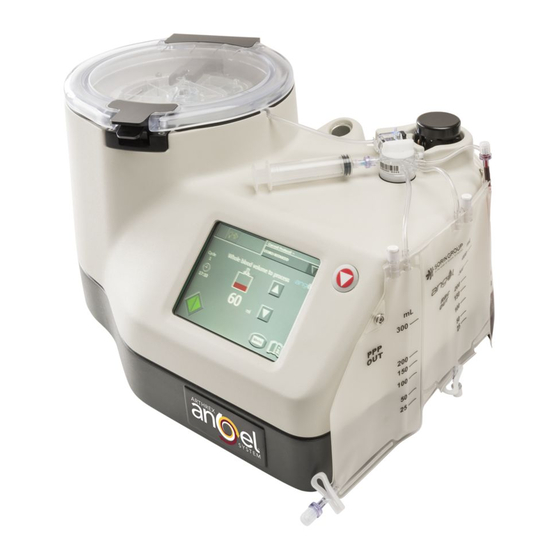
Whole Blood Compartment of the reservoir bag, the clinician selects the desired volume of autologous whole blood/bone marrow to process and presses the “Start” Button on the Touch Screen Display. The Angel System will fill the Variable Volume Separation Chamber with the pre-determined volume of... -
Page 20: Angel System Components
2. Lid Latch Release Handle 6. Stop Button 3. Lid 7. Touch Screen Display 4. Pump Rotor Figure 1-1 Front-view of the Angel System 1. Power Cord 3. USB Port 2. Power Switch Figure 1-2 Rear-view of Angel System Angel ®... -
Page 21: Shipping And Storage
5. Store between 50 kPa and 106 kPa atmospheric pressure. Installation This section contains installation instructions for the Angel System. The Angel System has been designed to be a “plug and play” device and it requires very little preparation to get started. -
Page 22: Special Tools, Equipment And Environmental Requirements
Naples, FL 34108 USA www.arthrex.com Unpacking/Assembly 1. Open the shipping carton and remove the Angel System and all ancillary components. Unpacking Tip – Unwrapping the Stator Arm: It is important to note the following when unpacking/ installing the Angel Centrifuge. - Page 23 2. Install the device in an operating environment between 10 and 30 degrees C (50- 86 degrees F), 10% to 70% relative humidity and 70 kPa to 106 kPa pressure. 3. Place the Angel System on a solid, flat work surface. 4. Install the Power Cord Assembly supplied with the equipment into the Angel System.
-
Page 24: Operational Checks
No other checks or tests are required as part of this installation procedure. Setting the Date and Time The date and time used internally by the Angel System may be set from within the “Settings” tab of the Menu Screen (see Figure 1-5). - Page 25 Up and Down Arrow Buttons will disappear. 4. Once the value of all fields have been set correctly and locked in, touch the Close Button to exit the Menu Screen. Angel ® cPRP System Operator’s Manual...
- Page 26 Overview This page intentionally left blank Angel ® cPRP System Operator’s Manual...
-
Page 27: Chapter 2: Installing The Angel Cprp Processing Set
Variable Volume Separation Chamber that can process from 40 mL to 180 mL of anticoagulated autologous whole blood or a mixture of blood and bone marrow in a single cycle. Each Angel Processing Set is capable of processing up to three (3) cycles. -
Page 28: Figure 2-1 Angel ® Processing Set
Installing the Angel cPRP Processing Set 1. Platelet Cuvette / 6. Whole Blood 11. 60 ml Specimen Cups Valve Assembly Clip Compartment (quantity, 2 each) 2. Platelet Cuvette 7. RBC Compartment 12. Syringe-activated PRP Valve 3. Rotating Valve 8. PPP Compartment 13. -
Page 29: Warnings And Precautions
Universal Precautions for blood borne pathogens should be practiced (e.g., gloves, Personal Protective Equipment (PPE), etc.). The Angel Processing Set is intended for single patient use only. • Each set can be used on the same patient for up to three sequential processing cycles. -
Page 30: Turning On The Angel System
Installing the Angel cPRP Processing Set Turning on the Angel System 1. Turn on the Angel System by pressing the Power Switch on the back of the machine. The message, “Self-test in progress. Please stand by” will be displayed on the Angel System’s Touch Screen Display, and then the machine will move the Valve Assembly Driver to the loading position. - Page 31 Installing the Angel cPRP Processing Set With the Angel System turned on, do the following: 1. Open the Centrifuge Lid and rotate the Centrifuge to a position so that the interlock mechanism shown in Figure 2-3, item 2 (below) does not interfere with the Stator Arm Brake.
- Page 32 3. Remove the Angel Processing Set from the packaging. 4. Lay the Angel Processing Set on the top of the machine. 5. Carefully examine the Angel cPRP Processing Set for damage, prior to use. Do not use if the Processing Set is damaged.
- Page 33 Installing the Angel cPRP Processing Set 8. Insert the Variable Volume Separation Chamber into the Centrifuge Adapter by aligning the notches in the Separation Chamber Plate with the aligning feature on the Centrifuge Adapter (see illustration immediately below). 9. Once aligned, press the Separation Chamber Plate down near the location of the position indicator and turn it clockwise until the position indicator snaps into place.
- Page 34 Installing the Angel cPRP Processing Set 10. Place the tube leading from the Variable Volume Separation Chamber through the slot on the rim of the Centrifuge Well. 11. Lower the Centrifuge Stator Arm and align it with the mating feature on the top of the rotating seal of the Variable Volume Separation Chamber (see Figure 2-4).
-
Page 35: Figure 2-4 Centrifuge Stator Arm Aligned With Variable Volume Separation Chamber
Installing the Angel cPRP Processing Set Stator Arm lowered and aligned Figure 2-4 Centrifuge Stator Arm Aligned with Variable Volume Separation Chamber 12. Close the Centrifuge Lid. After closing the lid, make sure that the tubing remains in the slot on the centrifuge rim and is not occluded or pinched by the lid(see illustration below). - Page 36 Installing the Angel cPRP Processing Set 13. Place the Pump Loop Tubing over the Pump Rotor. The pump loop will automatically load when the processing cycle is initiated. Seat the Platelet Cuvette/Valve Assembly by aligning the Platelet Cuvette and the Valve Assembly with the Platelet Sensor body and the Valve Assembly Driver.
- Page 37 Installing the Angel cPRP Processing Set 14. Hang the Three-Compartment Reservoir Bag on the two support pins located on the side of the Angel System. 15. Remove the breather cap from the PRP valve port located on the Valve Assembly. If desired, attach the Syringe-activated Valve to the PRP valve port.
- Page 38 Installing the Angel cPRP Processing Set Final Set-up 17. After set-up, inspect the circuit to make sure there are no kinks or occlusions. Please refer to the Instructions for Use for the Angel Concentrated Platelet Rich Plasma (cPRP) ® Processing Set for further details.
-
Page 39: Chapter 3: Processing
Chapter 2: Installing the Angel cPRP Processing Set, beginning with “Turning on the Angel System” on page 2-4. After set-up, inspect the Angel Processing Set to make sure there are no kinks or occlusions. The Load Screen will be displayed on the Angel System’s Touch Screen Display (see Figure 3-1). -
Page 40: Running The Separation Process
Processing The adhesive labels included in the Angel Processing Set packaging can be used to label & uniquely identify the patient’s Processing Set, collected whole blood/bone marrow aspirate and the separated blood/ bone marrow aspirate components, if desired. Note: Before processing more than one cycle of blood or the mixture of blood and bone marrow, agitate the Whole Blood Compartment of the reservoir bag to mix the remaining blood, providing a more uniform collection of blood components. -
Page 41: Figure 3-3 Run Screen
Screen” on page 3-14. accurate values. Once separation is complete, and all components are collected, the End of Cycle Screen is displayed on the Angel System’s Touch Screen Display (see Figure 3-4). Figure 3-4 End of Cycle Screen For a detailed explanation of... -
Page 42: Figure 3-5 End Of Case Screen
4. The Angel System allows a maximum total processing volume of 180 mL. If the maximum volume has not been reached and the available volume is greater than 40 mL, the “New Cycle”... - Page 43 Remove the Three-Compartment Reservoir Bag from the support pins on the side of the Angel System. 6. Turn off the Angel System using the switch at the rear of the machine. 7. The Angel Processing Set is intended for single patient use only.
-
Page 44: Saving Case Data
Processing Saving Case Data The Angel System stores a tally table and a detailed log file about every case that has been processed, with an option to save the tally table and the detailed case log file. The tally tables and case logs may be saved to USB storage devices. The case logs may be saved to a USB storage device. -
Page 45: Entering Optional Case Data Fields
In addition to the standard data stored for each case, such as the volumes of collected RBC, PPP, and PRP, the Angel System provides three optional data fields which may be entered by the operator and saved with the standard case data: “ID”... -
Page 46: Modifying Optional Data Field Values
3. Once the new value has been entered, touch the “Enter” Button, located in the lower left corner of the Keyboard Screen. The value of the field will be saved and it will return to the “Tally” tab or End of Case Screen. Angel ® cPRP System Operator’s Manual... -
Page 47: Selecting Past Cases
To select past cases for display or to save, perform the following steps: 1. Touch the “Past Cases” Button (see Figure 3-8). The Past Cases Screen will appear on the Angel System’s Touch Screen Display (see Figure 3-8). Figure 3-8 Past Cases Screen 2. -
Page 48: Saving A Tally Table To A Usb Storage Device
“<Serial Number>-<Case Number>.txt”. For example, if the serial number of the Angel System on which the case was run is “GB0000” and the case number of the saved tally table is “00030”, then the name of the file which contains the tally table would be “GB0000-00030.txt”. -
Page 49: Saving A Case Log
The Output Screen will appear on the Angel System’s Touch Screen Display (see Figure 3-9). The Angel System will then scan for a connected storage device, and the text “Searching for connected devices. Please wait…” will appear on the Output Screen. -
Page 50: Touch Screen User Interface
The following section offers a detailed description of the user interface, focusing on the screens encountered during normal use. Once the Angel System has completely loaded, the Start Screen is displayed on the Touch Screen Display. The Start Screen is used to select the whole blood or the mixture of blood and bone marrow volume to process and to begin each processing cycle (see Figure 3-10). - Page 51 A maximum of 180 mL can be processed in up to three (3) cycles for each disposable Angel Processing Set. A cycle can process from 40 to 180 mL of blood or mixture of blood and bone marrow. The default volume is 60 mL.
-
Page 52: Run Screen
Menu Button Touching the Menu Button will bring up the Menu Screen. Various Angel System settings can be adjusted from the Menu Screen. Touching the Close Button in the Menu Screen will close the Menu Screen and display the previously displayed screen. Refer to the section “Menu Screen”... - Page 53 The icon labeled “PRP” represents the state of the PRP syringe. The number displayed is the approximate volume (mL) of PRP collected by the Angel System. (The number is not displayed until the first volume of PRP is collected.) 3-15 Angel ®...
-
Page 54: End Of Cycle Screen
(3) cycles for each disposable “End Case” Button Touching the “End Case” Button ends the current case and displays the End of Case Screen (see “End of Case Screen” on page 3-17). 3-16 Angel ® cPRP System Operator’s Manual... -
Page 55: End Of Case Screen
The End of Case Screen lists the following information in the ‘Case’ field: a sequential case number assigned by the machine, the serial number of the Angel System, and the date with the time at which the case was started. -
Page 56: Menu Screen
Touching one of the tabs on the left will display the associated menu screen. Language Tab The “Language” tab is used to select the language used when displaying text (see Figure 3-14). 3-18 Angel ® cPRP System Operator’s Manual... -
Page 57: Figure 3-14 "Language" Tab Of The Menu Screen
Touching the Close Button will close the Menu Screen and return to the previously displayed screen. Language Buttons Touching one of the Language Buttons will cause the Angel System to display all text in that language. Tally Tab The “Tally” tab of the Menu Screen displays information about the case that has just completed processing and allows the operator to save that information (see Figure 3-15). -
Page 58: Figure 3-15 Tally Tab Of The Menu Screen
See Chapter 4: Programmability Option. Settings Tab The “Settings” tab is used to change the volume of audible alarms, set the date and time, and to check for new software versions (see Figure 3-16). 3-20 Angel ® cPRP System Operator’s Manual... -
Page 59: Figure 3-16 "Settings" Tab Of The Menu Screen
Touch Screen Display. The New Software Screen is used to check for the latest software, download, and install new versions of the Angel System’s software. For details on using the New Software Screen, refer to the section “New Software” in Chapter 6: Routine Care of this manual. -
Page 60: Information Screen
These animations are divided into multiple instructional steps. The Forward Button advances to the next step, while the Back Button replays the current step or skips back to the previous step. 3-22 Angel ® cPRP System Operator’s Manual... -
Page 61: Past Cases Screen
The Past Cases Screen lists the six most recent cases, prior to the current case. For each case listed, the following information is displayed (from left to right): the sequential case number automatically assigned by the Angel System • the date and time the case was started (from the moment the Start Button •... -
Page 62: Output Screen
2. Down Arrow Button Figure 3-19 Output Screen The case number (as assigned by the Angel System), and the number of data lines the selected case contains (in parenthesis), is displayed in the upper left corner of the Output Screen. - Page 63 USB storage device. “Select destination for log file:” Field This field is used to select a USB storage device connected to the Angel System’s USB Port. When touched, the “Select destination for log file:” field will highlight, and the Up and Down Arrow Buttons will appear on the right side of the screen.
-
Page 64: Stop Button
Processing Stop Button The Stop Button is not required in normal use of the Angel System. However, if it becomes necessary to stop the processing cycle before it has completed, follow these steps: Press the Stop Button mounted on the front of the Angel System. This will halt the system’s Pump, Centrifuge, and Valve, and will display the Empty Screen... -
Page 65: Power Loss
Processing Power Loss If power is lost while the Angel System is processing, and residual blood/bone marrow is in the Variable Volume Separation Chamber, follow these steps to safely remove the Angel Processing Set from the machine: 1. Do not remove the Pump Loop Tubing from the Pump Rotor until the handle on the Valve Assembly is pointed toward the Whole Blood Compartment port. - Page 66 Processing This page intentionally left blank 3-28 Angel ® cPRP System Operator’s Manual...
-
Page 67: Chapter 4: Programmability Option
During blood separation using the Angel System Standard Protocol, the anticoagulated whole blood or the mixture of blood and bone marrow is pumped into the Angel System’s spinning Variable Volume Separation Chamber. The red blood cells, the heaviest elements of the blood, are separated from the lighter elements, the plasma and platelets, through centrifugation. -
Page 68: Entering Values And Text
Programmability Option The Angel System provides additional system flexibility through the use of custom protocols in an effort to address the needs of the experienced clinician. Variation in blood parameters may affect the collection of PRP. Custom protocols provide the experienced user with the ability to adjust the centrifugation cycle to meet these possible variations. -
Page 69: Creating A New Protocol
3. Touch the Rename Button to rename the newly created protocol to a more useful name. Touching the Rename Button will display the Keyboard Screen on the Angel System’s Touch Screen Display (see Figure 4-2). 4. Type in the new name for the protocol. -
Page 70: Editing The Parameters Of A Protocol
To restore the parameters of a protocol, follow these steps: 1. From the Protocol Pull-Down Button, select the protocol you wish to restore. 2. Touch the “Restore” Button. 3. Touch the Close Button to return to the previously displayed screen. Angel ® cPRP System Operator’s Manual... -
Page 71: Renaming A Protocol
1. Select the protocol you wish to rename, from the Protocol Pull-Down Button. 2. Touch the Rename Button. Touching the Rename Button will display the Keyboard Screen on the Angel System’s Touch Screen Display (see Figure 4-2). 3. Use the “Backspace” Button to edit the previous name, or clear the previous name by touching the “Clear”... -
Page 72: The Protocols Tab
(see Figure 4-3) 1. Protocol Buttons 5. Up Arrow Button 2. Protocol Parameters 6. Down Arrow Button 3. Protocol Pull-Down Button 7. Information Button 4. Close Button Figure 4-3 “Protocols” tab of the Menu Screen Angel ® cPRP System Operator’s Manual... -
Page 73: Protocol Buttons
This protocol parameter sets the amount (%) of Hematocrit contained in the PRP product of a case. This value is based on a harvest of PRP (including PPP dilution) equivalent to 10% of the whole blood or the mixture of blood and bone marrow volume processed. Angel ® cPRP System Operator’s Manual... -
Page 74: Protocol Pull-Down Button
Touching the “Make this the default (wakeup) protocol” Button will set the current protocol as the wakeup protocol. Whenever the Angel System is turned on, the wakeup protocol will be used by default. “Modify RPM/Time” Button Touching the “Modify RPM/Time” Button will allow the four RPM and Spin Time parameters to be modified. -
Page 75: Close Button
Changes are saved automatically. 7. Information Button Touching the Information Button will bring up an Information Screen containing contextual help. Touching the Close Button from the Information Screen will return you to displayed screen. Angel ® cPRP System Operator’s Manual... - Page 76 Programmability Option This page intentionally left blank 4-10 Angel ® cPRP System Operator’s Manual...
-
Page 77: Chapter 5: Troubleshooting
Angel System. Alarms and Notifications Alarm icons appear as buttons in the alarm display area of the Angel System’s Touch Screen Display. Touching an alarm icon will display the Information Screen containing the description and response information for that alarm. - Page 78 (3) Ensure that the Platelet Sensor is at least 1 meter (3 feet) from all external light sources. Machine If the Angel System detects Power down the Angel System temperature that the temperature is for a short time before any...
- Page 79 Valve Assembly handle in the moved, is displayed. direction indicated by the alarm icon. The following table contains the description and response information for text notifications which may be encountered while operating the Angel System. Angel ® cPRP System Operator’s Manual...
- Page 80 No destination found! The Angel System is not To output a log file to an external connected to a valid destination destination, refer to the section or the destination cannot “Troubleshooting the Save...
- Page 81 Troubleshooting Text Description Response No USB storage device found! The Angel System does not To output tally data or a log file to detect any connected USB a USB storage device, refer to storage device. the section “Troubleshooting the Save Process” on page 5-6 for troubleshooting steps.
-
Page 82: Troubleshooting The Save Process
Once you have fixed any connection problems, touch the “Re-check devices” Button from the Output • Screen. The Angel System should now be able to find the appropriate device, and the saving process should be successful. If an Output Screen becomes unresponsive, cycle the machine power off and then on to correct the •... -
Page 83: Other Operational & Troubleshooting Tips
Occurs when air or fluid is trapped in the expandable bladder. b. If the disposable tubing is loaded in the peristaltic pump head, the trapped air/ fluid can be removed by twisting the pump head clockwise (to the right). Angel ® cPRP System Operator’s Manual... - Page 84 Whole Blood, RBC or PPP collection bag. See Chapter 2: Installing the Angel cPRP Processing Set above for further details. 5. Cannot remove separation cassette from centrifuge a.
- Page 85 8. Device will not process more than 180 ccs of whole blood a. The FDA cleared Angel device marketed in the United States can only process a total of 180 cc of blood. This total volume of 180cc may be done in a maximum of 3 cycles per disposable.
- Page 86 Occurs when “end-case” was not selected after the previous processing procedure i. Start “new case” or manually turn valve manifold on the processing set disposable to match the position of the valve attachment key on the Angel machine. 12. The pump rotor spins intermittently and won’t draw blood a.
-
Page 87: Chapter 6: Routine Care
The Angel System will now check for software on any connected USB storage device or USB connection. While it searches, the text “Searching for software sources. Please wait…” will appear on the screen. -
Page 88: Figure 6-1 Unlock Code Screen
Three successive progress bars monitor each stage of this process: checking for updates, copying, and validating the downloaded files. Once the new software version has been copied to the Angel System and validated, the Software Validated Screen is displayed (see Figure 6-2). -
Page 89: Figure 6-2 Software Validated Screen
To cancel the installation of the new software version, touch “No” from the Install Screen. It will return to the current Angel System software, without any changes to the system software. Touch “Yes” to install the software. If the installation is successful, a “Continue” Button is displayed on the Install Screen. -
Page 90: New Software Screen
2. Increment Button Figure 6-4 New Software Screen The Angel System’s serial number is displayed in the top right corner of the New Software Screen. Close Button Touching the Close Button will close the New Software Screen and display the Menu Screen. -
Page 91: Visual Inspection
Angel System are to be thoroughly cleaned and disinfected according to the following instructions.. Note: In the event of minor fluid (blood) spills that only affect the exterior of the Angel System (and do not accumulate in the Centrifuge Well), such spills should be addressed within 10 minutes of the occurrence, if possible, and should not be allowed to dry on the exterior surfaces of the unit. - Page 92 7. Check all surfaces for visible soil. Repeat cleaning steps if soil is visible and re-inspect. PRECAUTION When cleaning the Platelet Sensor, Centrifuge Lid and Touchscreen areas, use a neutral- pH enzymatic detergent. Do not use bleach, abrasive materials or solvents, as they may cause damage to the sensor. Angel ® cPRP System Operator’s Manual...
-
Page 93: Non-Routine Care
GENERAL Routinely verify that all air intake areas of the Angel System are clear of debris and clean as required. If the device is equipped with screens on the bottom of the unit, periodically inspect the screens for lint, debris and/or damage. -
Page 94: Figure 6-7 Removing The Centrifuge Adaptor Plate
Remove the springs and set aside for cleaning. Remove the Centrifuge Plate by removing the four cap screws that secure the Centrifuge Plate to the motor spindle. 1. Springs (x8) 2. Centrifuge Plate Spindle Angel ® cPRP System Operator’s Manual... -
Page 95: Preventive Maintenance Requirements
Ensure the RMA Number appears on the outside of the container. g. Ship as instructed. Preventive Maintenance Requirements The Angel System is designed to be maintenance free and therefore does not require any Preventive Maintenance. All calibration and operational checks are performed automatically upon start-up of the device. -
Page 96: Fuse Replacement
In the event that a fuse fails, follow these steps to replace it. If the replacement fuse fails, there may be a problem with the electrical outlet or an electrical component failure internal to the machine. Contact Arthrex, Inc. Customer Service. WARNING To prevent risk of electrical shock, shut OFF power and unplug the system from the electrical outlet before performing cleaning procedures or replacing the fuses. - Page 97 3. Replace the fuses with fuses of the identical specifications (5 x 20 mm size, 2X F 5A L 250VAC fast blow). These can be obtained at any electronic parts retailer. 4. Reverse the removal steps to re-install. 6-11 Angel ® cPRP System Operator’s Manual...
- Page 98 Routine Care This page intentionally left blank 6-12 Angel ® cPRP System Operator’s Manual...
-
Page 99: Chapter 7: Technical Data
Technical Data Chapter 7: Technical Data Note: Circuit descriptions and component supply lists are NOT included because the Angel System includes no user-serviceable parts (except for fuses, which are specified on page 6-10). Specifications Performance Characteristics Blood or a mixture of blood and bone marrow processing volume per cycle = 40 to 180 mL... - Page 100 The operator of the Angel System should assure that it is used in this environment. If the Angel System is used within these prescribed environments, the system will continue to process whole blood or a mixture of whole blood and bone marrow without manufacturer service.
- Page 101 The operator of the Angel System should assure that it is used in this environment. If the Angel System is used within these prescribed environments, the system will continue to process whole blood or a mixture of whole blood and bone marrow without manufacturer service.
- Page 102 Note: U is the a.c. mains voltage prior to application of the test level. See Recommended separation distances between portable and mobile RF communications equipment and the Angel System below for further information Angel ® cPRP System Operator’s Manual...
- Page 103 (RF wireless communications) Portable RF communications equipment (including peripherals such as antenna cables and external antennas) should be used no closer than 30cm (12 inches) to any part of the Angel System, including cables specified by the manufacturer. Otherwise, degradation of the performance of the Angel System could result.
- Page 104 Technical Data The Angel System is intended for use in an electromagnetic environment in which radiated RF disturbances are controlled. The customer or user of the Angel System can help prevent electromagnetic interference by maintaining a minimum distance between portable and mobile RF communications equipment (transmitters) and the Angel System as recommended below, according to the maximum output power of the communications equipment.
-
Page 105: Chapter 8: Other Commercial Matters
This is not a warranty document. For all warranty information, including disclaimers, exclusions, terms, conditions and related provisions refer to the “Arthrex U.S. Product Warranty” section of the Arthrex, Inc. website, found at www.arthrex.com whose provisions are incorporated herein by reference. - Page 106 Each product undergoes safety tests as prescribed by the relevant standards, the results of which are available upon request. d) Any requests for specific measurements of safety parameters different from those above quoted shall be analyzed and assessed by the manufacturer as appropriate. Angel ® cPRP System Operator’s Manual...
-
Page 107: Identification Of Manufacturer
Other Commercial Matters Identification of manufacturer Please feel free to contact Arthrex, Inc. for any further details and/or technical assistance. Arthrex, Inc. 1370 Creekside Blvd Naples, FL 34108 USA Tel: + 1 800-391-8599 support@arthrex.com www.arthrex.com Angel ® cPRP System Operator’s Manual... - Page 108 Other Commercial Matters Copyright © 2020 Arthrex, Inc. 1370 Creekside Blvd Naples, FL 34108 USA Tel: + 1 800-391-8599 support@arthrex.com www.arthrex.com DFU-0262-3 Revision 0 06/2020 Angel ® cPRP System Operator’s Manual...
Need help?
Do you have a question about the Angel and is the answer not in the manual?
Questions and answers