Table of Contents
Advertisement
Advertisement
Table of Contents

Related Manuals for SpaceraiL Spacewarp Level 9.1


Summary of Contents for SpaceraiL Spacewarp Level 9.1
- Page 1 Level 9.1 Instruction Manual...
-
Page 2: Figure
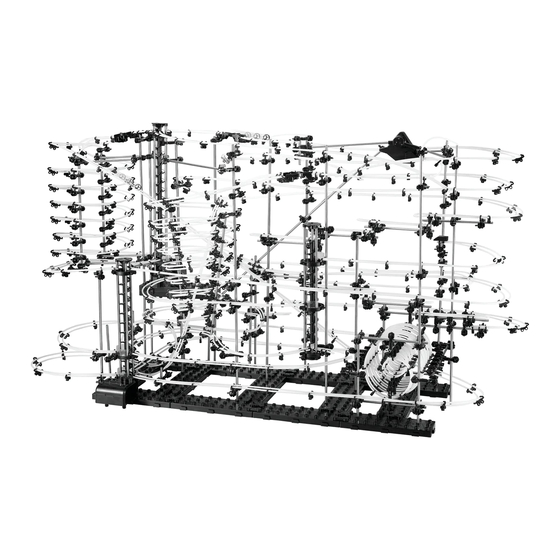
SpaceRail is a spectactular marble-run coaster that guarantees high-speed action rides consisting of wild rotations, daring loop- the-loops and spectactular swivel motions. These marble-run coasters are an ultimate challenge for teenage and adult enthusiasts alike. Spacerails are available in several different sizes and levels of difficulty. -
Page 3: Table Of Contents
Table of Contents Figure 1..................P. 2-3 Figure 2-6..................P. 4 Parts List...................P. 5 Assem blyof the base plate & arm holder B......P. 6 Assem blyof the arm s and seesaw s..........P. 7 Assem blyof the pendulum and the elev ator......P. 8 Assem blyof the elev ator............P. - Page 4 These images show the SpaceRail Level 9.1 from different views. They will be very useful during assembly. fg. 2 (top ) fg. 3 (left) fg. 4 (front) fg. 5 (right) fg. 6 (back)
-
Page 5: Parts List
Parts List Pliers T ape m easure or folding ruler T o o ls fo r in sta lla tio n : U se 2 x C /LR14 batteries (not included) P a rts list H andle the com ponents w ith care to prev ent them from getting lost. [S 1 ] 600m m [S2 ] 39 1m m [S3 ] 300m m... -
Page 6: Assem Blyof The Base Plate & Arm Holder B
Assembly of base plate & arm set B 01-1 [B3] Base holder (sm all) A sse m b ly o f b a se p la te 1. Assem ble the base plate (13 [B2] Base holder (big) pieces). Pay attention to a proper seating of the clips and slots (fg. -
Page 7: Assem Blyof The Arm S And Seesaw S
Assembly of arms & seesaws [A3] Arm tube [A 1] Arm A sse m b ly o f a rm s 1. Assem ble the arm s according to fg. 03 Caution: Arm holder A (A2) + arm holder B (A4) are different 107 arm s are needed for the com plete set-up [A4] Arm holder B... -
Page 8: Assem Blyof The Pendulum And The Elev Ator
Assembly of pendulum and elevator [A 5] Arm w rench [Ex 6] Counterw eight [A4] Arm holder B In s ta lla tio n o f th e p e n d u lu m [A4] Arm holder B [S6] Shaft 65m m Connect attachm ent parts w ith [S1] Shaft 600m m pendulum (fg. -
Page 9: Assembly Of The Elevator
Assembly of the elevator [S2] Shaft 391m m In s ta lla tio n o f th e e le v a to r 1. Insert the 391m m shaft into 11-1 the gearbox (fg. 11-1) 2. Slide the elev ator (16 pcs) onto the shaft (fg. -
Page 10: Assem Blyof The Free Fall Helix
Assembly of the free fall helix 12-8 [S3] Shaft 300m m 12-9 [S3] Shaft 300m m In sta lla tio n o f th e fre e 12-1 fa ll h e lix 1. A ttach spacer [C3] to the shaft (fg. -
Page 11: Positions Of Shafts And Arm S
Assembly of rails Letters and num bers (e.g. H-2) show the correct positions of shafts and arm s R a il a sse m b ly ste p s T his ball roller coaster prov ides 6 ex its (start) and 9 entries (end). Please note fg. - Page 12 Assembly of rails A tta ch th e se e sa w s a s sh o w n R a il a sse m b ly ste p s A tta ch th e se e sa w s a s sh o w n 3.
- Page 13 Assembly of rails R a il a sse m b ly ste p s 8. Please note page E4 for stairw ay installation 9. From shaft/arm AE-8 to stairw ay (fg. 29, 29-2) 10. From free fall helix (ex it A ) to frst foor elev ator entry BJ2 (fg.
- Page 14 Assembly of rails Junction C R a il a sse m b ly ste p s 13. From second foor elev ator ex it BI3 to „bypass slip“ (fg. 31, 31-1, 31-2) 14. From second foor elev ator ex it BI3 to junction C (fg. 31, 31-3) From second foor elev ator ex it BI3 to „bypass slip“...
- Page 15 Assembly of rails Second foor elev ator R a il a sse m b ly ste p s 17. From frst foor elev ator ex it BJ3 to second foor elev ator entry BI1 (fg.33, 33-1, 33-2) 18. From frst foor elev ator ex it BJ2 to second foor elev ator entry BI2 (fg.33, 33-3) First foor elev ator...
- Page 16 Assembly of rails R a il a sse m b ly ste p s 21. From frst foor elev ator ex it BJ3 to second foor elev ator entry BI2 (fg. 35, 35-1) 22. From junction B v ia the loop to frst foor elev ator entry BJ1 (fg.
-
Page 17: Rail M Ounting And Assem Bly Of The Loops
Assembly of rails and loop In sta lla tio n o f th e ra ils [R1] Rail A ttachm ent of rails to arm s and shafts (fg . 37 + 38) A ttach rail to arm (fg . 37) Rail joining (fg . -
Page 18: Assem Bly Of The Double Loop Tunnel
Assembly of double loop tunnel and exits/entries of the free fall helix A sse m b ly o f th e d o u b le lo o p tu n n e l (fg . 46-49 ) 1. T he looping diam eters depend on the fall height of the steel balls (see the ex am ple in fg. -
Page 19: A Ssem Bly Of The Elev Ator (Entry And Ex It) And Rail M Ounting
Assembly of rails Ex it In sta lla tio n o f e le v a to r (e n try & e x it) Im portant inform ation for the assem bly of elev ator entry and ex it (fg . -
Page 20: W Arnings
In se rtin g th e b a tte ry : Use a Phillips screw driv er to open the battery com partm ent cov er. Insert 2 x C/LR14 batteries w ith the correct polarity and replace the battery com partm ent cov er. D istributed by : SpaceRail LLC - Salt Lake City, UT - www.spacerails.com - orders@spacerails.com - 801.486.3867...
Need help?
Do you have a question about the Spacewarp Level 9.1 and is the answer not in the manual?
Questions and answers