Table of Contents
Advertisement
Quick Links
Advertisement
Table of Contents

Related Manuals for Sper scientific 800019


Summary of Contents for Sper scientific 800019
- Page 1 Bluetooth ® Hygrometer 800019 Instruction Manual...
-
Page 2: Table Of Contents
TABLE OF CONTENTS INTRODUCTION..........3 PANEL DESCRIPTION........4 MEASUREMENT PROCEDURES....5 AC WEIGHTING SCALES......5 BACKLIGHT..........5 HOLD FUNCTION........5 MAX/MIN FUNCTION........6 AUTO POWER OFF........7 BLUETOOTH COMMUNICATIONS.....8 BATTERY REPLACEMENT.......11 SPECIFICATIONS........12 OPTIONAL ACCESSORIES......13 WARRANTY..........16... -
Page 3: Introduction
INTRODUCTION Sper Scientific’s Bluetooth Hygrometer is ® small, light, and simple to use. Displays humidity, wet bulb, dew point and air temperature in °C or °F on the meter’s large 1-½” backlit display. Features a bar graph display, minimum and maximum hold (peak) and data hold functions. -
Page 4: Panel Description
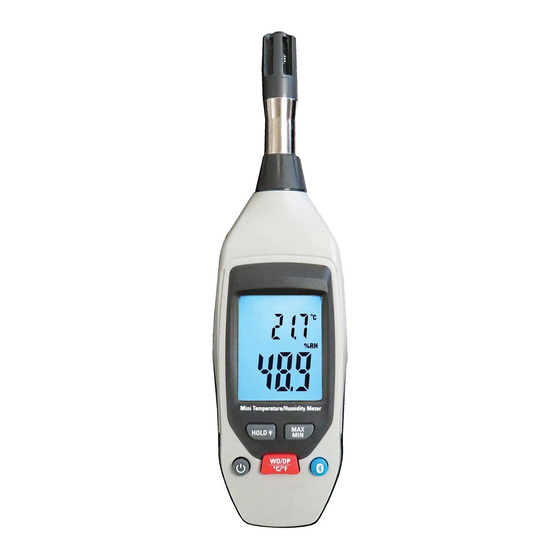
PANEL DESCRIPTION 1. Temperature/ RH Sensors 2. LCD Display 3. HOLD/ button 4. MAX/MIN button 5. Power button 6. Temp. Mode button 7. Bluetooth button... -
Page 5: Measurement Procedures
MEASUREMENT PROCEDURES 1. Turn the meter on/off by pressing the POWER button. 2. RH (Relative Humidity) will appear in large digits on the lower display and temperature in smaller digits on the upper display. 3. Hold the red button down for 2 seconds to toggle between temperature readings in °C and °F. -
Page 6: Max/Min Function
to display “HOLD” and the last reading. Press HOLD again to exit this function. MAX/MIN FUNCTION Max/Min readings are continually updated as soon as you enter the Max/Min mode. These readings are reset when you exit the Max/ Min mode, or when the meter is turned off. 1. -
Page 7: Auto Power Off
AUTO POWER OFF 1. If no buttons are pushed for about 10 min- utes, the meter will automatically turn off. 2. While the meter is on, press the power button for 2 seconds to override Auto Power Off: disappears from the display indicat- ing that Auto Power Off is disabled. -
Page 8: Bluetooth Communications
Bluetooth ® 3. Press “Connect Device” on the APP. 4. Now choose “800019” from the device list that now appears. The meter will immedi- ately begin displaying a real time graph of your meter’s readings. - Page 9 Viewing saved Data 6. Press < at the top of the screen to view saved data. Next, choose “Files” at the bottom of the screen, then choose the file you wish to view. A graph of the entire record will now appear. Press on the lower right to see the data including recording times, maximum, minimum and...
- Page 10 Settings Alarms: 1. Select Instrument Type: Environmental Meter. 2. Press Next then Choose Function and select your alarm parameter. 3. Insert your Hi and Low alarm values. 4. Repeat steps 3 & 4 for additional alarm parameters you wish to set for your meter. 5.
-
Page 11: Battery Replacement
BATTERY REPLACEMENT • Turn off the meter when is displayed. • Open the battery compartment and insert a fresh 9V battery. • Replace the cover. -
Page 12: Specifications
SPECIFICATIONS Display ½” high digits, 4-digit LCD, display updates every 0.5 seconds. Range 0.0 ~ 100.0% RH -20.0°C ~ 60.0°C (-0.4°F ~ 140.0°F) Resolution 0.1% RH, 0.1°C/0.1°F Sensors Humidity: Capacitance Temperature: Thermistor Operating 32 to 122°F (0 to 50°C) Environment 80% RH non-condensing Storage 4-140°F (-20°C - 60°C) -
Page 13: Optional Accessories
OPTIONAL ACCESSORIES 840093 Field Tripod... - Page 14 NOTES...
- Page 15 NOTES...
-
Page 16: Warranty
WARRANTY Sper Scientific warrants this product against defects in materials and workmanship for one (1) year from the date of purchase, and agrees to repair or replace any defective unit without charge. If your model has since been discontinued, an equivalent Sper Scientific product will be substituted if available.
Need help?
Do you have a question about the 800019 and is the answer not in the manual?
Questions and answers